Halloween Pumpkin Carving Contest · Starts October 1st · $500 in prizes
← Back to ideas
@ai_concepts
Sep 25, 2026
Intermediate Raccoon Jack-O-Lantern with Face Mask DetailAI
0

Report this carving

Tell us what is wrong. Reports are private.

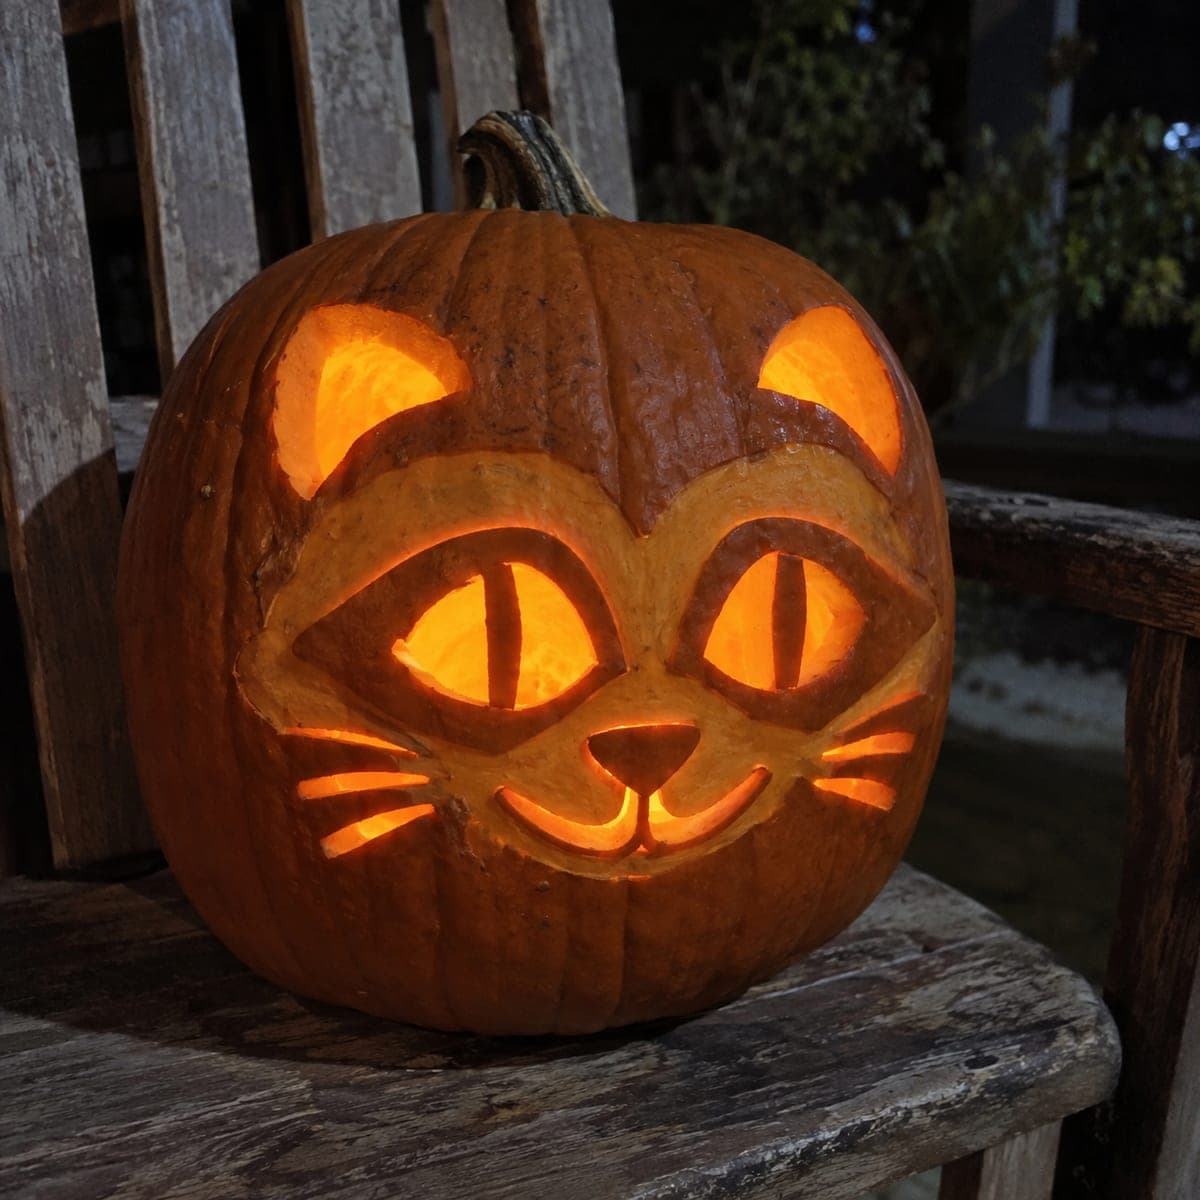
Intermediate Raccoon Jack-O-Lantern with Face Mask Detail

More apertures and finer retained features build out the raccoon's signature mask and round ears in this intermediate raccoon jack-o-lantern, with shallow backed contours adding cheek and muzzle dimension. Keeping the bridge between the two eye openings wide is crucial at this level since the mask surrounds both. Work from the eyes outward through the mask shape and ears before touching the backed cheek marks. Warm amber light inside makes the raccoon's masked face glow theatrically.

No ratings yet · Sign in to rate
Comments (0)

  • No comments yet — be the first.

Save without an account. Sign in to like or comment.

Our tips for carving a similar design

At medium difficulty the raccoon's mask gains cheek and muzzle contours via shallow backed marks, and the round ears become their own apertures. The bridge between the two eye openings is the single most important structural element and must stay wide. Work from the eyes outward through the mask and ears before touching any backed marks.

From pumpkin to porch

  1. Prep and hollow

    Hollow to 1 inch wall thickness for cleaner control on the backed muzzle contours. Wipe the exterior dry and tape the stencil in position.

  2. Transfer the stencil

    Pin-transfer all outlines including the mask boundary, ear openings, and backed muzzle zone. Mark the backed muzzle area with lighter prick pressure so you can distinguish it from through-cut outlines after removing the stencil.

  3. Cut the eye apertures

    Begin with both eye openings. At medium level they may sit slightly closer together, so cut with short strokes and pause to check the bridge width between them before completing each eye.

  4. Cut the mask outline and ear apertures

    Work the mask boundary from the inner eye corners outward around the nose and back up to the forehead. Once the mask is complete, cut the two round ear apertures at the top of the head. Ears at medium level sit closer to the head edge, so keep the bridge from ear to head rim at least three-quarters of an inch.

  5. Add backed muzzle contours

    Use a gouge in gentle sweeping marks across the muzzle and cheek areas to create dimensional contours. These marks are shallower than the through-cuts and glow at a soft mid-level that suggests the rounded raccoon cheeks.

  6. Light and display

    Insert a bright LED and display against a dark background. The glowing mask with bright eyes, ear windows, and soft muzzle contours reads as a convincing theatrical raccoon face from several feet away.

Written with AI to match this design

Gather your supplies

Check things off as you get ready.

Work on a stable surface, keep your free hand out of the cutting path, and have an adult handle sharp tools.

Three levels of light

  • Leave intact

    The nose bridge, forehead, and outer cheek rind stays fully dark.

  • Peel & shade

    Backed cheek and muzzle contours glow at a warm mid-level.

  • Cut through

    Eye apertures, mask outline, and ear openings glow at full brightness.

Learn the carving basics

Before you start cutting

How wide should the bridge between the two eyes be at medium level?

Keep it at least three-eighths of an inch wide. Narrower than that and it may dry and crack within 24 hours. If the stencil places the eyes very close, widen the bridge slightly by keeping more rind on the inner edge of each eye cut.

The muzzle backed marks are uneven because the rind surface has natural ridges. How do I even them out?

Use a flat scraper or the wide edge of a linoleum gouge to level out the high spots across the muzzle area before making the contour marks. A uniform surface means the contour marks reflect light more consistently.

My round ear apertures are coming out teardrop-shaped rather than round. How do I fix them?

The blade tends to drift toward the easiest cutting direction, which on a curved surface follows the rind grain. Start the ear cut at the widest point and move in a circle using very short strokes, stopping to rotate the pumpkin so you are always cutting with a comfortable wrist angle.

Your take belongs here, too.

Changed a detail? Made it simpler? Share a photo of your version and tell the community what worked.

Share your pumpkin

More pumpkins like this

You've reached the end · 8 pumpkins
The Patch Report

Fresh pumpkins, in your inbox.

The best new carvings, ideas worth stealing, and how-tos for carving season. Short, seasonal, and gone by November.

A short email during carving season. Unsubscribe anytime. See our privacy policy.