Halloween Pumpkin Carving Contest · Starts October 1st · $500 in prizes
← Back to ideas
@ai_concepts
Sep 25, 2026
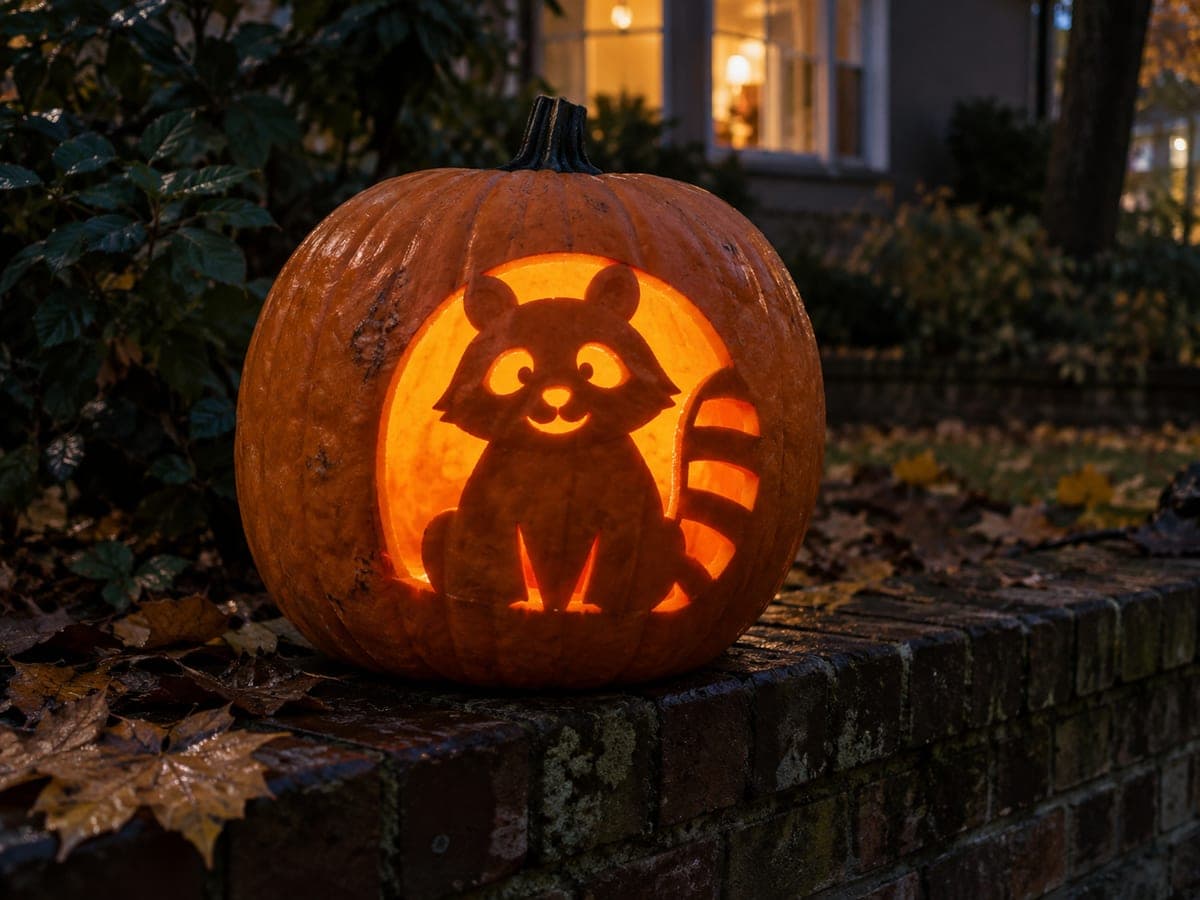
Hard Raccoon Pumpkin Carving with Striped TailAI
0

Report this carving

Tell us what is wrong. Reports are private.

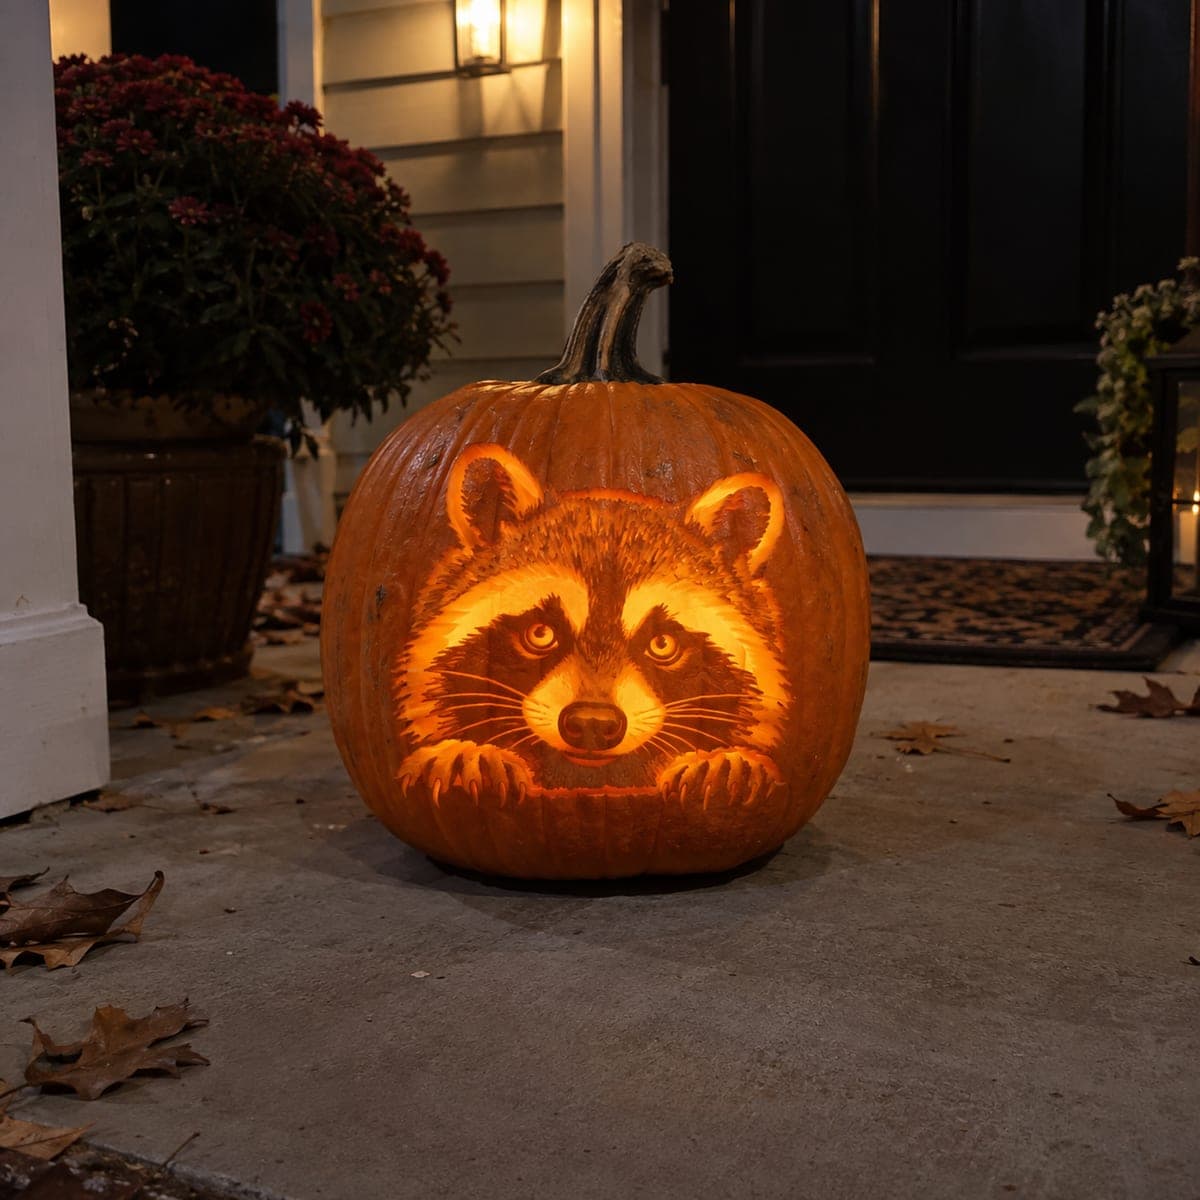
Hard Raccoon Pumpkin Carving with Striped Tail

This hard raccoon pumpkin carving idea extends the design beyond the face, adding striped tail apertures and fine facial detail while maintaining broadly rooted structural bridges throughout. Shallow backed marks across the forehead and muzzle add fur texture over fully supported rind. Cut the largest facial apertures first, then work down to the tail stripe pattern on the lower or side face of the pumpkin. A bright LED reveals the interplay between the through-cut stripes and the backed fur lines.

No ratings yet · Sign in to rate

Comments (0)

  • No comments yet — be the first.

Save without an account. Sign in to like or comment.

Our tips for carving a similar design

This design extends the raccoon portrait beyond the face to include a striped tail pattern on the lower or side of the pumpkin, while fine backed marks across the forehead and muzzle add fur texture over fully supported rind. Cut the largest facial apertures first, then the tail stripe pattern, and add the backed fur marks last when all structural cuts are complete.

From pumpkin to porch

  1. Prep the pumpkin

    Choose a taller pumpkin that gives enough vertical surface for both the face and the tail stripe zone. Hollow to a smooth 1 inch wall throughout, including the side or lower area where the tail stripes will be cut.

  2. Transfer the full stencil

    Pin-transfer all outlines across the full surface including the tail zone. Mark backed fur areas with lighter pin pressure. The tail stripes are typically three to five parallel slot apertures that wrap around the side or base of the pumpkin.

  3. Cut the main facial apertures

    Start with the eye openings, mask boundary, and ear apertures. At hard level there are more and finer facial apertures than at medium level. Confirm each bridge before moving to the next cut.

  4. Cut the tail stripe apertures

    Work through the tail stripe slot openings in order from the widest to the narrowest. Each stripe is a long narrow aperture, so cut the inner long edge first, then the outer edge, to avoid the blade torquing the thin slot.

  5. Add backed fur texture

    Use a fine gouge across the forehead, muzzle, and any rind between aperture zones. Vary stroke direction slightly to simulate fur. Work over areas with solid backing only, keeping depth at half the wall thickness.

  6. Illuminate and display

    Place a bright LED inside and orient the pumpkin so both the face and the tail stripe zone are visible. At hard level the interplay between the through-cut stripes and the backed fur lines creates a rich textural effect that rewards close inspection.

Written with AI to match this design

Gather your supplies

Check things off as you get ready.

Work on a stable surface, keep your free hand out of the cutting path, and have an adult handle sharp tools.

Three levels of light

  • Leave intact

    The rind between tail stripe slots, the nose bridge, and all facial bridges stays fully dark.

  • Peel & shade

    Backed fur marks across the forehead and muzzle glow at mid-level, adding coat depth.

  • Cut through

    Eye apertures, mask outline, ear openings, and tail stripe slots glow at full brightness.

Learn the carving basics

Before you start cutting

How do I cut a long narrow tail stripe slot without the blade drifting to one side?

Cut the center line of the slot first as a pilot cut, then widen each edge outward to full width. Starting from a center reference line keeps both long edges parallel and prevents the slot from becoming wider at one end than the other.

The tail stripes are on the curved side of the pumpkin and the stencil does not lie flat there. How do I transfer it?

Cut the stencil into short sections and tape each one flat against the curved surface individually. Overlapping the sections slightly at the cuts ensures continuous outlines. Alternatively, use the poke-and-trace method with a flexible sheet of tracing paper conforming to the curve.

The backed fur marks in the muzzle area are going too deep and I can see light bleeding through. What now?

Dab the thin spot on the interior wall with a thin smear of petroleum jelly or a piece of opaque tape on the inside. Both diffuse or block the light bleed without affecting the appearance from the front.

Your take belongs here, too.

Changed a detail? Made it simpler? Share a photo of your version and tell the community what worked.

Share your pumpkin

More pumpkins like this

You've reached the end · 8 pumpkins
The Patch Report

Fresh pumpkins, in your inbox.

The best new carvings, ideas worth stealing, and how-tos for carving season. Short, seasonal, and gone by November.

A short email during carving season. Unsubscribe anytime. See our privacy policy.