Halloween Pumpkin Carving Contest · Starts October 1st · $500 in prizes
← Back to ideas
@ai_concepts
Sep 25, 2026
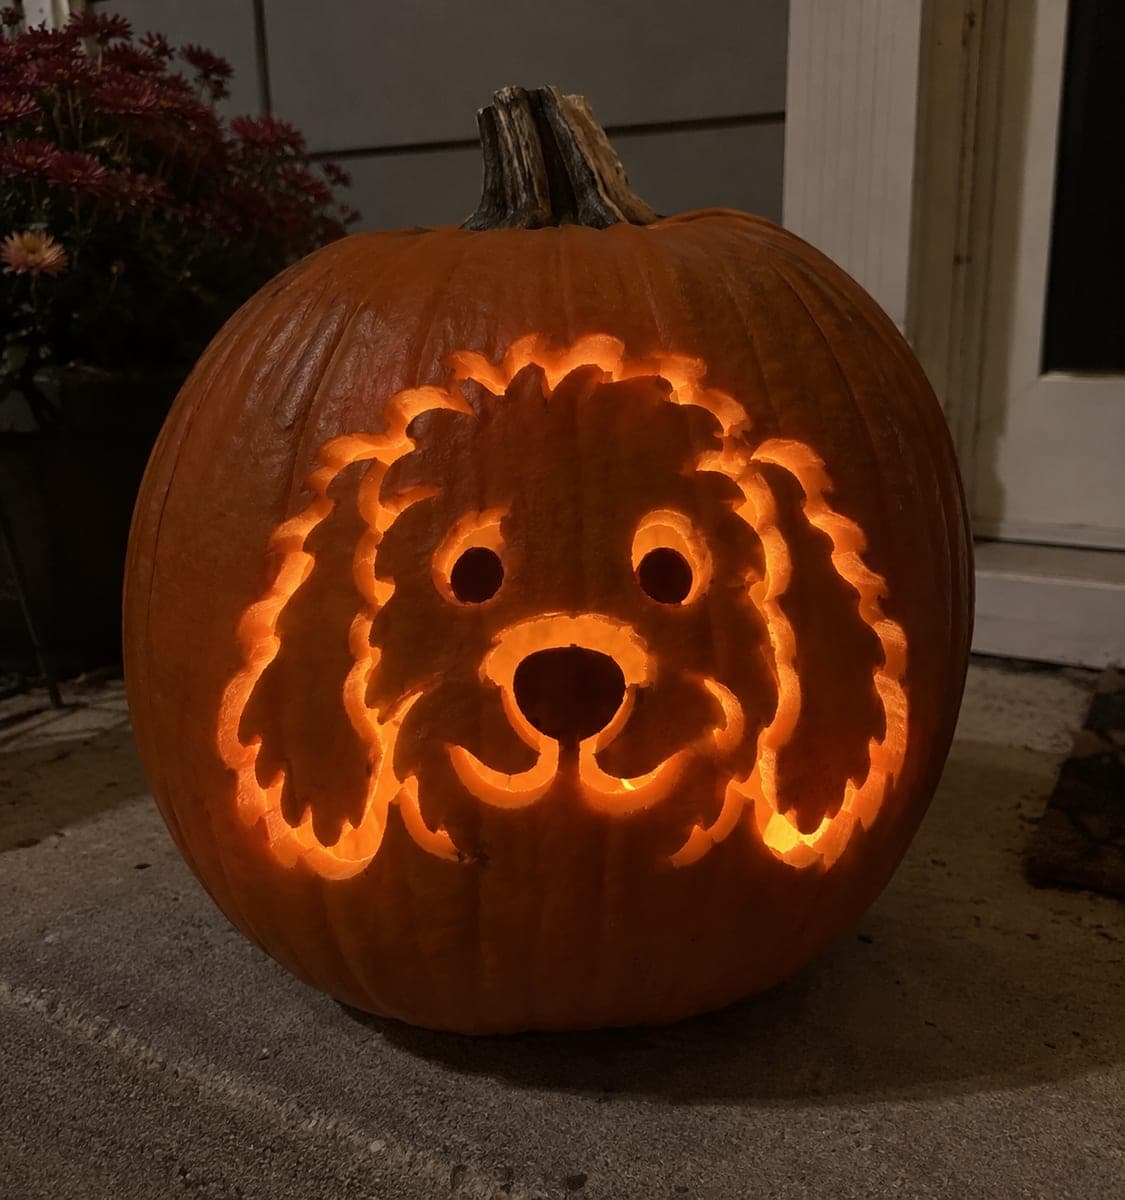
Expert Labradoodle Jack-O-Lantern with Fine Fur TextureAI
0

Report this carving

Tell us what is wrong. Reports are private.

Expert Labradoodle Jack-O-Lantern with Fine Fur Texture

An expert labradoodle jack-o-lantern pushes the shading technique to its limit, combining fully open key apertures with dense shallow-backed fur relief across the crown, muzzle, and outer coat. The broad retained face and muzzle act as the structural spine, so all the fine texture sits on solid backing. Use a ribbon-style gouge for the fine fur lines and keep your cuts going in the direction of natural hair growth. Scatter several tea lights inside at different heights for the most dimensional effect.

No ratings yet · Sign in to rate

Save this design for carving night, then share a photo of your own jack-o'-lantern once it's glowing.

Comments (0)

  • No comments yet — be the first.

Save without an account. Sign in to like or comment.

Our tips for carving a similar design

Every surface outside the structural muzzle and face spine is covered in a dense field of shallow-backed fur marks, layered over the fully open key apertures. The retained face and muzzle act as the one-piece structural column, so all the intricate texture sits on solid backing. A ribbon-style gouge following natural hair growth direction is the right tool for this level of coverage.

From pumpkin to porch

  1. Select a large, fresh pumpkin

    Freshness matters at the expert level because dense shading requires many small cuts, and a dehydrated pumpkin will crack or break. Pick a large pumpkin with a thick, smooth rind. Hollow to three-eighths of an inch throughout, keeping the muzzle and face column at a full half-inch for structural reserve.

  2. Transfer, color-code, and plan the session

    This design has more shading zones than any previous tier. Pin-transfer everything and use three colors: one for through-cuts, one for primary fur contour lines, one for secondary texture fills. Plan to work the apertures in the first half of the session and the shading in the second.

  3. Cut all apertures cleanly

    Complete the eyes, nose, smile, and ear curl apertures to a professional standard before touching any shading zone. Any rough or asymmetric aperture will be amplified by the surrounding dense texture. Spend extra time on the final edge-finishing pass with a detail knife.

  4. Primary fur contour pass

    Use a ribbon-style gouge to carve the main coat contour lines from the crown downward, working in the direction of natural hair growth on a Labradoodle. Cover the full extent of the design with primary lines at half wall depth before moving to the secondary pass. Keep strokes slightly curved.

  5. Secondary fur texture fill

    Within each primary clump, add a set of finer curved strokes at quarter depth to suggest individual curls. This pass is what elevates the design from hard to expert. Work methodically section by section rather than jumping around so you can track which zones are finished.

  6. Light with multiple tea lights and photograph

    Place two or three tea lights inside at different positions and heights. Multiple light sources create overlapping illumination that shows off the dense shading from many angles simultaneously. View in complete darkness for the full effect and photograph from several positions.

Written with AI to match this design

Gather your supplies

Check things off as you get ready.

Work on a stable surface, keep your free hand out of the cutting path, and have an adult handle sharp tools.

Three levels of light

  • Leave intact

    Retained muzzle and face column acting as the structural spine

  • Peel & shade

    Dense two-level backed fur across crown, full outer coat, and muzzle: primary contour at half depth, secondary curl texture at quarter depth

  • Cut through

    Eyes, nose, smile, and ear curl apertures at full glow

Learn the carving basics

Before you start cutting

How do I avoid hand fatigue during the dense shading pass?

Work in 20-minute sessions with short breaks, especially during the secondary texture pass which requires the most strokes. Keep the pumpkin at a comfortable height on a table rather than holding it in your lap. A sharp gouge requires much less pressure than a dull one, so resharpen before the secondary pass if needed.

Some fur lines overlap the aperture edges and look messy. How do I clean this up?

Use a detail knife to re-trace the aperture edge cleanly, removing any shading that crossed the line. The aperture perimeter should be a sharp, clean boundary with shading right up to the edge but not crossing it. A clean aperture edge against dense shading creates the most dramatic contrast.

Can I stop after the primary contour pass if I run out of time?

Yes. The primary contour pass alone produces a hard-level result and looks good when lit. The secondary fill pass adds the expert-level layered depth but is not required for the design to be successful. Stop wherever the level of detail feels right for your display context.

Your take belongs here, too.

Changed a detail? Made it simpler? Share a photo of your version and tell the community what worked.

Share your pumpkin

More pumpkins like this

You've reached the end · 8 pumpkins
The Patch Report

Fresh pumpkins, in your inbox.

The best new carvings, ideas worth stealing, and how-tos for carving season. Short, seasonal, and gone by November.

A short email during carving season. Unsubscribe anytime. See our privacy policy.