Halloween Pumpkin Carving Contest · Starts October 1st · $500 in prizes
← Back to ideas
@ai_concepts
Sep 25, 2026
Labradoodle Pumpkin Stencil with Ear Curl DetailAI
0

Report this carving

Tell us what is wrong. Reports are private.

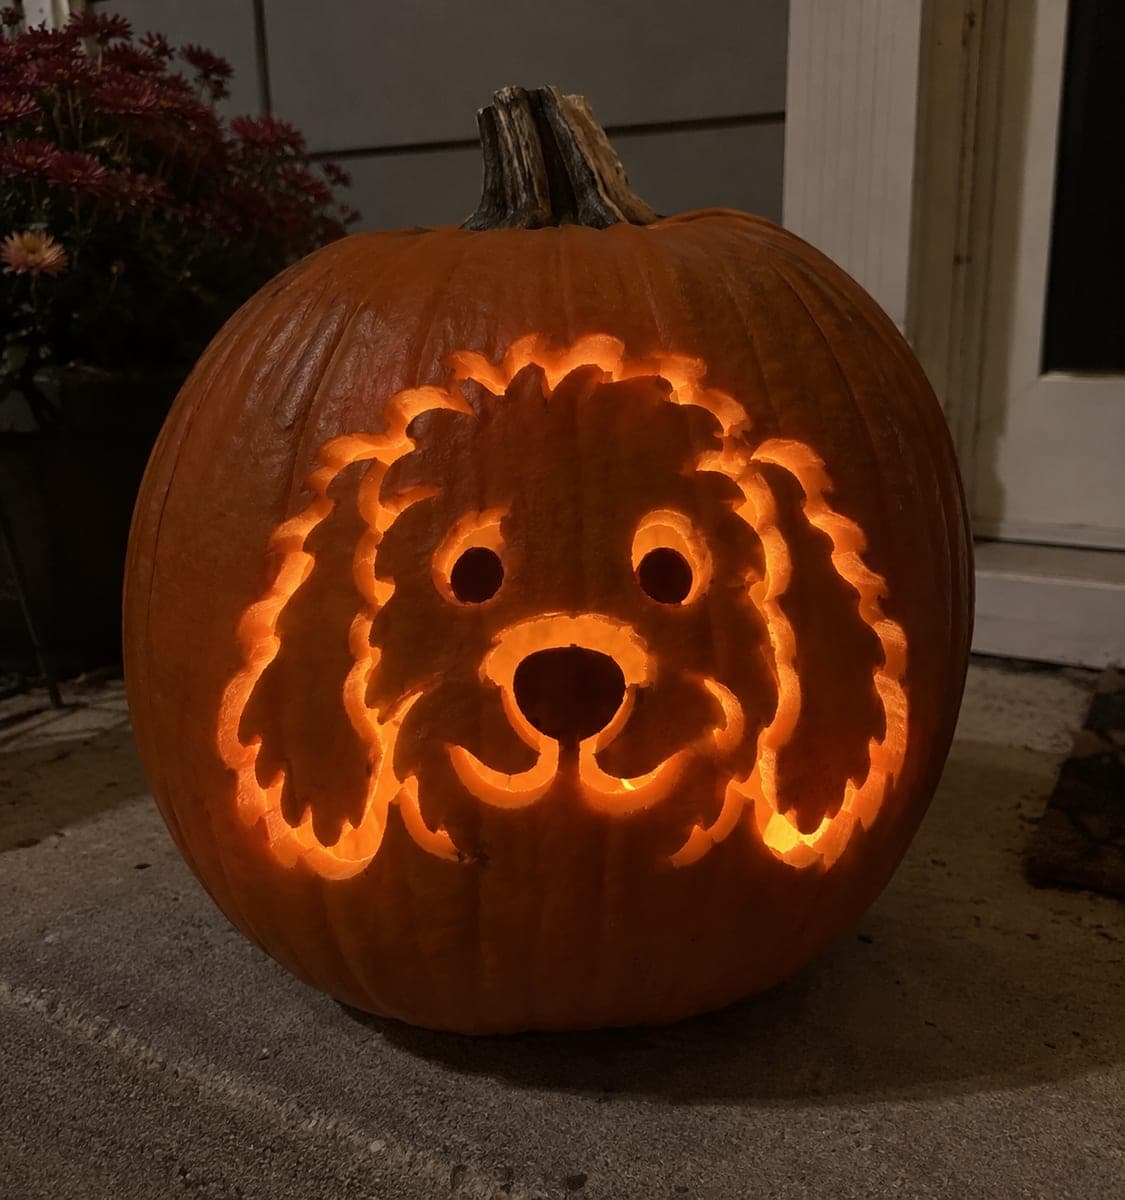
Labradoodle Pumpkin Stencil with Ear Curl Detail

Eye, nose, smile, and major ear curl apertures are cut through in this intermediate labradoodle pumpkin stencil, separated by a broad retained muzzle and face. Smaller crown, muzzle, and outer fur contours are added as shallow backed relief to give the coat a dimensional shaggy look. Cut the largest apertures first to define the face structure, then finish with the backed fur lines using a fine detail gouge or linoleum cutter. An LED tea light placed toward the back of the pumpkin makes the relief lines cast visible shadows.

No ratings yet · Sign in to rate

Save this design for carving night, then share a photo of your own jack-o'-lantern once it's glowing.

Comments (0)

  • No comments yet — be the first.

Save without an account. Sign in to like or comment.

Our tips for carving a similar design

The eyes, nose, smile, and major ear curl apertures provide bright focal points, while shallower backed crown and outer fur contours layer the curly-coat texture around them. A broad retained muzzle and face section acts as the structural base throughout, so the backed relief never risks separating from the shell. Completing the apertures before any relief work gives registration anchors for the finer detail passes.

From pumpkin to porch

  1. Hollow and plan relief zones

    Scoop the pumpkin to a slightly thinner wall than usual (around three-eighths of an inch) in the fur relief areas so backed marks read at a shallower proportional depth. Mark the retained muzzle and face boundaries clearly before starting, as these must stay fully intact.

  2. Transfer and classify all marks

    Pin-transfer the stencil and label each element: eyes, nose, smile, and ear curl as through-cuts; crown and outer fur lines as backed relief. The detailed shading areas benefit from this pre-labeling more than simpler designs do.

  3. Cut the eye, nose, and smile apertures

    Open the two eye apertures, the nose, and the smile opening in that order. Each aperture should be entirely within the retained face zone, not crossing into the outer fur area. Clean up edges with a detail knife after each cut.

  4. Cut the ear curl apertures

    The major ear curl openings sit at the sides of the face. Cut them after the facial apertures so you can see the spacing clearly. Ear curls typically have rounded comma-like shapes; use a fine-tipped saw for the tight inner curves.

  5. Carve the fur relief

    Use a fine detail gouge or linoleum cutter for the crown and outer fur contours. Work in the direction of natural hair growth, using short curved strokes. Aim for about half the wall depth on the main contour lines and a quarter depth on the finer secondary texture.

  6. Position the light and check

    Place an LED tea light toward the back of the pumpkin interior so it casts raking light across the relief surface. The fur lines should produce visible shadow stripes alongside the bright eye and ear glow. Adjust the light position until the relief reads clearly.

Written with AI to match this design

Gather your supplies

Check things off as you get ready.

Work on a stable surface, keep your free hand out of the cutting path, and have an adult handle sharp tools.

Three levels of light

  • Leave intact

    Broad retained muzzle, face center, and outer rind beyond the fur contour zone

  • Peel & shade

    Crown, muzzle accent, and outer fur contour lines carved to varied shallow depths

  • Cut through

    Eyes, nose, smile, and major ear curl apertures glowing fully

Learn the carving basics

Before you start cutting

How do I keep the relief fur lines from looking like random scratches?

Always carve in the direction natural hair would grow on the dog's head, radiating outward from the center of the face toward the ears and crown. Consistent stroke direction unifies the texture. Group the strokes in bundles of three or four with slight curves to suggest curl clusters.

The ear curl apertures are comma-shaped and hard to cut cleanly. Any tips?

Drill or punch the tight inner curve of the comma shape first, then saw outward to the broader end. This gives you a clean starting hole at the most difficult point. Finish with a detail knife to smooth the inner curve.

How far apart should the two depth levels of relief be?

The main contour lines (defining fur clumps) should be about half the wall depth. Secondary texture within each clump should be about a quarter depth. The visual difference between those two levels creates the layered curly look when the light rakes across the surface.

Your take belongs here, too.

Changed a detail? Made it simpler? Share a photo of your version and tell the community what worked.

Share your pumpkin

More pumpkins like this

You've reached the end · 8 pumpkins
The Patch Report

Fresh pumpkins, in your inbox.

The best new carvings, ideas worth stealing, and how-tos for carving season. Short, seasonal, and gone by November.

A short email during carving season. Unsubscribe anytime. See our privacy policy.