Halloween Pumpkin Carving Contest · Starts October 1st · $500 in prizes
← Back to ideas
@ai_concepts
Sep 25, 2026
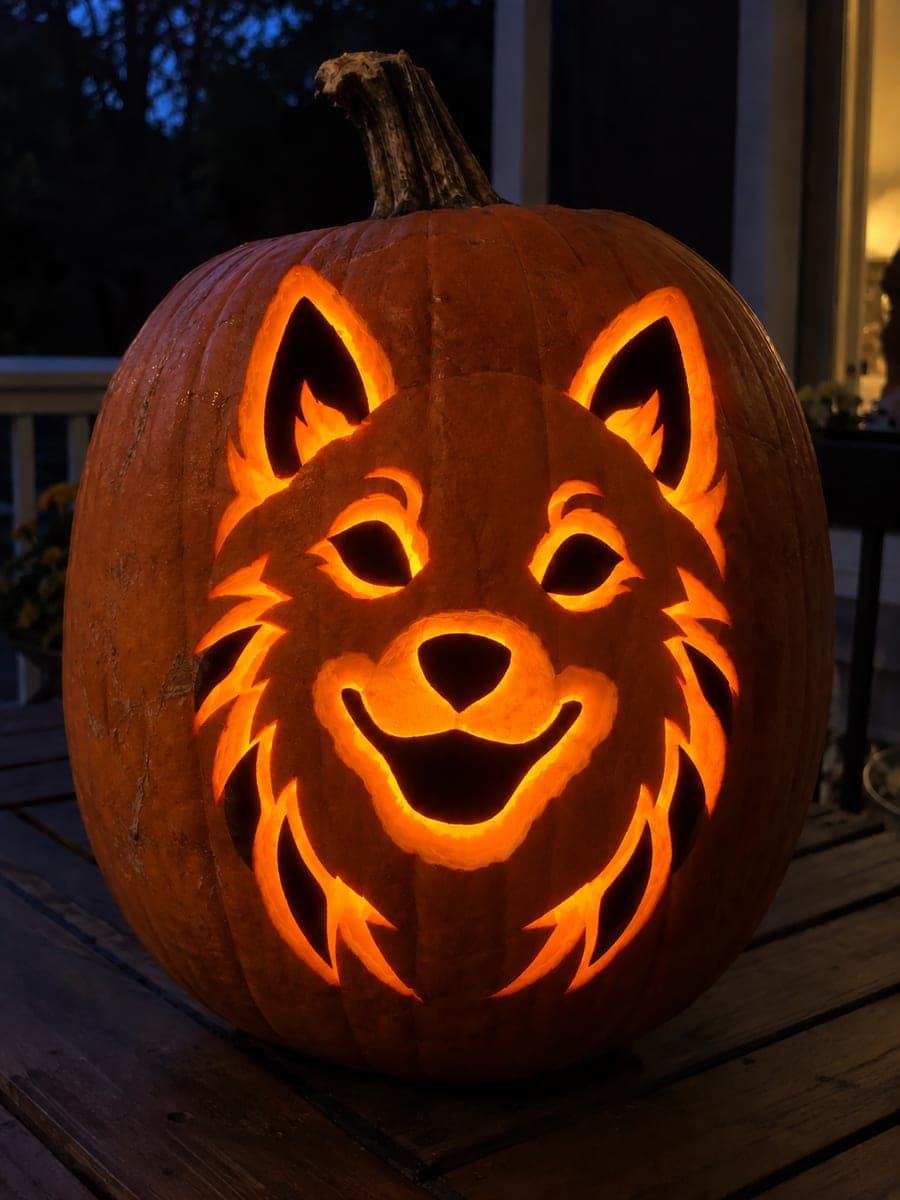
Expert Shiba Inu Pumpkin with Shaded Fur AperturesAI
0

Report this carving

Tell us what is wrong. Reports are private.

Expert Shiba Inu Pumpkin with Shaded Fur Apertures

Open eye, ear, nose, smile, and main cheek and neck apertures combine with fine fur relief in this expert shiba inu pumpkin stencil, all held together by a broad connected muzzle and face structure. Minor fur texture is added with shallow backed marks rather than through-cuts, preserving the delicate bridges. Tackle the widest structural apertures (cheek and neck) first to set the skeleton, then refine the facial features before finishing with the surface relief. A small flameless LED candle keeps this complex design safe and glowing all night.

No ratings yet · Sign in to rate

Comments (0)

  • No comments yet — be the first.

Save without an account. Sign in to like or comment.

Our tips for carving a similar design

Wide cheek and neck apertures plus eyes, ears, nose, and smile openings create the bright structural framework, while fine fur texture marks on solid backing fill every surface in between. The broad connected muzzle and face are the load-bearing spine, so all relief carving must terminate before reaching those boundaries. Tackling the widest structural apertures first sets the skeleton before any detail work begins.

From pumpkin to porch

  1. Prepare a large, fresh pumpkin

    Use the largest fresh pumpkin available for this expert design. Hollow to three-eighths of an inch in all shading zones and half an inch in the structural muzzle and face areas. Mark the muzzle and face structural limits clearly in marker so they are never accidentally thinned.

  2. Transfer and code all marks

    Pin-transfer the full stencil and use three marker colors: one for through-cut apertures, one for primary fur contour lines, one for minor texture backed marks. Verify that cheek and neck apertures are coded as through-cuts and not confused with any of the relief zones.

  3. Cut cheek and neck apertures first

    Start with the widest cheek and neck apertures that form the outer structural skeleton. These set the boundaries of the face design and determine how much rind separates everything else. Work slowly and measure bridge widths after each cut.

  4. Cut facial apertures

    Move inward to eyes, inner ears, nose, and smile. Cut largest to smallest within this group. Remove the area within backed eye disks using a small drill for the narrow vertical slit pupils rather than a saw. The muzzle and face spine should remain completely uncut.

  5. Add primary fur contour relief

    Use a detail gouge to carve the main fur direction lines at half wall depth across the outer coat, crown, and neck zones. Work from the structural borders outward, always stopping a clear margin from any aperture edge or bridge. Follow the natural growth direction of the Shiba's coat.

  6. Add minor texture and final check

    Fill within the primary fur zones with minor texture marks at quarter wall depth. Insert a bright LED candle and view in complete darkness. Every aperture zone should glow fully and the fur relief should show distinct shadow patterns. A flameless candle keeps this complex design safe for all-night display.

Written with AI to match this design

Gather your supplies

Check things off as you get ready.

Work on a stable surface, keep your free hand out of the cutting path, and have an adult handle sharp tools.

Three levels of light

  • Leave intact

    Broad connected muzzle and face structural spine

  • Peel & shade

    Two-level fur relief across outer coat, crown, and neck: primary contour at half depth, minor texture at quarter depth

  • Cut through

    Eyes (with vertical slit pupils in backed eye disks), inner ears, nose, smile, and wide cheek and neck apertures

Learn the carving basics

Before you start cutting

What is the difference between a backed eye disk and a normal eye aperture?

A backed eye disk means the main eye area is peeled back to half wall depth (so it glows dimly) and a narrow vertical slit pupil is then cut all the way through within it (glowing fully bright). The contrast between the dim disk and the bright slit gives the eye a realistic iris-and-pupil appearance.

How do I prevent the cheek apertures from cracking the surrounding fur relief zones?

Always cut the cheek apertures before adding any fur relief nearby. If you cut relief into a zone first and then cut the adjacent aperture, the vibration from sawing can crack the thinned relief rind. Apertures always come before any thinning of adjacent areas.

How long will this carved pumpkin last before deteriorating?

A freshly hollowed pumpkin with this level of carving typically lasts five to seven days at room temperature. Refrigerate it when not displayed (wrap loosely in plastic) to extend its life. Applying petroleum jelly to all cut surfaces each day also slows dehydration noticeably.

Your take belongs here, too.

Changed a detail? Made it simpler? Share a photo of your version and tell the community what worked.

Share your pumpkin

More pumpkins like this

You've reached the end · 8 pumpkins
The Patch Report

Fresh pumpkins, in your inbox.

The best new carvings, ideas worth stealing, and how-tos for carving season. Short, seasonal, and gone by November.

A short email during carving season. Unsubscribe anytime. See our privacy policy.