Halloween Pumpkin Carving Contest · Starts October 1st · $500 in prizes
← Back to ideas
@ai_concepts
Sep 25, 2026
Detailed Labradoodle Pumpkin with Layered Fur ShadingAI
0

Report this carving

Tell us what is wrong. Reports are private.

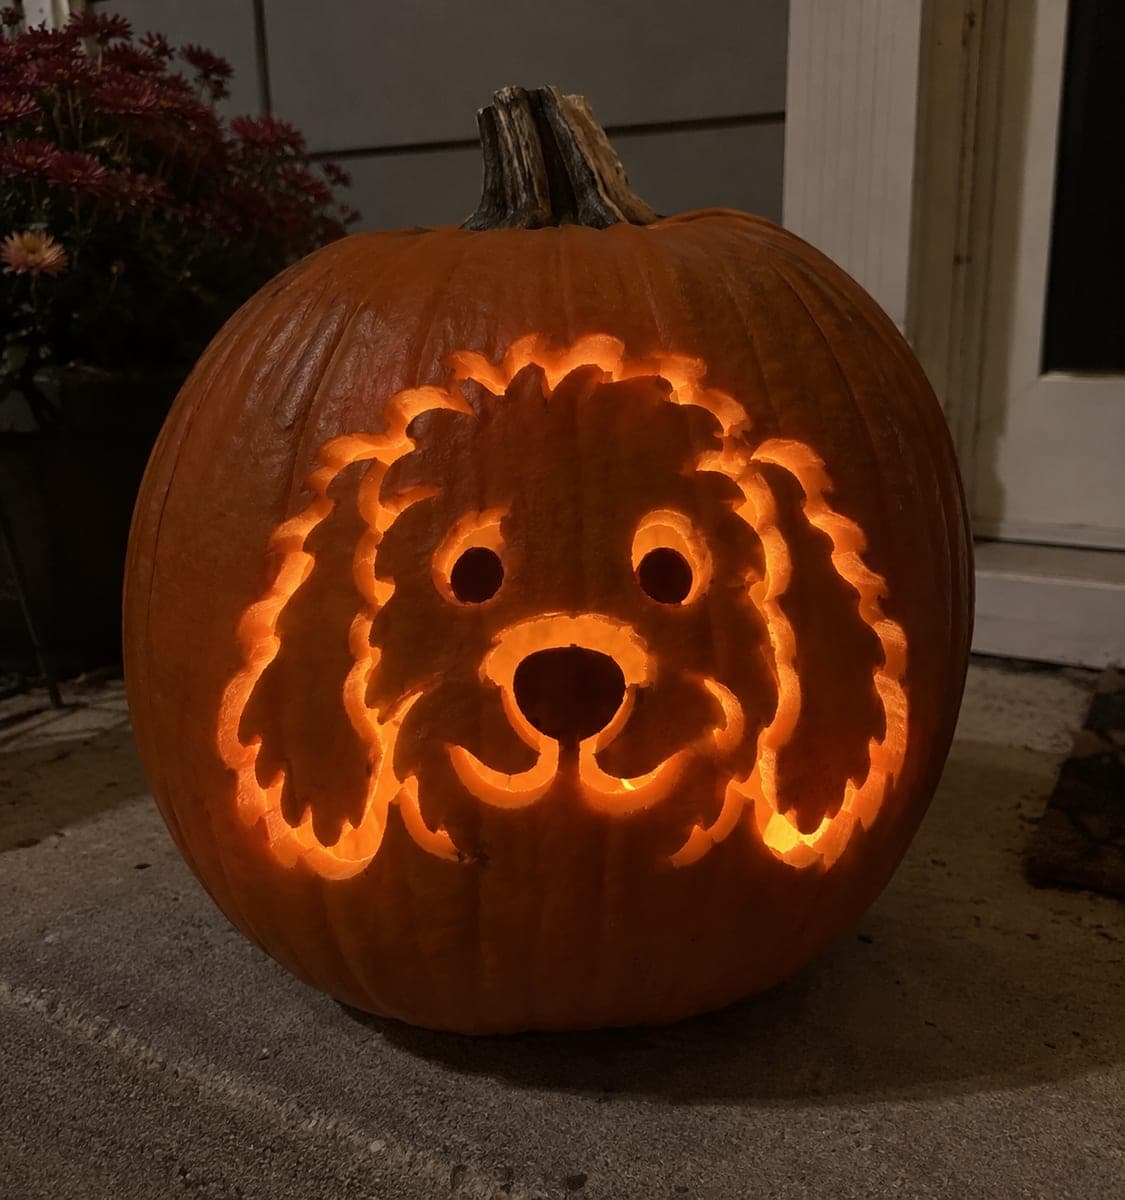
Detailed Labradoodle Pumpkin with Layered Fur Shading

This hard labradoodle pumpkin stencil uses open eye, nose, smile, and ear curl apertures combined with shaded fur relief to create a coat that glows in layers. Broad retained face and muzzle sections keep the design stable while the finer backed crown and outer fur lines build up the curly texture. Work the main apertures first, then add the relief shading in passes from lightest to deepest. Viewing from arm's length in the dark reveals how the shading creates genuine depth.

No ratings yet · Sign in to rate

Comments (0)

  • No comments yet — be the first.

Save without an account. Sign in to like or comment.

Our tips for carving a similar design

The eye, nose, smile, and ear curl apertures establish a bright framework, and two distinct depths of backed relief across the crown and outer fur zones build the curly coat above and around them. The broad retained muzzle and face serve as the anchor that keeps all the relief work attached to the shell. Working apertures before relief, then shading in passes from shallow to deep, produces the most controlled result.

From pumpkin to porch

  1. Prepare the pumpkin and thin the wall

    Hollow to roughly three-eighths of an inch in the shading zones and a half-inch in the structural muzzle and face areas. A thinner wall in shading zones makes the backed marks glow at half the wall's depth rather than disappearing into opaque rind. Mark the structural muzzle and face limits so you never accidentally thin those zones.

  2. Transfer and plan your sequence

    Pin-transfer the stencil and code all apertures in one color and all shading regions in another. Within the shading regions, note which are primary contour lines (deeper) and which are secondary texture (shallower). Planning this before cutting saves time and prevents misreads mid-project.

  3. Cut all apertures first

    Complete the eyes, nose, smile, and both ear curl openings before beginning any shading. This order ensures that the structural muzzle and face retain their full original thickness throughout all the relief work. Keep edges crisp with a detail knife finish pass.

  4. First shading pass: primary contour lines

    Using a detail gouge at roughly half wall depth, carve the main fur clump outlines across the crown and outer coat. Work in the natural direction of hair growth. These primary lines define the fur structure and will be the brightest parts of the relief when lit.

  5. Second shading pass: secondary texture

    Add finer texture strokes within each fur clump at roughly a quarter wall depth. These lighter marks add the curly quality within each clump. Keep the strokes curving slightly to suggest the natural wave of Labradoodle fur.

  6. Final light check

    Insert a bright LED candle and evaluate the design at arm's length in a dark room. The two-level relief should read as distinct texture even from a distance. Deepen any areas that look flat and smooth any edges that look ragged.

Written with AI to match this design

Gather your supplies

Check things off as you get ready.

Work on a stable surface, keep your free hand out of the cutting path, and have an adult handle sharp tools.

Three levels of light

  • Leave intact

    Retained muzzle, face center, and shell beyond the fur shading zone

  • Peel & shade

    Two-level backed fur relief across crown, muzzle, and outer coat: primary contour at half depth, secondary texture at quarter depth

  • Cut through

    Eyes, nose, smile, and major ear curl apertures at full glow

Learn the carving basics

Before you start cutting

My two shading depths look the same when the pumpkin is lit. How do I fix this?

The contrast between depth levels is only visible when the wall is thin enough for light to transmit through the shallower sections. If the wall is too thick, even half-depth marks will look dark. Either thin the wall further in the relief zone or deepen the primary contour marks by an additional pass.

Can I use a Dremel tool for the texture passes?

A rotary tool with a small ball-ended burr works well for the secondary texture pass, giving smooth rounded grooves. Use it at low speed and move constantly to avoid burning the rind or creating uneven depth. Always wear eye protection when using rotary tools on pumpkin.

Does the design look good in daylight as well as at night?

Yes. The two-level shading creates visible texture even in natural light because the deeper grooves cast their own shadows. Position the pumpkin where sunlight rakes across the surface at a low angle for the most dramatic daytime effect.

Your take belongs here, too.

Changed a detail? Made it simpler? Share a photo of your version and tell the community what worked.

Share your pumpkin

More pumpkins like this

You've reached the end · 8 pumpkins
The Patch Report

Fresh pumpkins, in your inbox.

The best new carvings, ideas worth stealing, and how-tos for carving season. Short, seasonal, and gone by November.

A short email during carving season. Unsubscribe anytime. See our privacy policy.