Halloween Pumpkin Carving Contest · Starts October 1st · $500 in prizes
← Back to ideas
@ai_concepts
Sep 25, 2026
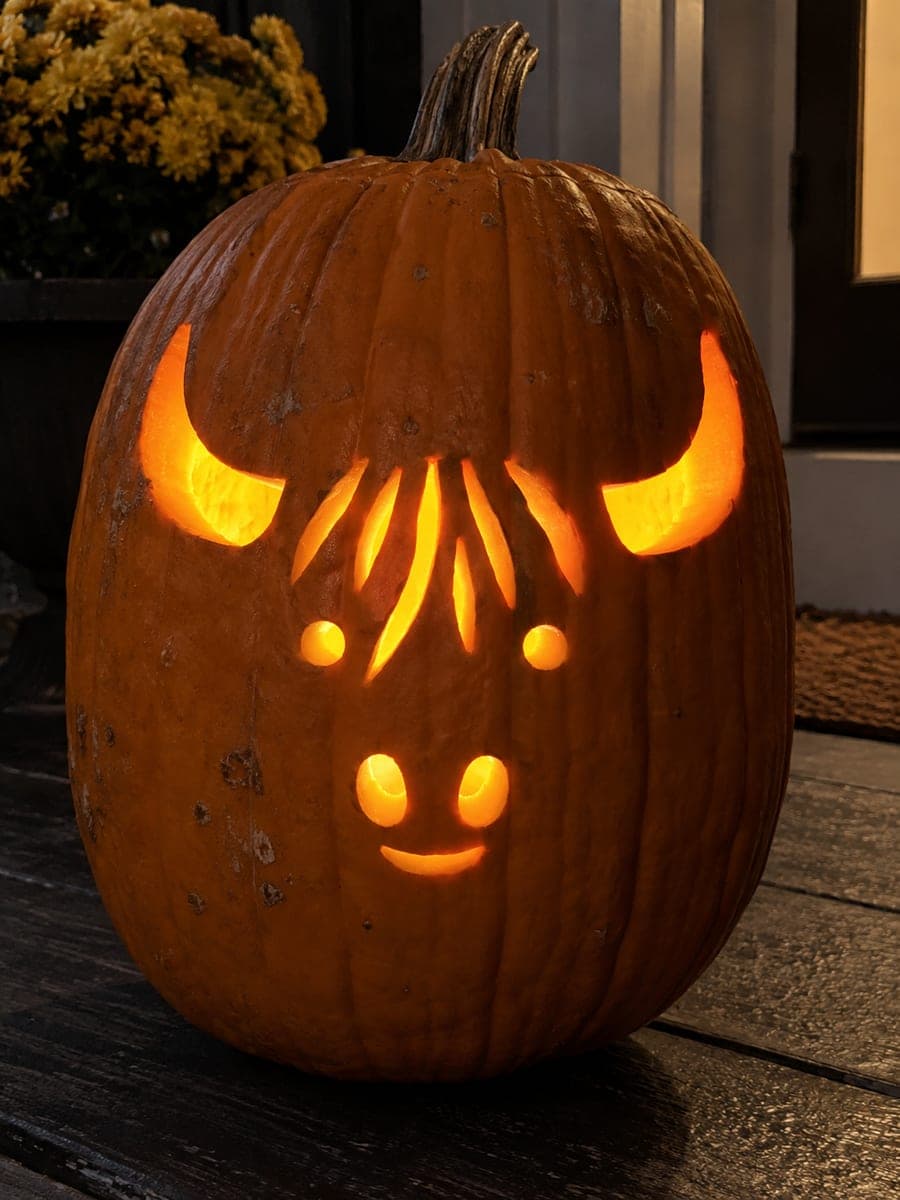
Easy Highland Cow Pumpkin Carving with Shaggy HairAI
0

Report this carving

Tell us what is wrong. Reports are private.

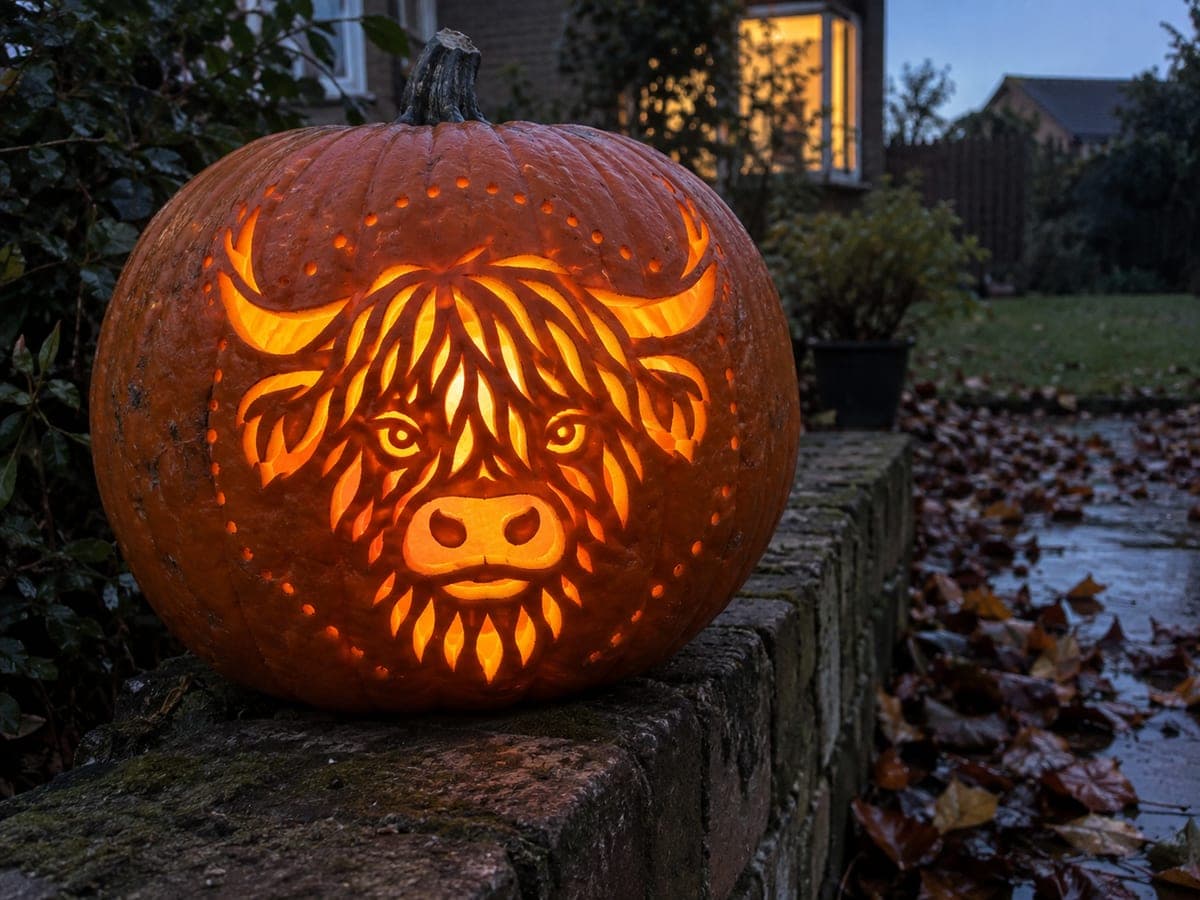
Easy Highland Cow Pumpkin Carving with Shaggy Hair

Broadly rooted retained features and separate through apertures create a cute, glowing easy highland cow pumpkin carving, with the breed's signature shaggy forelock suggested by the outer head contours. Cut the eyes and nose apertures first since they anchor the whole face, then add any shallow contours along the shaggy hair line. This is a relaxed beginner pumpkin carving idea that still produces a recognizable and distinctive result. An LED tea light will make the wide face glow warmly.

No ratings yet · Sign in to rate

Comments (0)

  • No comments yet — be the first.

Save without an account. Sign in to like or comment.

Our tips for carving a similar design

This easy highland cow carving uses the breed's wide face and fluffy forelock as its defining shape, kept sturdy by broad bridges between every opening. Cut the eyes and nose first since they anchor the face, then shape any outer head contours that suggest the shaggy hair line. The design reads clearly as a highland cow from first glance, even at a simple difficulty level.

From pumpkin to porch

  1. Prep the pumpkin

    Choose a round, wide pumpkin to suit the highland cow's broad face proportions. Cut the lid, hollow out to 1 to 1.5 inch wall thickness, and dry the exterior before taping the stencil.

  2. Transfer the stencil

    Tape the stencil to the front of the pumpkin and pin-transfer all outlines. The forelock outer contour is the most organic shape in this design, so make sure its dot map is complete before removing the stencil paper.

  3. Cut the eye and nose apertures

    Start with the two round eyes and the small oval nose, since these anchor the whole face. They are the largest openings on the easy design and are widely spaced, making them forgiving for a beginner.

  4. Cut the outer head contour

    Work around the outer edge of the head and forelock outline. The forelock region usually has an organic flowing edge rather than a straight line, so use short strokes and turn the pumpkin as needed to follow the curves.

  5. Add shallow contours if included

    If the stencil marks a backed hair-line along the forelock, use a gouge to shave the outer skin in that area only. This simple added step makes the forelock look fluffy rather than flat when lit.

  6. Light and display

    Drop an LED tea light inside and position the pumpkin at eye level. The wide glowing face with its signature fluffy forelock makes a charming and immediately recognizable display that guests of any age will appreciate.

Written with AI to match this design

Gather your supplies

Check things off as you get ready.

Work on a stable surface, keep your free hand out of the cutting path, and have an adult handle sharp tools.

Three levels of light

  • Leave intact

    The solid rind forming the face, cheeks, and forelock bridges stays fully dark.

  • Peel & shade

    Any shallow backed forelock contours glow softly at mid-brightness.

  • Cut through

    The round eye apertures and small nose opening glow at full brightness.

Learn the carving basics

Before you start cutting

How do I suggest the shaggy forelock on a simple easy design without backing or fine cuts?

The outer contour of the head itself does most of the work. If the stencil gives the top of the head a wavy or irregular edge rather than a clean round arc, that silhouette shape alone reads as shaggy hair when lit from inside.

My round eye apertures keep coming out oval. How do I cut a truer circle?

Start the cut at the top of the circle and work clockwise in a continuous stroke without lifting the blade. Pumpkin saws naturally want to follow the blade's flex, so moving in one direction without stopping keeps the cut rounder than starting and stopping at corners.

Should I add a small horn shape at this easy level?

Adding horns is optional at easy level. If you include them, keep each horn as a simple triangular aperture with a wide base rooted into the head shape. Avoid thin, pointed horn cutouts at beginner level since they are fragile and difficult to cut cleanly.

Your take belongs here, too.

Changed a detail? Made it simpler? Share a photo of your version and tell the community what worked.

Share your pumpkin

More pumpkins like this

You've reached the end · 8 pumpkins
The Patch Report

Fresh pumpkins, in your inbox.

The best new carvings, ideas worth stealing, and how-tos for carving season. Short, seasonal, and gone by November.

A short email during carving season. Unsubscribe anytime. See our privacy policy.