Halloween Pumpkin Carving Contest · Starts October 1st · $500 in prizes
← Back to ideas
@ai_concepts
Jul 12, 2026
Jack Russell Terrier Etched Pumpkin PortraitAI
0

Jack Russell Terrier Etched Pumpkin Portrait

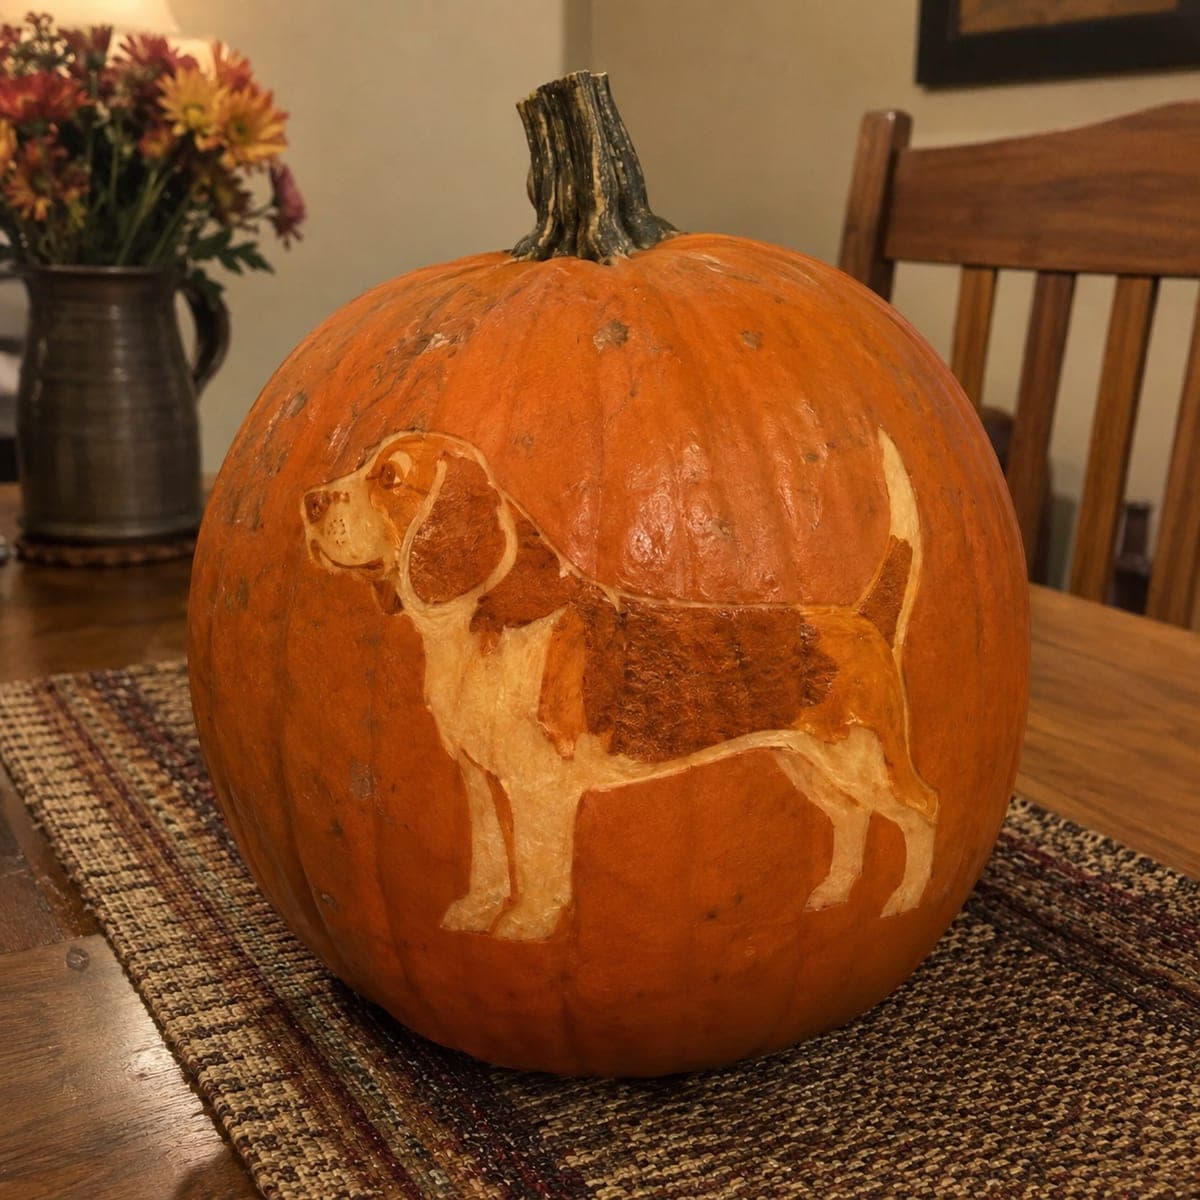
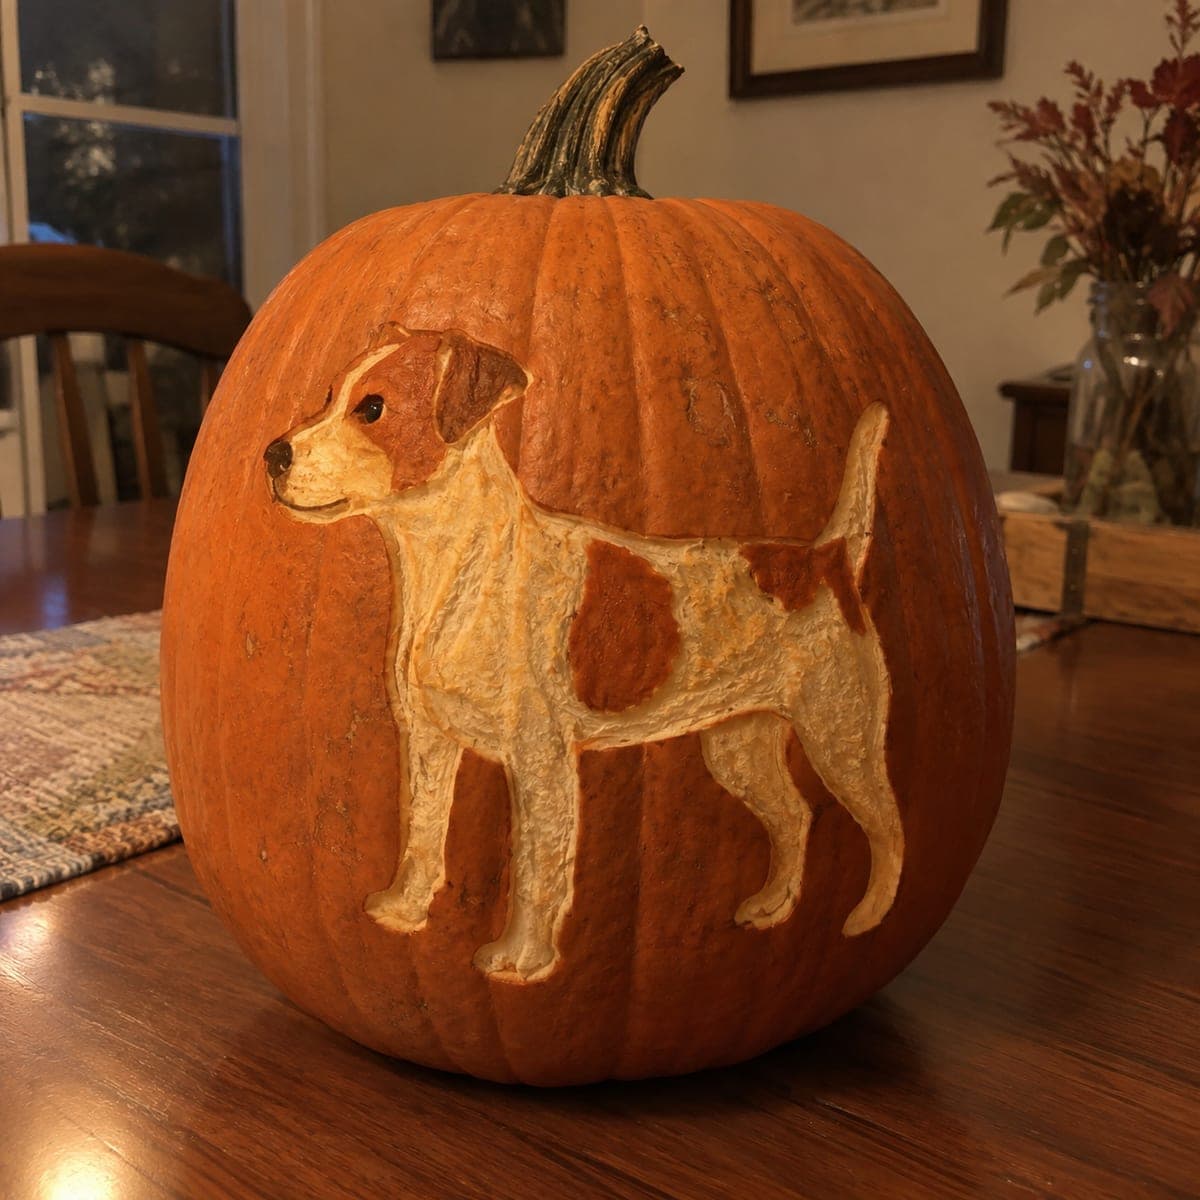
A full-body Jack Russell terrier stands alert on this pumpkin, his brown eye patch and saddle markings left in untouched skin while the white coat is carved down to pale flesh. The two-layer etching gives a lifelike coat pattern without piercing the shell, so it displays well unlit indoors. Map the brown patches on your pattern before you start, because the areas you do not carve are what sell the breed.

This is an AI-generated concept image: a realistic, carvable design idea rather than a photo of a finished carve. AI concepts are always labeled and sit out the leaderboard and the contest.

No ratings yet · Sign in to rate
Comments (0)

  • No comments yet — be the first.

Save without an account. Sign in to like or comment.

Our tips for carving a similar design

The whole trick here is two-layer etching, no cutting through the shell. The brown eye patch and saddle stay as untouched dark skin while the white coat gets shaved down to pale flesh, so the markings read like a real Jack Russell. Because nothing is pierced, this portrait displays beautifully on a table indoors, lit or not.

Written by PumpkinCarvingIdeas.com, inspired by the image above. These are our suggestions, not instructions from the uploader. This approach to the AI concept has not been tested on a real pumpkin.

From pumpkin to porch

  1. Pick a smooth face and transfer the pattern

    Choose a tall pumpkin with a broad, even side and few deep ribs so the dog's body stays undistorted. Tape your Jack Russell pattern flat against that face and poke the main outline with a transfer tool or pushpin. Before you unpin the paper, shade in the brown patches so you remember which zones stay untouched. Those dark areas are what make the breed recognizable, so map them clearly first.

  2. Score the outlines cleanly

    With a small detail knife or a fine gouge, trace the full body outline, the legs, tail, and the borders of each brown patch. Keep these cuts shallow, just deep enough to define edges. Take your time around the face and ears where the shapes are small. Clean outlines keep the peeled coat from bleeding into the dark markings later.

  3. Peel the white coat to pale flesh

    Using a ribbon or lino gouge, shave off only the orange skin inside the white-coat areas to expose the pale flesh underneath. Work in shallow, even passes and stop as soon as you reach the light layer. Leave the eye patch, the back saddle, and the smaller brown spots completely untouched so they stay dark. An adult should handle all the sharp tools here.

  4. Add depth with shading passes

    Go back over the coat and scrape a little deeper along the chest, belly, and leg creases to suggest muscle and shadow. A shallower touch on the raised areas keeps them lighter, which builds a rounded, lifelike body. Leave a thin ridge of skin between the brown patches and the peeled coat so the markings have crisp edges. Step back often to check the balance of light and dark.

  5. Refine the face and eye

    The eye is the emotional anchor, so carve it carefully and keep it small and rounded. Leave the brown ear and eye patch dark, and peel just enough around the muzzle to give the white face definition. A tiny untouched dot for the pupil and nose helps the expression land. Soften any harsh lines with a gentle scrape.

  6. Seal, light, and photograph

    Rub a thin coat of petroleum jelly or a spritz of lemon water over the peeled areas to slow drying and browning. Set a warm LED puck behind or beside the pumpkin, since this etch shows well even unlit indoors. Photograph it in soft low light to catch the glow in the pale coat. Keep it cool between showings to make it last.

Gather your supplies

Check things off as you get ready.

Work on a stable surface, keep your free hand out of the cutting path, and have an adult handle sharp tools.

Three levels of light

  • Leave intact

    The brown eye patch, ear, back saddle, and small body spots stay as untouched dark skin.

  • Peel & shade

    The white coat, chest, legs, and muzzle are shaved to pale flesh for a soft glow.

  • Cut through

    Nothing is cut all the way through; this is a surface etch that keeps the shell intact.

Learn the carving basics

Before you start cutting

Since this is a concept image, can a real pumpkin actually look this detailed?

Yes, this is an achievable etched portrait because nothing pierces the shell. The lifelike look comes from careful two-layer shading rather than deep cuts. Give yourself extra time for the face and patch borders, and the coat pattern will read clearly.

How do I keep the brown markings from looking muddy?

Score the border of each brown patch first, then peel right up to that line without crossing it. Leaving a thin ridge of skin at the edge gives the marking a crisp outline. Resist the urge to smooth those borders away, since the contrast is what sells the breed.

Will an etched pumpkin like this dry out fast?

Peeled skin does dry and darken over a few days, which can actually deepen the coat contrast at first. Seal the exposed flesh with petroleum jelly or lemon water and keep the pumpkin cool between displays. For a big event, carve it within a day or two of showtime.

Your take belongs here, too.

Changed a detail? Made it simpler? Share a photo of your version and tell the community what worked.

Share your pumpkin

More pumpkins like this

You've reached the end · 8 pumpkins
The Patch Report

Fresh pumpkins, in your inbox.

The best new carvings, ideas worth stealing, and how-tos for carving season. Short, seasonal, and gone by November.

A short email during carving season. Unsubscribe anytime. See our privacy policy.