Halloween Pumpkin Carving Contest · Starts October 1st · $500 in prizes
← Back to ideas
@ai_concepts
Sep 1, 2026
Japanese Koi Fish Pumpkin With Flowing Water PlantsAI
0

Japanese Koi Fish Pumpkin With Flowing Water Plants

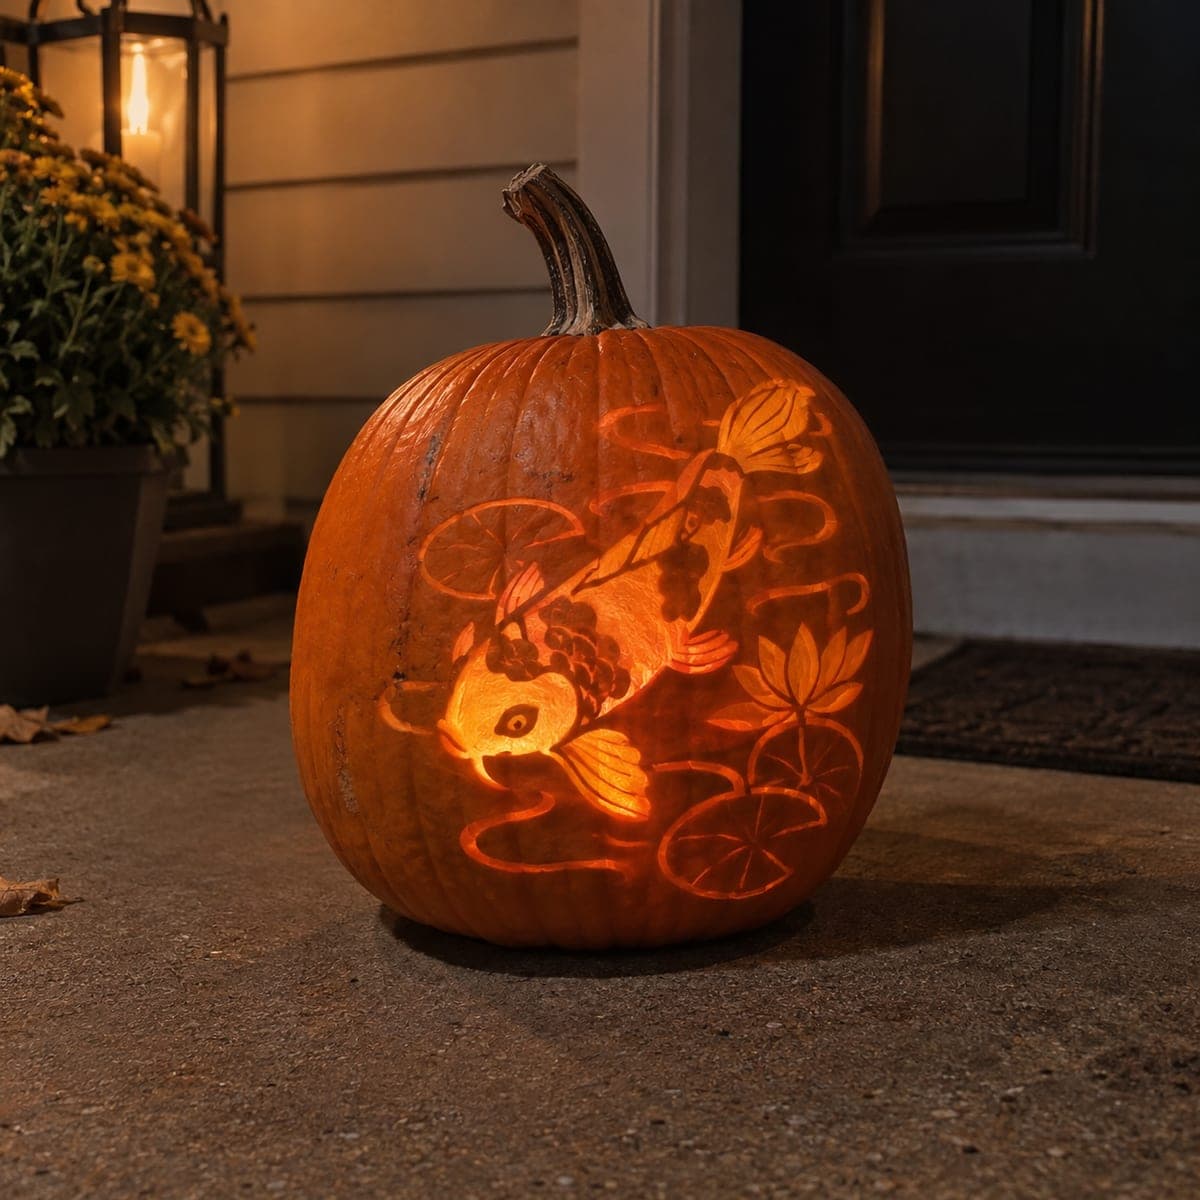
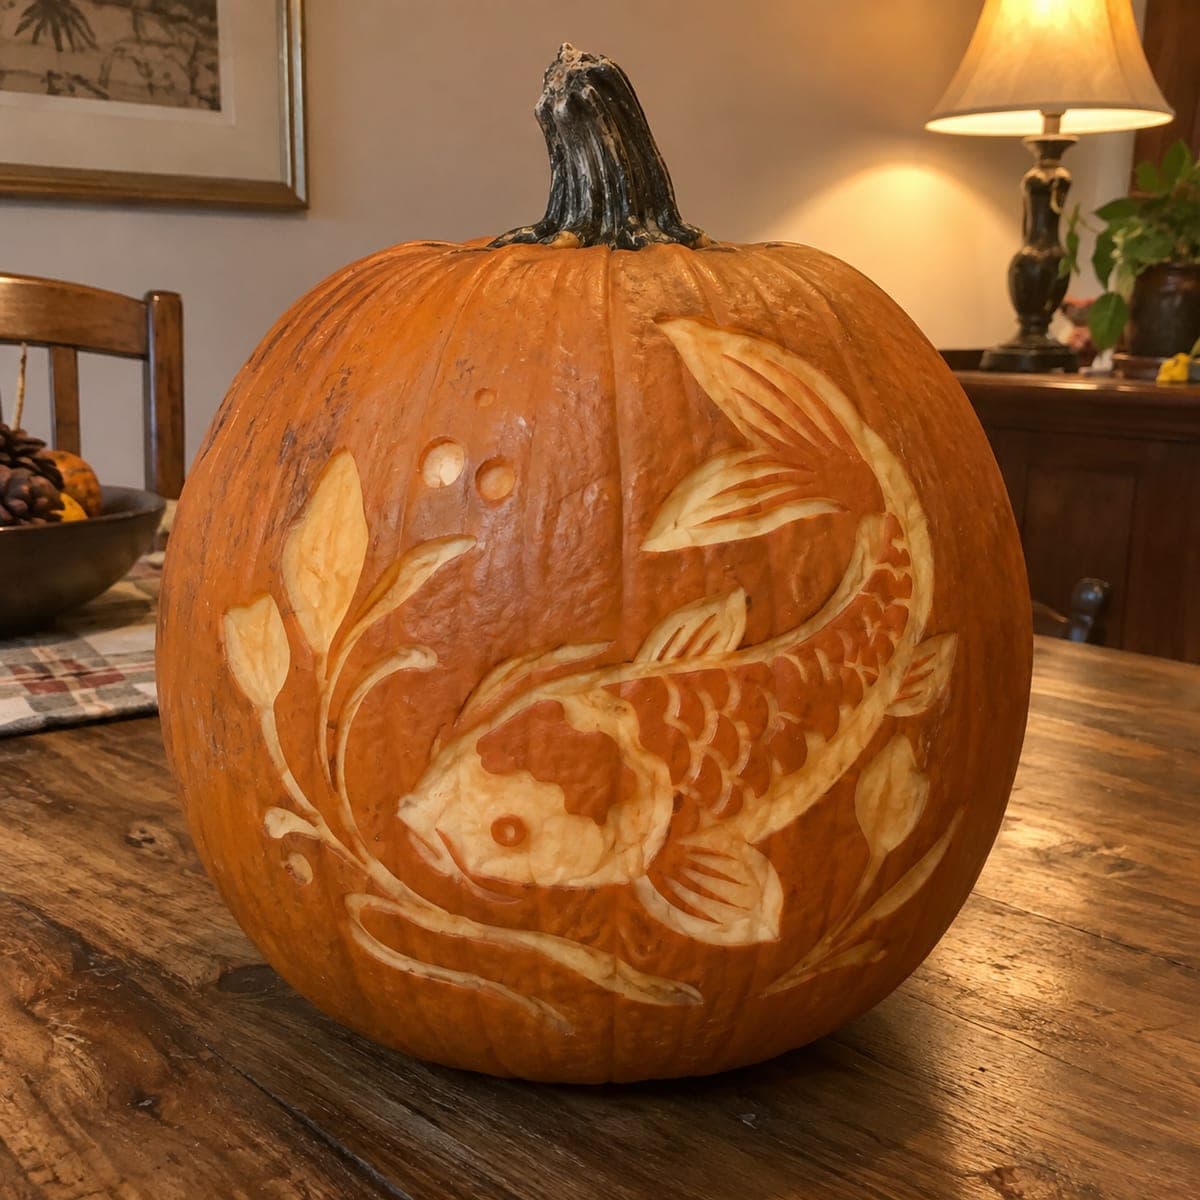
A koi curves gracefully down this pumpkin, its scales etched one by one and framed by flowing leaves and rising bubbles. Carved entirely in surface relief, the design has a serene, almost woodblock feel that suits a dining table as well as a doorstep. Lay out the S-curve of the body first, etch scales from tail to head so they overlap naturally, and leave it unlit for daytime display.

This is an AI-generated concept image: a realistic, carvable design idea rather than a photo of a finished carve. AI concepts are always labeled and sit out the leaderboard and the contest.

No ratings yet · Sign in to rate
Comments (0)

  • No comments yet — be the first.

Save without an account. Sign in to like or comment.

Our tips for carving a similar design

The core trick here is surface relief, meaning you shave away only the outer skin and a thin layer of flesh so light never fully passes through. The koi's S-curved body, overlapping scales, flowing leaves, and rising bubbles all read as glowing tan shapes against the darker orange skin. Plan the whole scene shallow, working from tail to head so scales overlap naturally, and treat it more like woodblock relief than a lantern.

Written by PumpkinCarvingIdeas.com, inspired by the image above. These are our suggestions, not instructions from the uploader. This approach to the AI concept has not been tested on a real pumpkin.

From pumpkin to porch

  1. Pick and prep a smooth pumpkin

    Choose a large, evenly rounded pumpkin with one broad, blemish-free face for the design. Wipe it clean and dry the carving area. Since this is a surface relief piece, you do not need to hollow it or cut a lid unless you want a faint interior glow later. A firm, thick wall gives you room to shave layers without breaking through.

  2. Transfer the S-curve and layout

    Print or draw the koi so its body sweeps in a long S down the face, with the leaves and bubbles framing the empty space around it. Tape the pattern on and poke or trace the main outlines: body, head, fins, tail, leaf stems, and bubble circles. Step back and check the flow before you cut anything. This map keeps the scales and plants from crowding each other.

  3. Skin the koi and plant shapes

    With a small loop or gouge tool, peel the skin off the koi body, fins, leaves, and bubbles down to the pale flesh so those areas glow soft tan. Leave the background skin untouched so the fish pops against dark orange. Keep the depth even and shallow, just a couple of millimeters. An adult should handle all the sharp and gouge tools.

  4. Etch the scales from tail to head

    Work the overlapping scales one row at a time, starting at the tail and moving toward the head so each scale tucks under the one ahead of it. Use the tip of a small U-gouge or a fine detail knife to press shallow crescent lines. Vary the shading slightly so the body looks rounded rather than flat. Take your time here since the scale pattern is what sells the koi.

  5. Add fins, leaves, and bubbles

    Score the thin ribs into the fins and tail with light, curved strokes, and carve the leaf veins the same way. For the bubbles, shave shallow circles and leave a tiny untouched dot for a highlight. Keep every line shallow and connected so nothing flakes off. These small marks give the whole scene its flowing, calm feel.

  6. Seal, display, and photograph

    Rub cut edges with a little petroleum jelly or a spritz of lemon water to slow browning, since a relief piece is meant to be seen in daylight. Set it on a table or doorstep in good light where the tan shapes read against the skin. If you want a faint evening effect, hollow the back and add a small LED, never a candle. Snap your photo in soft daylight to catch the woodblock texture.

Gather your supplies

Check things off as you get ready.

Work on a stable surface, keep your free hand out of the cutting path, and have an adult handle sharp tools.

Three levels of light

  • Leave intact

    The background around the fish stays as untouched dark orange skin.

  • Peel & shade

    The koi body, fins, leaves, and bubbles are skin-peeled to glow soft tan.

  • Cut through

    Nothing is cut all the way through; this is a shallow relief design.

Learn the carving basics

Before you start cutting

Do I need to hollow the pumpkin for this design?

Not for the main effect, since surface relief reads best in daylight without a light behind it. You can leave the pumpkin whole for a cleaner, sturdier carving. If you want a faint evening glow, hollow the back only and drop in an LED.

How do I keep the scales looking natural?

Work from the tail toward the head so each row of scales overlaps the one in front, just like on a real fish. Keep every crescent shallow and consistent in size, and let the shading get slightly deeper along the belly to suggest roundness. Patience matters more than pressure here.

Since this is a concept image, can a real pumpkin look this detailed?

Yes, though the fine scale rows take time and a steady hand. Because everything stays shallow relief rather than cut through, there is little risk of pieces breaking off, which makes the detail achievable. Just expect the surface to brown within a day or two, so carve close to when you want to display it.

Your take belongs here, too.

Changed a detail? Made it simpler? Share a photo of your version and tell the community what worked.

Share your pumpkin

More pumpkins like this

You've reached the end · 8 pumpkins
The Patch Report

Fresh pumpkins, in your inbox.

The best new carvings, ideas worth stealing, and how-tos for carving season. Short, seasonal, and gone by November.

A short email during carving season. Unsubscribe anytime. See our privacy policy.