Halloween Pumpkin Carving Contest · Starts October 1st · $500 in prizes
← Back to ideas
@ai_concepts
Aug 5, 2026
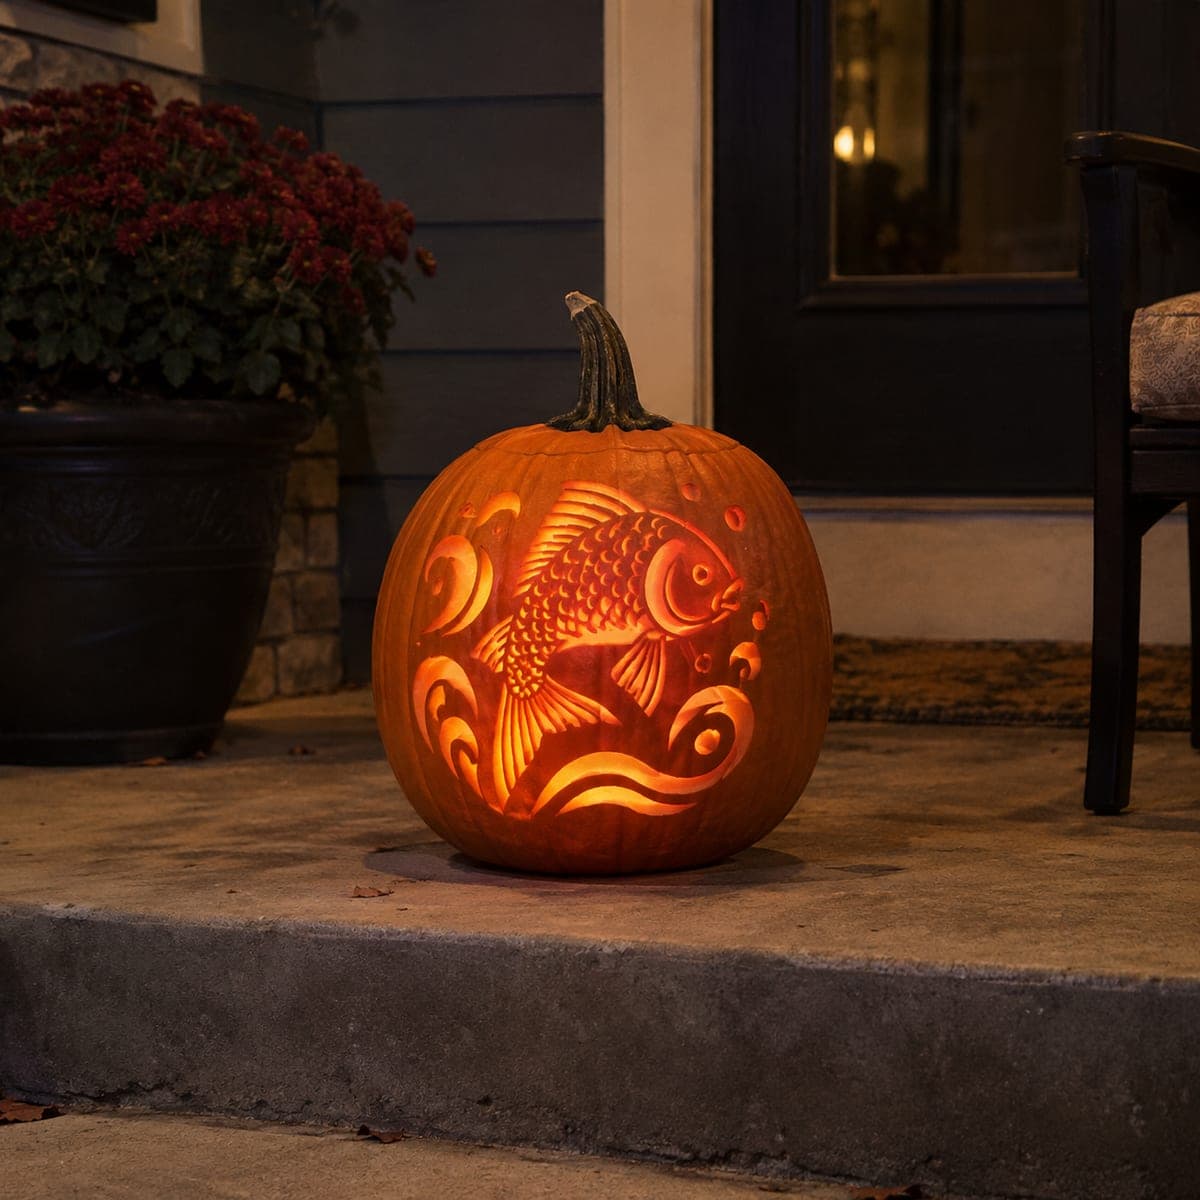
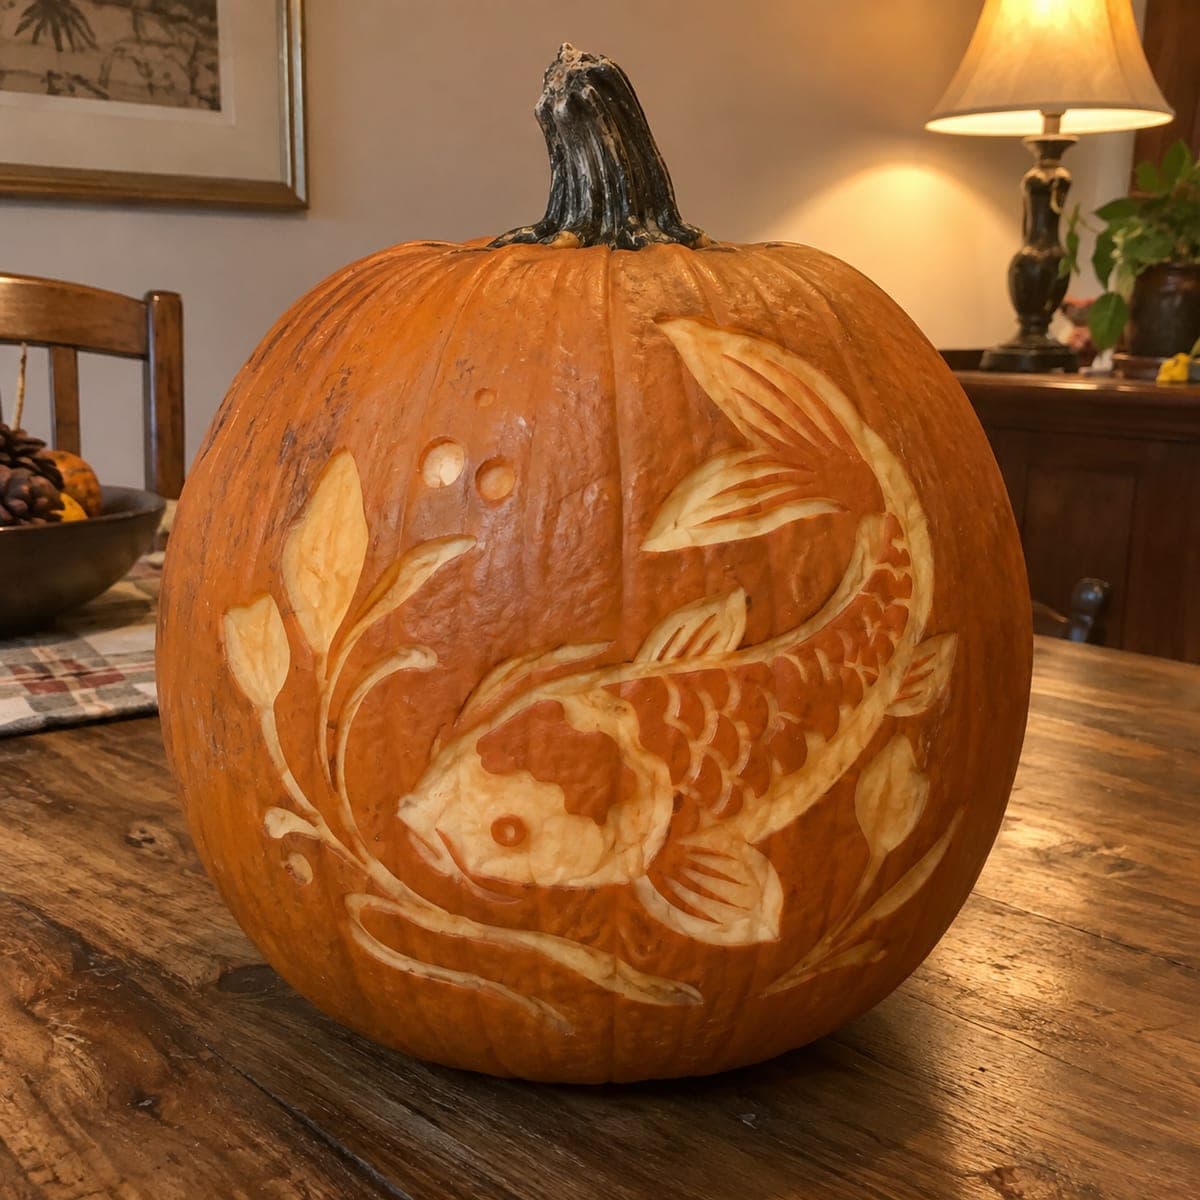
Koi Fish and Waves Cutout Pumpkin at NightAI
0

Koi Fish and Waves Cutout Pumpkin at Night

A koi fish glides through stylized waves in this elegant cutout pumpkin carving, the fins and scales rendered as connected cut shapes that glow brilliantly when lit. The flowing water lines extend around the pumpkin's curves, making the composition feel larger than the carving area. Transfer the pattern with a pin-poke method, then carve the wave lines first before tackling the fish body, leaving thin bridges of skin between the scale sections to prevent structural collapse.

This is an AI-generated concept image: a realistic, carvable design idea rather than a photo of a finished carve. AI concepts are always labeled and sit out the leaderboard and the contest.

No ratings yet · Sign in to rate
Comments (0)

  • No comments yet — be the first.

Save without an account. Sign in to like or comment.

Our tips for carving a similar design

The core trick here is turning a koi fish into a set of connected cut shapes, where each scale, fin, and wave curl is separated by a thin bridge of skin so the whole thing glows without falling apart. You carve the flowing water lines first to lock in the composition, then work up the fish body, saving the widest openings for last. Plan the negative space carefully so the dark bridges read as scale and fin outlines against the bright cutouts.

Written by PumpkinCarvingIdeas.com, inspired by the image above. These are our suggestions, not instructions from the uploader. This approach to the AI concept has not been tested on a real pumpkin.

From pumpkin to porch

  1. Prep the pumpkin and gut it well

    Pick a tall, round pumpkin with a smooth front face big enough for the fish and the waves that wrap around the curve. Cut a lid from the bottom or the back rather than the top so the design stays intact and the pumpkin sits flat. Scrape the inside wall behind the design down to about one inch thick so light passes through evenly. A thinner wall makes the scale bridges much easier to control.

  2. Transfer the pattern with pin pokes

    Tape your koi and wave stencil tightly over the front, smoothing out wrinkles around the curve. Poke through every line with a pin or a poking tool, spacing the holes close together on the tight scale and fin curves. Peel the paper off and connect the dots lightly with a marker so you can see the full layout. Take a moment to mark which sections are cutouts and which are skin bridges before any blade touches the pumpkin.

  3. Carve the wave lines first

    Start with the flowing water curls at the bottom and sides using a fine detail saw. These long, sweeping cuts set the frame for the whole scene, so cut them cleanly and let them taper to points. Because they are narrow openings surrounded by plenty of skin, they hold up well and give you carving practice before the harder fish. Support the pumpkin from inside with your free hand as you work each curve.

  4. Build the fish body and scales

    Move to the fish, cutting the eye, the mouth, and the fin lines as connected shapes. For the scales, cut each small crescent opening while leaving a thin bridge of skin between them so the rows do not collapse into one big hole. Keep bridges at least a quarter inch wide and resist the urge to connect neighboring cuts. Work from the center of a cluster outward so the surrounding skin keeps things stable.

  5. Open the largest cutouts last

    Save the widest openings, like the large fin gaps and any big body sections, for the very end. Once those are removed the face loses rigidity, so doing them last keeps the pumpkin firm while you carve everything else. Ease each piece out gently by pushing from the inside rather than yanking from the front. If a bridge feels weak, leave a little extra skin rather than risk a crack.

  6. Light it and take the night photo

    Set a battery LED puck or a string of LEDs inside so the whole design lights evenly from behind. LEDs stay cool and safe, which matters with so many thin bridges around the scales. Photograph it at dusk on a step or porch, as shown, so the glow reads against a dim background. If any section looks dim, shave a little more from the inside wall behind it.

Gather your supplies

Check things off as you get ready.

Work on a stable surface, keep your free hand out of the cutting path, and have an adult handle sharp tools.

Three levels of light

  • Leave intact

    The stem and the untouched skin around the background, plus the thin bridges outlining each scale and fin, stay dark to define the shapes.

  • Peel & shade

    Shallow shaded areas along the fish body or wave edges can be skin-peeled for a soft mid orange glow that adds depth.

  • Cut through

    The wave curls, the fin gaps, the eye, and the scale crescents are cut all the way through for the brightest light.

Learn the carving basics

Before you start cutting

How do I keep the scale rows from collapsing?

Leave a thin bridge of skin between every scale cut, at least a quarter inch wide, so each row stays anchored to its neighbors. Carve one crescent at a time rather than joining cuts together. If you thin the inside wall evenly, the bridges will still glow bright without needing to be removed.

Should I carve the fish or the waves first?

Start with the wave lines. They are simpler sweeping cuts that set the frame for the whole composition, and carving them first keeps the pumpkin sturdy while you tackle the detailed fish. Save the largest openings for the very end so the face does not weaken too early.

This is an AI concept image, so can a real pumpkin look like this?

Yes, a similar look is achievable, though the dense scale work takes patience. Keep every bridge a bit wider than the render suggests and thin your inside wall so light still pours through. Expect an evening of careful work and treat the delicate scale rows as the hardest part.

Your take belongs here, too.

Changed a detail? Made it simpler? Share a photo of your version and tell the community what worked.

Share your pumpkin

More pumpkins like this

You've reached the end · 8 pumpkins
The Patch Report

Fresh pumpkins, in your inbox.

The best new carvings, ideas worth stealing, and how-tos for carving season. Short, seasonal, and gone by November.

A short email during carving season. Unsubscribe anytime. See our privacy policy.