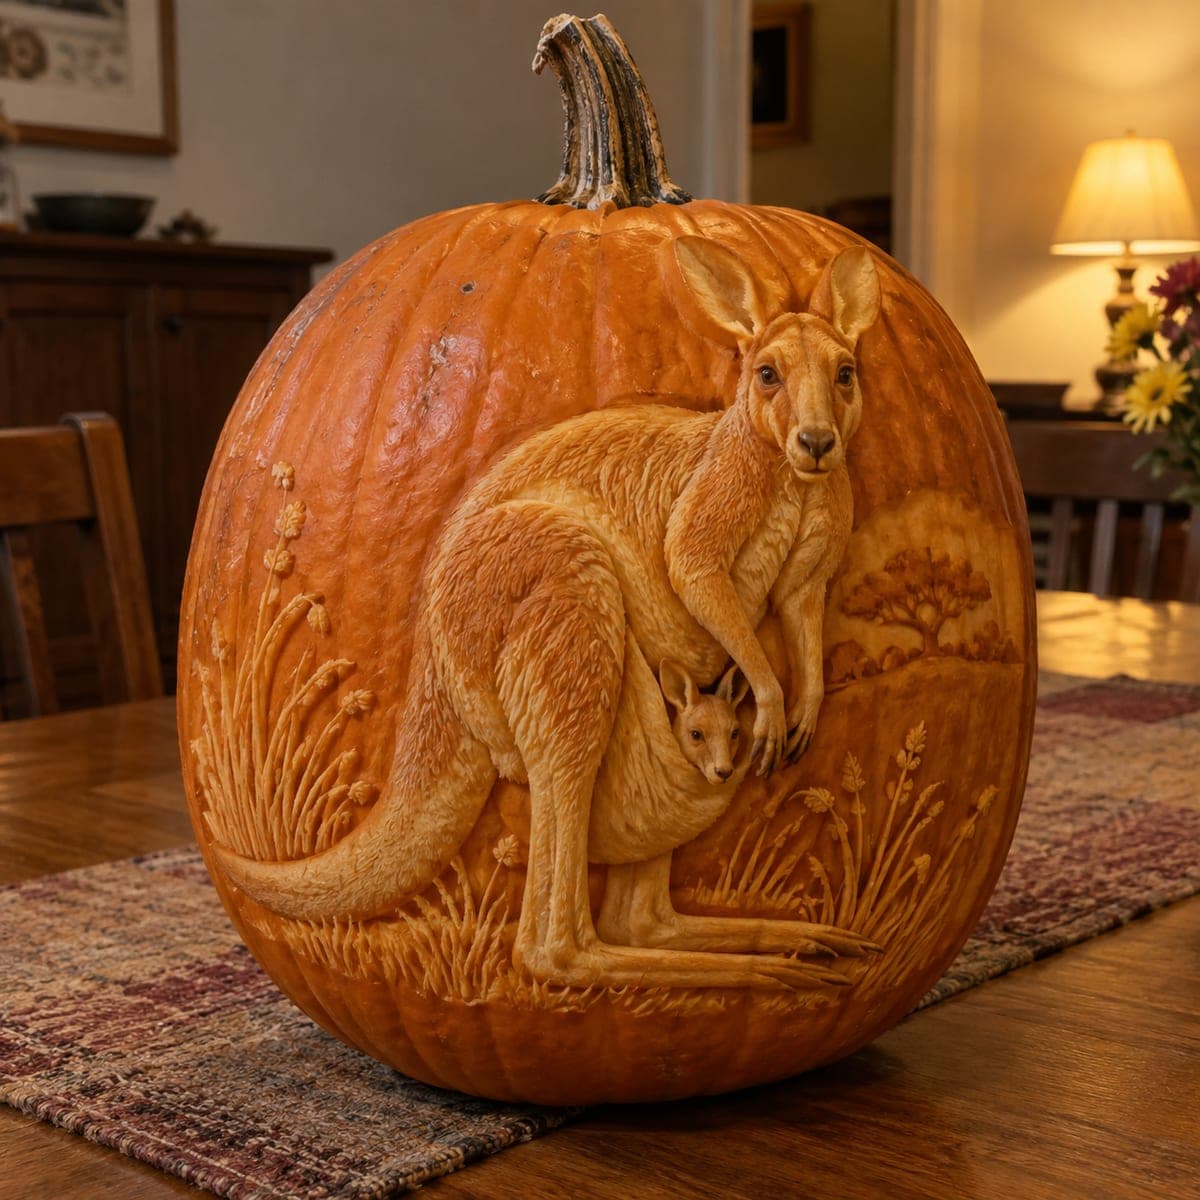
A mother kangaroo with a joey peeking from her pouch stands in sculpted relief, surrounded by carved outback grasses and a distant gum tree. The fur, ears, and grass stems are all raised by cutting the background away, a subtractive relief approach that demands ribbon tools and a steady plan. Rough out the large shapes first and save the whisker-fine grass for last, then display it indoors since deep relief carving dries out fast outside.
This is an AI-generated concept image: a realistic, carvable design idea rather than a photo of a finished carve. AI concepts are always labeled and sit out the leaderboard and the contest.
The core trick here is subtractive relief: instead of cutting holes, you lower the background skin so the mother kangaroo, her joey, and the grasses stand out as raised sculpture. Everything you want to keep, the fur, the ears, the tail curve, the gum tree, and each grass stem, is left tall while the space around it is shaved down in layers. Plan the whole scene on paper first, rough the big animal shapes early, and save the whisker-fine grass for the very end.
Written by PumpkinCarvingIdeas.com, inspired by the image above. These are our suggestions, not instructions from the uploader. This approach to the AI concept has not been tested on a real pumpkin.
From pumpkin to porch
1
Prep and transfer the scene
Pick a large, tall pumpkin with a smooth, blemish-free face and cut a lid or a bottom access hole so you can scoop it out. Thin the front wall to about an inch so your relief has room to catch light. Tape your stencil in place and poke through the main outlines: the kangaroo body, head, ears, the joey in the pouch, the tree, and the grass line. Step back and check the layout before you cut anything.
2
Establish the raised silhouette
With a small gouge or a fine ribbon tool, score just outside the outline of the kangaroo and joey so they are protected. Then begin removing skin from the background only, working the flat areas of sky and ground down a shallow depth. Keep the animal and the tree at full height. Go slowly and check often that your cuts stay clean along the edges.
3
Rough out the large forms
Now shape the big masses. Lower the hindquarters slightly behind the shoulder, round the belly, and carve the pouch so the joey reads as tucked inside. Establish depth layers: the mother is closest, the tree sits farther back and shallower, the grass will be nearest of all. Do not chase detail yet, just get the planes and shadows right.
4
Shade the fur and faces
Switch to fine ribbon and detail tools to draw fur direction with shallow parallel strokes, following the body from chest down to the tail. Peel a thin layer of skin on the lit sides of the muzzle and ears for a soft glow, and leave the eyes and nose darker for contrast. Keep the joey's face gentle and rounded. Work from the high points down so you always have solid material to lean against.
5
Add the outback grasses and tree
Save the whisker-fine grass stems for last since they are the most fragile. Carve them as raised ridges by clearing the background between blades, leaving each stem attached at the base as a natural bridge. Give the gum tree a light, feathery canopy with shallow cuts. Do not undercut these thin elements or they will snap.
6
Light it and photograph indoors
Set a battery LED puck or string inside, never a candle, since the heat and flame ruin fine relief. Warm white light brings out the peeled fur highlights and the shadowed background. Deep relief dries and curls fast, so display this one indoors on a table runner and shoot your photos the same evening. A light coat of petroleum jelly on the cut faces slows drying if you want an extra day.
Gather your supplies
Check things off as you get ready.
Work on a stable surface, keep your free hand out of the cutting path, and have an adult handle sharp tools.
Three levels of light
Leave intact
The eyes, nose, and the darkest fur shadows stay as untouched skin.
Peel & shade
The lit sides of the muzzle, ears, belly, and the gum tree canopy get skin-peeled for a soft mid glow.
Cut through
Only the lowered background planes are shaved deepest for the brightest light, with no full holes through the wall.
This is a concept image, so can a real pumpkin hold this much raised detail?
Yes, with the right pumpkin and patience. A large, thick-walled pumpkin gives you enough material to lower the background while keeping the animals tall. Just avoid undercutting the thin grass stems and leave each one anchored at the base so nothing snaps off.
How do I keep the fine grass stems from breaking?
Carve them last, after the heavy work is done, and always leave them attached at the bottom as natural bridges. Clear the background between blades rather than cutting all the way around any single stem. Shallow, raised ridges are far stronger than free-standing spikes.
Why display it indoors instead of on the porch?
Deep relief exposes a lot of surface area, so it dries, curls, and browns much faster than a simple cutout. Indoor air is gentler and shows off the shading under a warm LED. Rub the cut faces with a thin layer of petroleum jelly to buy an extra day of freshness.
Your take belongs here, too.
Changed a detail? Made it simpler? Share a photo of your version and tell the community what worked.
 AI
AI


Comments (0)