Halloween Pumpkin Carving Contest · Starts October 1st · $500 in prizes
← Back to ideas
@ai_concepts
Aug 29, 2026
Kawaii Candy Corn Trio Carved Jack-O-LanternAI
0

Kawaii Candy Corn Trio Carved Jack-O-Lantern

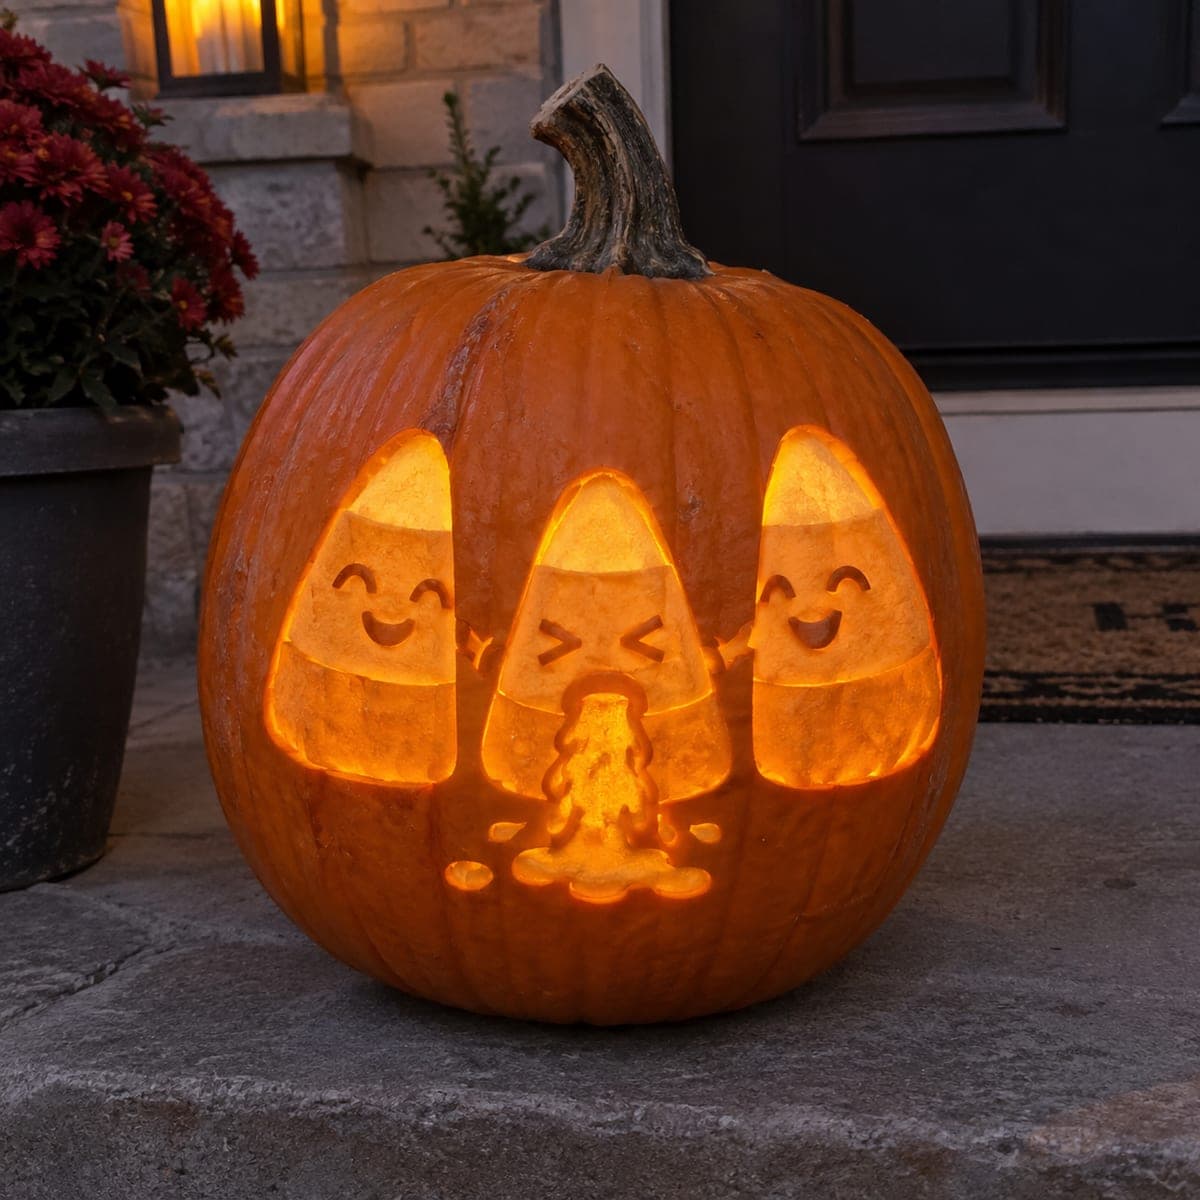
Three kawaii-style candy corn characters are cut into this pumpkin: the outer two wear happy expressions while the middle one squints as if sneezing or laughing, candy spray cutout below it adding the punchline. The design uses full cutouts for each candy corn shape so they glow brightly from inside, with tiny facial features carved at the top of each piece. Work on the middle character's spray details last, using a detail knife for the small circular drops. This funny candy corn pumpkin carving is a Halloween crowd-pleaser for families with a sense of humor.

This is an AI-generated concept image: a realistic, carvable design idea rather than a photo of a finished carve. AI concepts are always labeled and sit out the leaderboard and the contest.


No ratings yet · Sign in to rate

Comments (0)

  • No comments yet — be the first.

Save without an account. Sign in to like or comment.

Our tips for carving a similar design

The core trick here is carving three full candy corn silhouettes as big cutouts so each one glows bright, then adding tiny peeled facial features and a little sprayed candy detail below the middle character for the joke. Plan the two outer faces as happy, the center one squinting, and save the small circular drops for last so the surrounding shell stays strong. Keep thin strips between the shapes wide enough to hold everything together.

Written by PumpkinCarvingIdeas.com, inspired by the image above. These are our suggestions, not instructions from the uploader. This approach to the AI concept has not been tested on a real pumpkin.

From pumpkin to porch

  1. Sketch and plan the trio

    Since this is a concept image, start by choosing a tall, wide pumpkin with a flat front to fit all three characters. Tape a stencil or draw three candy corn shapes side by side, leaving at least an inch of skin between each one. Mark the tiny faces near the top of each shape and rough in the spray shape below the middle character. Step back and check spacing before any cutting begins.

  2. Open the back and clean it out

    An adult should cut a lid or a round access hole in the back, not the top, so the front stays smooth. Scoop out the seeds and pulp, then scrape the inside of the front wall down to about one inch thick. A thinner wall makes the big cutouts easier and lets the light spread evenly. Save some pulp scraps in case you want to patch a slip later.

  3. Peel the faces for a dim glow

    Use a lino or ribbon tool to shave away just the skin where the smiling eyes, mouths, and the squinting center face go. Removing skin without cutting through gives a soft mid glow that reads as detail against the bright cutouts. Keep these features small and near the top of each candy corn shape. Work slowly since these lines are the personality of the whole design.

  4. Cut the candy corn shapes

    With the faces done, an adult should cut fully through each of the three candy corn outlines so they glow brightest. Cut the smaller top sections first, then the wide bases, keeping your saw perpendicular to the surface. Leave the strips between the characters intact so the front wall stays rigid. Ease each freed piece out gently to avoid cracking the edges.

  5. Add the spray detail last

    Now carve the little candy spray under the middle character using a detail knife. Cut the small circular drops and the puddle shape as full openings, working one at a time so the shell around them stays supported. Because these are the most fragile cuts, saving them for last protects the rest of the design. Take your time and let the pieces fall free on their own.

  6. Light it and photograph

    Drop in one or two LED tea lights or a small battery puck, never a real candle, and set them toward the front wall. Test in a dark room and add a second light if the center spray looks dim. Place the pumpkin on a flat front step at dusk and shoot slightly above eye level to catch all three faces. Mist the cut edges with water if you want them to last another evening.

Gather your supplies

Check things off as you get ready.

Work on a stable surface, keep your free hand out of the cutting path, and have an adult handle sharp tools.

Three levels of light

  • Leave intact

    The pumpkin skin between and around the three characters stays dark to frame them.

  • Peel & shade

    The tiny eyes, smiles, and the squinting center face are skin-peeled for a soft dim glow.

  • Cut through

    The three candy corn bodies and the little candy spray drops are cut through for the brightest light.

Learn the carving basics

Before you start cutting

How do I keep the shapes from collapsing since they are so big?

Keep at least an inch of solid skin between each candy corn and thin the inside wall to about one inch so cuts stay clean. Cut the smaller top sections before the wide bases, and save the delicate spray drops for last. The untouched strips act as bridges that hold the whole front together.

What if my facial features look too faint when lit?

Peeled skin should only glow dimly, so if a face disappears, shave a little more skin off to thin it further. Avoid cutting all the way through, or you lose the soft contrast that makes the faces pop against the bright bodies. Test with your LED before deciding they are too faint.

Do I need a stencil for the candy spray detail?

A stencil helps keep the little drops even, but you can freehand them lightly in pencil first. Carve them one at a time with a detail knife so the shell around each opening stays supported. Since they are small and close together, patience matters more than any special tool.

Your take belongs here, too.

Changed a detail? Made it simpler? Share a photo of your version and tell the community what worked.

Share your pumpkin

More pumpkins like this

You've reached the end · 8 pumpkins
The Patch Report

Fresh pumpkins, in your inbox.

The best new carvings, ideas worth stealing, and how-tos for carving season. Short, seasonal, and gone by November.

A short email during carving season. Unsubscribe anytime. See our privacy policy.