Halloween Pumpkin Carving Contest · Starts October 1st · $500 in prizes
← Back to ideas
@ai_concepts
Jul 24, 2026
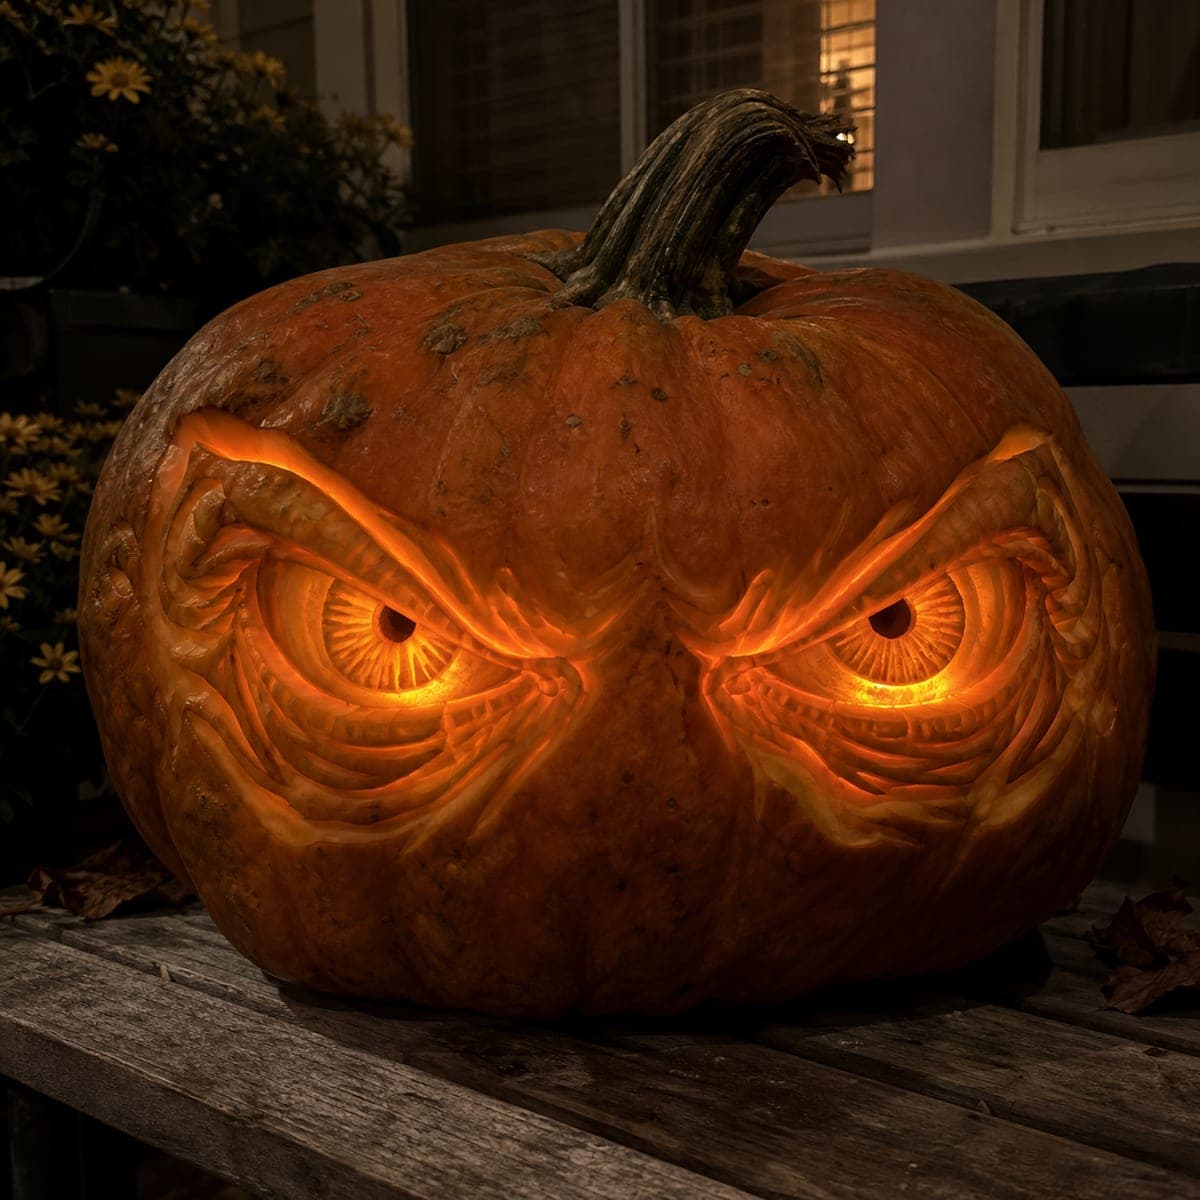
Menacing Owl Eyes Close-Up Jack-O-LanternAI
0

Menacing Owl Eyes Close-Up Jack-O-Lantern

Two enormous owl eyes with detailed iris rings and heavy brow ridges fill nearly the entire pumpkin face, creating an unsettling stare that glows intensely when lit. The etched feather texture around each eye socket and the angry brow furrows are carved at intermediate depth, while the iris centers are left thinner so they glow brighter. Use a loop tool in concentric circles for the iris detail and a flat chisel to taper the brow ridge. Set low to the ground so trick-or-treaters look down into the eyes for maximum effect.

This is an AI-generated concept image: a realistic, carvable design idea rather than a photo of a finished carve. AI concepts are always labeled and sit out the leaderboard and the contest.

No ratings yet · Sign in to rate
Comments (0)

  • No comments yet — be the first.

Save without an account. Sign in to like or comment.

Our tips for carving a similar design

The core trick here is depth control: two huge eyes fill the whole face, with feather texture and angry brows shaded at medium depth and only the iris centers thinned way down for a hot, intense glow. Since this is a concept image, treat it as a plan you could carve rather than a finished pumpkin. Map the two eyes big and symmetrical first, then work outward into the brow ridges and feather furrows.

Written by PumpkinCarvingIdeas.com, inspired by the image above. These are our suggestions, not instructions from the uploader. This approach to the AI concept has not been tested on a real pumpkin.

From pumpkin to porch

  1. Pick and prep the pumpkin

    Choose a wide, round pumpkin with a smooth front so the two eyes have room to spread almost cheek to cheek. Cut a lid from the bottom instead of the top so you can set it low over an LED and keep the stem looking natural. Scrape the inside wall behind the eyes down to about one inch so the thin iris areas will glow evenly. A flat, even interior wall makes the shading steps much more predictable.

  2. Transfer the two eyes

    Tape your stencil or draw two large almond eyes tilted down toward the center for that angry look. Poke through the main outlines with a pin or transfer wheel, marking the brow ridge, the eye opening, and the round iris in each. Step back and check that both eyes match in size and angle before you cut anything. Symmetry is what sells the stare, so fix it now while it is only dots.

  3. Shade the feathers and brows

    Use a ribbon or loop tool to peel the skin off the feather texture around each socket and along the heavy brow furrows, staying at medium depth. Work in short curved strokes that follow the feather direction so the light catches the ridges. Taper the top edge of each brow with a flat chisel so it reads as a thick, overhanging ridge. Leave the raised veins between furrows a little thicker so they stay dark and show contrast.

  4. Carve the iris rings

    Switch to a small loop tool and cut concentric circles inside each iris, going slightly deeper than the feather shading. Keep a thin bridge of skin between rings so the pattern holds together and does not collapse into one hole. Thin the iris body down until it glows a warm orange when backlit. This is the brightest shaded zone, so test it against a light as you go.

  5. Cut the pupils last

    Only after all the shading is done, cut a small round hole all the way through the center of each iris for the sharpest point of light. Keep these openings small so the eyes look focused and menacing rather than blank. Because these are the only full cutouts, save them for the end to keep the thin iris walls supported while you work. Clean the edges with a fine blade for a crisp pupil.

  6. Light it and shoot low

    Drop a warm LED puck or two inside and set the pumpkin on the ground or a low step so viewers look down into the eyes. Never use a candle near thin, shaded areas that can scorch. Rub a little petroleum jelly on cut edges to slow drying and keep the glow strong for a few nights. Photograph it at dusk from slightly above to catch that unsettling downward stare.

Gather your supplies

Check things off as you get ready.

Work on a stable surface, keep your free hand out of the cutting path, and have an adult handle sharp tools.

Three levels of light

  • Leave intact

    The raised veins between feather furrows and the brow crest stay dark for contrast

  • Peel & shade

    The feather texture, brow furrows, and iris rings glow dim orange

  • Cut through

    The small round pupils at each iris center burn brightest

Learn the carving basics

Before you start cutting

How do I keep the iris rings from breaking apart?

Leave a thin bridge of pumpkin skin between each concentric ring instead of cutting all the way through. Only the shading gets thinned, so the rings stay connected as one surface. Save the single pupil hole for the very end so the thin walls stay supported while you carve.

How deep should the shading be versus the pupils?

Keep the feather texture and brows at medium depth so they glow softly and hold their shape. Thin the iris body a bit more so it reads brighter. The pupils are the only spots cut fully through, giving two sharp points of light.

Why set it low to the ground?

The eyes tilt downward, so placing the pumpkin on the ground or a low step makes trick-or-treaters look down into the stare for maximum effect. A higher perch flattens the angle and loses the menace. Aim your camera slightly above the pumpkin to capture the same feeling.

Your take belongs here, too.

Changed a detail? Made it simpler? Share a photo of your version and tell the community what worked.

Share your pumpkin

More pumpkins like this

You've reached the end · 8 pumpkins
The Patch Report

Fresh pumpkins, in your inbox.

The best new carvings, ideas worth stealing, and how-tos for carving season. Short, seasonal, and gone by November.

A short email during carving season. Unsubscribe anytime. See our privacy policy.