Halloween Pumpkin Carving Contest · Starts October 1st · $500 in prizes
← Back to ideas
@ai_concepts
Sep 25, 2026
Mid-Level Healthcare Pumpkin Carving DisplayAI
0

Report this carving

Tell us what is wrong. Reports are private.

Mid-Level Healthcare Pumpkin Carving Display

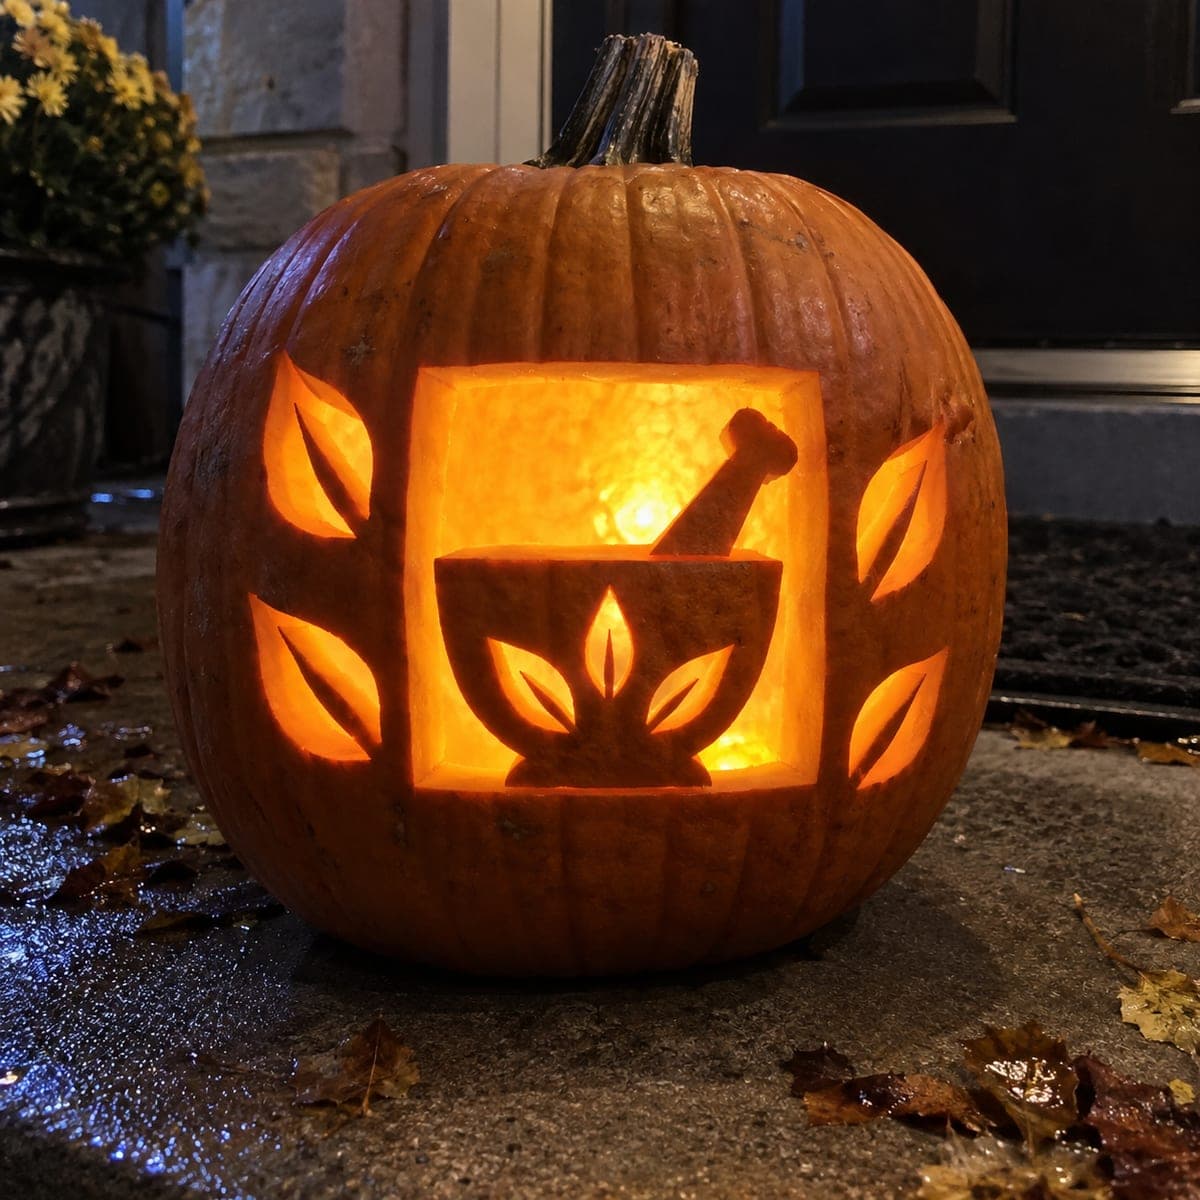
Multiple healthcare-themed apertures carved with broad connecting rind create a warm glowing display suited for a hospital hallway or break room in this intermediate healthcare pumpkin idea. Cut each symbol opening fully through and keep the surrounding shell generous so the pumpkin remains easy to transport after carving. Add shallow backed accents with a small gouge after the through-cuts are finished for extra visual layering. Grouping two or three of these together on a table amplifies the impact.

No ratings yet · Sign in to rate

Comments (0)

  • No comments yet — be the first.

Save without an account. Sign in to like or comment.

Our tips for carving a similar design

Multiple healthcare-themed apertures spread across the pumpkin face make this an intermediate project where spacing and bridge management are the main challenges. Cutting each symbol opening fully through with a generous surrounding shell keeps the pumpkin easy to transport even after significant material has been removed. A small gouge applied after the through-cuts are done adds shallow backed accents that catch the interior light and give the finished piece a more layered, professional appearance.

From pumpkin to porch

  1. Map the symbol layout in chalk

    Before gutting, hold the pumpkin at arm's length and sketch rough oval guides in chalk to indicate where each symbol will sit. Aim for even spacing across the face with at least three-quarters of an inch of rind between adjacent symbols. Erase and adjust with a dry cloth until the arrangement looks balanced.

  2. Gut and wall-check

    Cut the back lid and scoop the interior to an even one inch of wall thickness across the planned carving area. Use a depth gauge or a marked skewer to check thickness consistently. Slightly thicker walls between adjacent symbols give you a safer margin when both neighboring areas have been cut.

  3. Transfer patterns and mark bridges

    Pin-tool all symbol outlines through the printed patterns in sequence. After removing the paper, identify and mark every bridge between a retained rind section and the outer shell with a small pencil circle so you have a clear map before any material is removed.

  4. Cut all through-openings

    Work through each symbol opening one at a time, starting at the top of the face and moving downward. Confirm bridges are intact after each cut before starting the next symbol. The pumpkin becomes progressively lighter and slightly more flexible as you remove material, so hold it on a stable surface with a non-slip mat.

  5. Add shallow backed accents

    Switch to a small gouge and work accent details behind the through-cut zones at a shallow angle. A consistent quarter-inch depth gives a warm amber glow without risking breakthrough. Clean the shaved area with a dry brush to remove flesh dust before testing the glow.

  6. Arrange and light

    Place a warm LED puck inside and check the display in a dimmed room. Grouping two or three of these pumpkins together on a break room table or corridor shelf multiplies the effect and creates a cohesive seasonal display. Point each pumpkin slightly toward foot traffic so the carved face is visible from the main walking direction.

Written with AI to match this design

Gather your supplies

Check things off as you get ready.

Work on a stable surface, keep your free hand out of the cutting path, and have an adult handle sharp tools.

Three levels of light

  • Leave intact

    Outer shell and rind borders between symbols stay fully dark, providing clean visual separation and structural support.

  • Peel & shade

    Shallow backed accent areas scraped to a quarter inch depth emit a warm amber mid-glow.

  • Cut through

    Each healthcare symbol aperture is cut fully through for direct, bright illumination.

Learn the carving basics

Before you start cutting

How many symbols can I fit on one medium pumpkin without the structure weakening?

Two to three clearly spaced symbols is a safe limit for most medium pumpkins at intermediate level. Fitting more than three risks leaving the connecting rind too narrow between adjacent openings. If you want a denser design, move up to a large or extra-large pumpkin with a correspondingly broader carving face.

Should I cut the top or bottom symbols first?

Cut the topmost symbol first, then work downward. The uncut lower portion keeps the pumpkin stable and heavy while you work the upper area. Cutting the bottom first makes the pumpkin top-heavy and harder to hold steady for the more detailed upper cuts.

Can I skip the backed accents and just do plain cut-through symbols?

Yes, the through-cut symbols alone look clean and effective, especially for a bright display setting. The backed accents add visual depth but are not required. If you are new to gouge work, it is perfectly reasonable to stop after the through-cuts and achieve a great result without the extra step.

Your take belongs here, too.

Changed a detail? Made it simpler? Share a photo of your version and tell the community what worked.

Share your pumpkin

More pumpkins like this

You've reached the end · 8 pumpkins
The Patch Report

Fresh pumpkins, in your inbox.

The best new carvings, ideas worth stealing, and how-tos for carving season. Short, seasonal, and gone by November.

A short email during carving season. Unsubscribe anytime. See our privacy policy.