Halloween Pumpkin Carving Contest · Starts October 1st · $500 in prizes
← Back to ideas
@ai_concepts
Sep 25, 2026
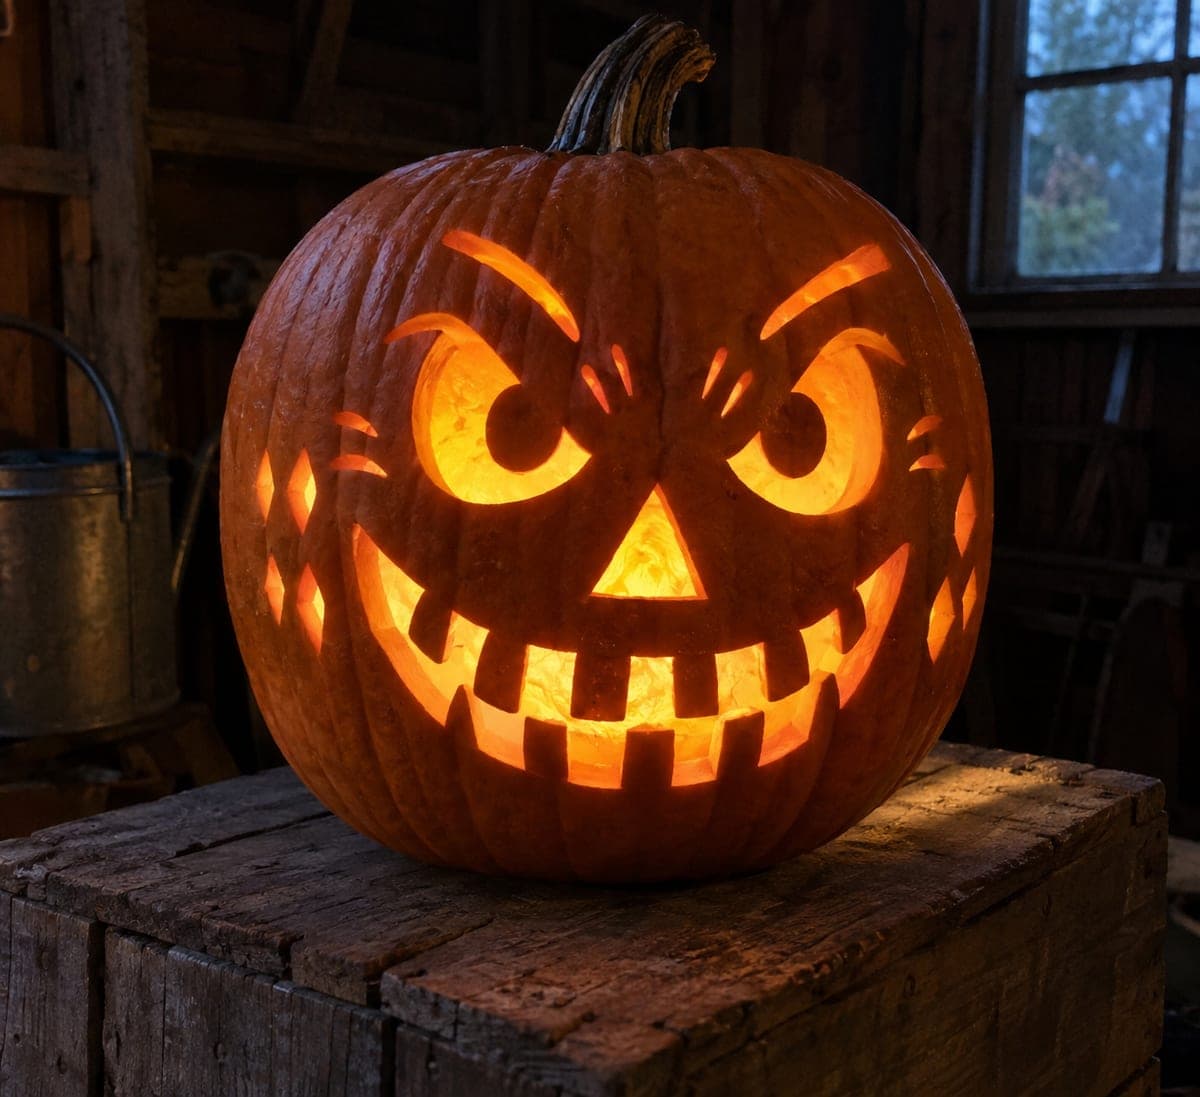
Mischievous Pumpkin Face with Wrinkle Holes and Cheek DiamondsAI
0

Report this carving

Tell us what is wrong. Reports are private.

Mischievous Pumpkin Face with Wrinkle Holes and Cheek Diamonds

Curved eye openings with broad attached pupils, arched eyebrow slits, six short forehead wrinkle holes, a triangle nose, a sweeping smile with eight thick rooted teeth, and six cheek diamond holes combine to make this hard pumpkin face design one of the most expressively mischievous in the collection. Cut the wrinkle holes and eyebrow slits before the eyes so you can judge spacing against a still-solid upper face. The cheek diamonds should be cut last, at a slight inward angle, so they suggest the cheekbones of a grinning face.

No ratings yet · Sign in to rate
Comments (0)

  • No comments yet — be the first.

Save without an account. Sign in to like or comment.

Our tips for carving a similar design

The mischievous expression comes from three layered details working together: the curved eye openings with broad attached pupils create alert eyes, the arched eyebrow slits signal a raised brow, and the sweeping smile with eight thick teeth delivers the grin. Cutting the wrinkle and eyebrow slits before the eyes lets you judge spacing on a still-solid upper face, which prevents placement drift.

From pumpkin to porch

  1. Plan the cutting sequence

    Sketch all features on the pumpkin with a washable marker and number them in cutting order: (1) six forehead wrinkle holes, (2) both arched eyebrow slits, (3) both curved eye openings with pupils, (4) triangle nose, (5) sweeping mouth with teeth, (6) six cheek diamonds. This order preserves the upper face structure longest.

  2. Hollow the pumpkin

    Cut a back lid and scoop the interior to about three-quarters of an inch of wall thickness on the face panel. A slightly thinner wall gives the many small wrinkle and diamond holes clean edges that hold detail well under illumination.

  3. Cut wrinkle holes and eyebrow slits

    Cut the six short forehead wrinkle holes as narrow oval or rectangular slits radiating slightly upward. Then cut both arched eyebrow slits as separate independent holes above the eye positions. Keep every wrinkle hole at least three-quarters of an inch from its neighbors to preserve the rind between them.

  4. Cut the eye openings

    Each eye is a curved opening with a broad pupil tab attached to the upper eyelid rind. Cut the outer boundary of each curved eye, then carefully cut the inner pupil opening, leaving the broad tab firmly connected at the top. The pupil tab is what gives these eyes their intense, slightly manic look.

  5. Cut the nose, mouth, and teeth

    Cut the triangle nose, then open the sweeping smile. The eight thick rooted teeth alternate upper and lower lip attachment; confirm each tooth root is at least three-quarters of an inch wide before cutting the gaps between them. Cut teeth gaps last within each section of the mouth.

  6. Cut the cheek diamonds and light up

    Mark six diamond shapes on the cheeks and cut them at a very slight inward angle to suggest cheekbones. Cut them last when the face is fully open and structural tension is evenly distributed. Insert a warm LED and display so the full character of the face is visible straight on.

Written with AI to match this design

Gather your supplies

Check things off as you get ready.

Work on a stable surface, keep your free hand out of the cutting path, and have an adult handle sharp tools.

Three levels of light

  • Leave intact

    Broad pupil tabs inside both eye openings stay as uncut dark rind; all rind between wrinkle holes, cheek diamonds, and teeth gaps also stays dark

  • Peel & shade

    None

  • Cut through

    Both curved eye rings around the pupils, arched eyebrow slits, six forehead wrinkle holes, the triangle nose, the full sweeping mouth with eight teeth gaps, and all six cheek diamonds glow at full brightness

Learn the carving basics

Before you start cutting

How wide should the pupil tabs be to survive the surrounding cuts?

Each pupil tab should span at least a third of the total eye width at its attachment point and be no narrower than half an inch. A broader connection point is always safer. If the eye opening is small, simplify the pupil to a solid central oval shape rather than a tab that risks snapping when the adjacent wrinkle holes are cut.

The wrinkle holes are very close together. How do I prevent them from merging?

Keep a minimum of three-quarters of an inch of rind between any two adjacent slits. If your sketch shows them tighter than that, reduce the count to four wrinkle holes rather than six and spread them slightly wider. The expression still reads as wrinkled with fewer holes as long as the arched eyebrows are present.

Should I cut the cheek diamonds before or after the mouth?

Cut the cheek diamonds after the mouth is complete. The mouth is the largest and most structurally significant opening, and cutting it first lets you see the full face expression before placing the cheek diamonds in relation to the smile. A diamond positioned just above the corner of the smile reads most naturally as a cheekbone accent.

Your take belongs here, too.

Changed a detail? Made it simpler? Share a photo of your version and tell the community what worked.

Share your pumpkin

More pumpkins like this

You've reached the end · 8 pumpkins
The Patch Report

Fresh pumpkins, in your inbox.

The best new carvings, ideas worth stealing, and how-tos for carving season. Short, seasonal, and gone by November.

A short email during carving season. Unsubscribe anytime. See our privacy policy.