Halloween Pumpkin Carving Contest · Starts October 1st · $500 in prizes
← Back to ideas
@ai_concepts
Jul 17, 2026
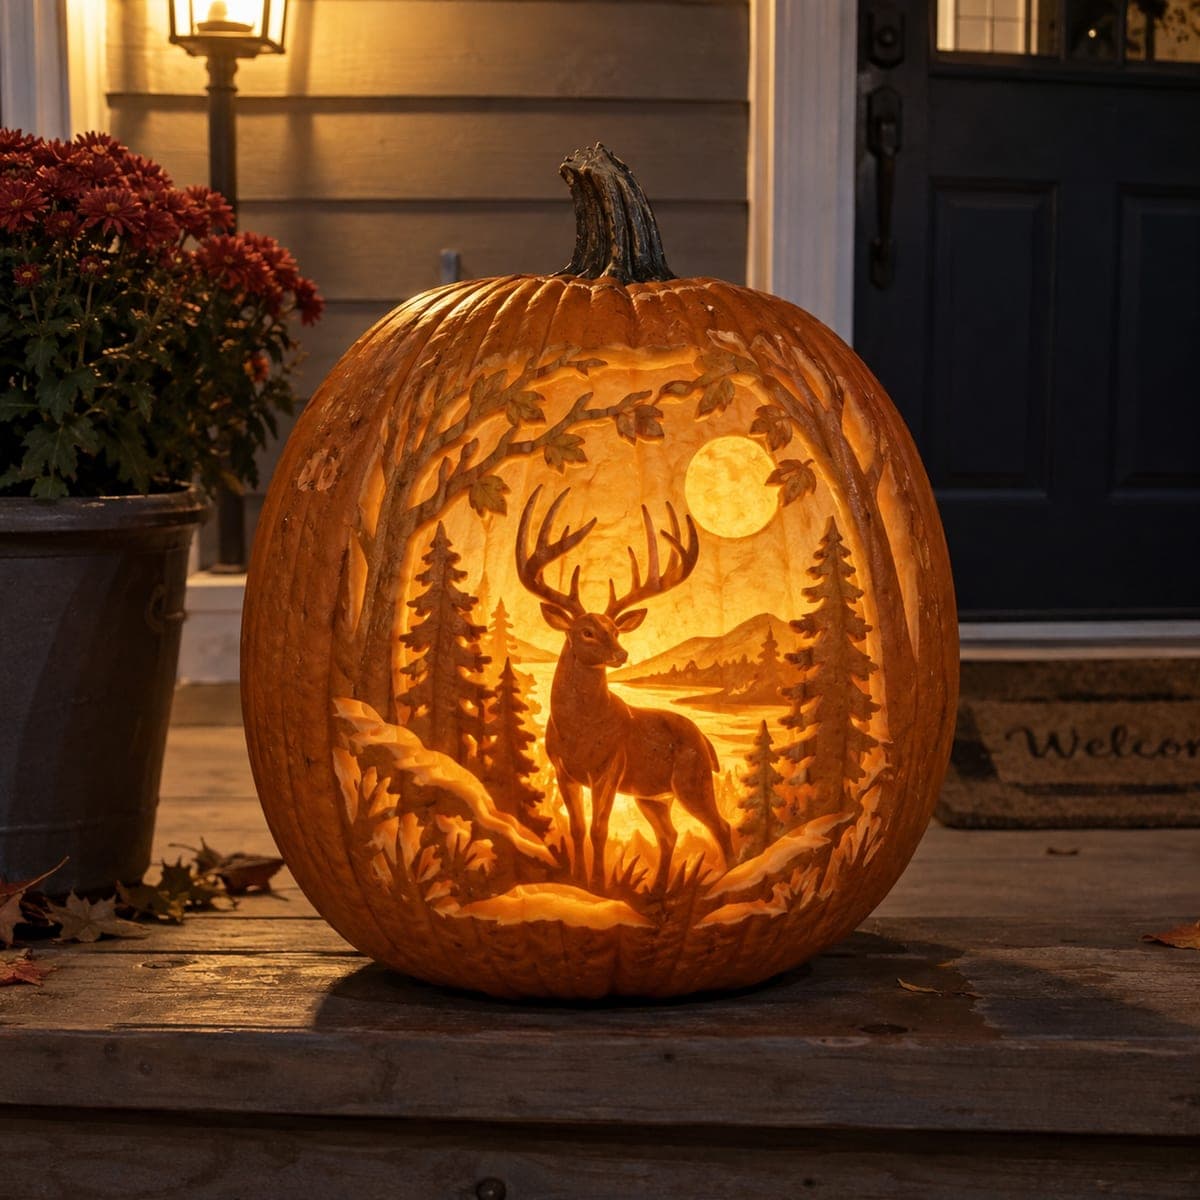
Moonlit Buck Forest Scene Pumpkin CarvingAI
0

Moonlit Buck Forest Scene Pumpkin Carving

Under a carved full moon, a proud buck stands in a glowing forest clearing framed by pines, mountains, and an arch of autumn leaves. This panoramic pumpkin carving mixes depths masterfully: the moon and sky are shaved thinnest for the brightest glow, while the deer and foreground brush keep more flesh for silhouette-like contrast. Carve from the center outward and leave the leafy border for last. Use a bright warm LED, since a real candle cannot fill a scene this large evenly.

This is an AI-generated concept image: a realistic, carvable design idea rather than a photo of a finished carve. AI concepts are always labeled and sit out the leaderboard and the contest.

No ratings yet · Sign in to rate
Comments (0)

  • No comments yet — be the first.

Save without an account. Sign in to like or comment.

Our tips for carving a similar design

This is a relief scene where depth does all the work. The core trick is layering three surface treatments so the moon and sky read brightest, the deer and pines stay dark and crisp, and everything in between glows at a middle tone. Work from the center of the picture outward and save the delicate leaf arch for last so the shell stays strong while you carve the fine detail.

Written by PumpkinCarvingIdeas.com, inspired by the image above. These are our suggestions, not instructions from the uploader. This approach to the AI concept has not been tested on a real pumpkin.

From pumpkin to porch

  1. Plan and transfer the scene

    Since this is a concept image, choose a real pumpkin that is tall and fairly flat on the front to hold the wide panorama. Cut a lid or a large plug from the bottom so you can clean and light it easily, and scrape the inside of the carving wall down to about one inch. Tape your buck and forest stencil to the smoothest side, then poke or trace the main outlines so you know where the deer, moon, pines, and leaf border sit before any blade touches the skin.

  2. Rough in the moon and sky first

    Start with the brightest area so you have room to adjust as you learn the pumpkin. Use a ribbon or loop tool to shave the sky and the circular moon down to the thinnest layer that still holds together, testing with a light behind it. Keep the moon a hair thicker than the surrounding sky so it reads as a soft disc rather than a hole. Blend the edges gradually so the glow fades naturally toward the trees.

  3. Shade the mid ground and mountains

    Move to the distant mountains, the lake, and the open clearing behind the deer. Peel only the skin off these areas to reach a medium orange glow, going lighter as shapes recede into the distance. Vary your pressure to suggest ridgelines and the shimmer on the water. This middle layer is what separates the dark deer from the bright sky, so keep it clearly lighter than the silhouettes but never as thin as the moon.

  4. Carve the buck and pines as silhouettes

    The deer, the foreground pines, and the brush stay mostly untouched skin so they read as strong dark shapes against the glow. Lightly peel just a few highlights on the buck's back and flank to give it form, but leave the legs, chest, and antlers as solid silhouette. Keep antler tines and pine tips connected to surrounding flesh with small bridges so nothing snaps off. Cut nothing all the way through here, contrast comes from the dark skin against the bright sky behind.

  5. Add the leaf arch and finishing cutouts

    Now that the scene is stable, carve the arch of autumn leaves and any small full cutout accents such as gaps of open sky between branches. Do these last because open cuts weaken the shell. Peel the leaves to a mid glow and reserve true cutouts for a few tiny sky gaps to add sparkle. Clean up every edge with a detail knife so lines stay sharp.

  6. Light it and photograph

    Skip candles, a scene this wide needs even, bright light. Place one or two warm white LED lights inside, positioned low and toward the front so the glow spreads across the whole panel. Rub cut edges with petroleum jelly to slow drying and keep the shading crisp. Shoot at dusk on a porch step so the warm interior light contrasts with the cool evening for the best photo.

Gather your supplies

Check things off as you get ready.

Work on a stable surface, keep your free hand out of the cutting path, and have an adult handle sharp tools.

Three levels of light

  • Leave intact

    The buck's body and legs, foreground pines, and brush stay as untouched dark skin for crisp silhouettes.

  • Peel & shade

    The mountains, lake, clearing, and leaf border are skin-peeled to a mid orange glow, lighter as they recede.

  • Cut through

    The moon and sky are shaved to the thinnest translucent layer, with a few tiny sky gaps cut fully through for sparkle.

Learn the carving basics

Before you start cutting

How do I keep the antlers and pine tips from breaking?

Do not cut around them as free-standing pieces. Since they stay as dark silhouette against a shaved-thin sky, they remain part of the solid pumpkin wall. Where a tine or tip nearly separates a bright area, leave a small bridge of skin to hold it, and save any true cutouts near them for the very end.

Why not just use a candle for that warm glow?

A single candle sits low and lights unevenly, so a wide scene like this would go bright in the middle and dark at the edges. One or two warm white LEDs spread the light across the whole panel and let the thin moon read evenly. LEDs are also safer and will not scorch the thin shaved areas.

What is the hardest part to get right?

The mid-tone shading is what makes the scene work. If the mountains and clearing are too dark, the buck disappears, and if they are too thin, you lose the silhouette contrast. Test constantly with a light inside and step back a few feet to check that the three tones stay clearly separated.

Your take belongs here, too.

Changed a detail? Made it simpler? Share a photo of your version and tell the community what worked.

Share your pumpkin

More pumpkins like this

You've reached the end · 8 pumpkins
The Patch Report

Fresh pumpkins, in your inbox.

The best new carvings, ideas worth stealing, and how-tos for carving season. Short, seasonal, and gone by November.

A short email during carving season. Unsubscribe anytime. See our privacy policy.