Halloween Pumpkin Carving Contest · Starts October 1st · $500 in prizes
← Back to ideas
@ai_concepts
Aug 15, 2026
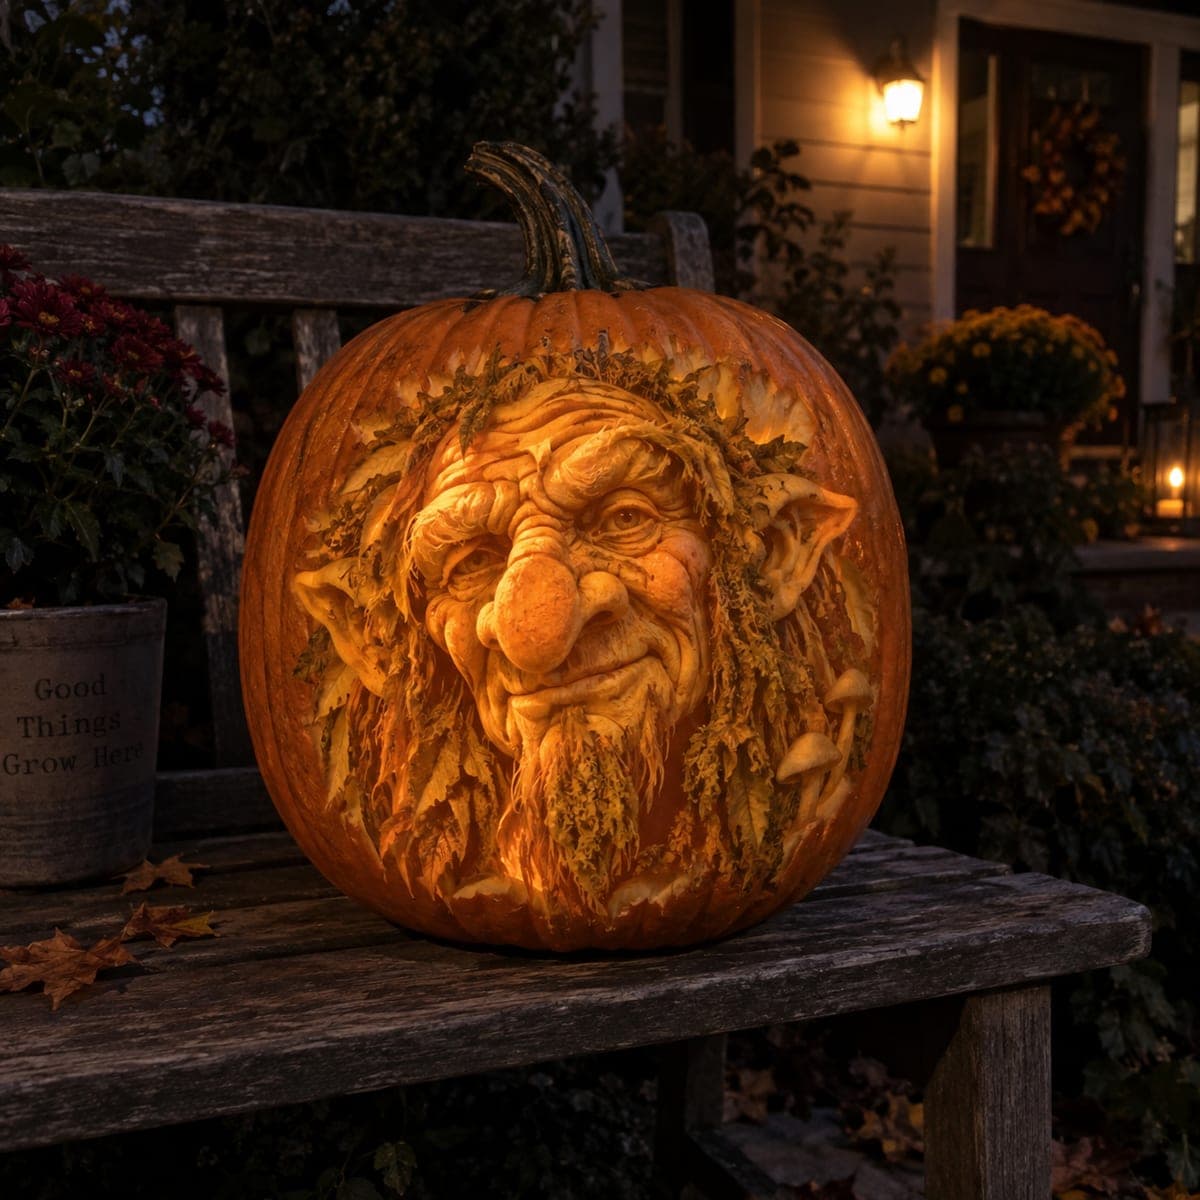
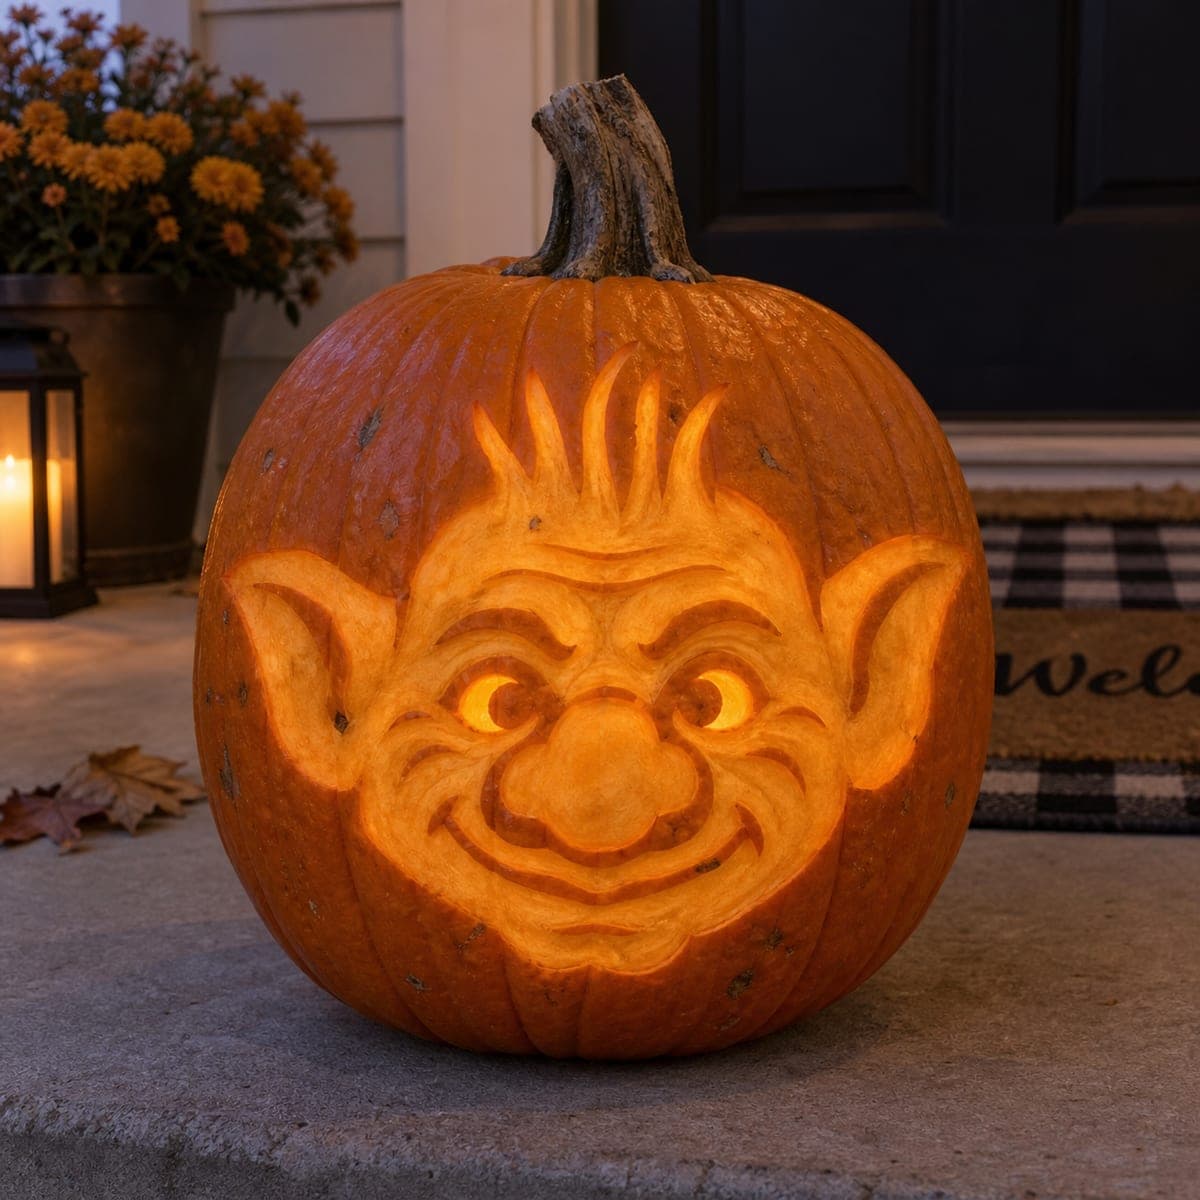
Mossy Forest Troll Face Pumpkin SculptureAI
0

Mossy Forest Troll Face Pumpkin Sculpture

Moss, ivy, and tangled beard-vines frame this smiling forest troll face, sculpted so deeply that his hooked nose and pointed ears stand clear of the pumpkin wall. Dried plants pressed into the carved hair add texture, an easy trick that also hides tool marks. Sculpt the nose and brow first to anchor the face, then let the foliage flow outward however the pumpkin's curves suggest.

This is an AI-generated concept image: a realistic, carvable design idea rather than a photo of a finished carve. AI concepts are always labeled and sit out the leaderboard and the contest.

No ratings yet · Sign in to rate
Comments (0)

  • No comments yet — be the first.

Save without an account. Sign in to like or comment.

Our tips for carving a similar design

The core trick here is relief sculpting, shaving the pumpkin wall to different depths so the nose, brow, and pointed ears push out into real three dimensional form while the beard and hair recede. Since no real pumpkin exists in this concept image, plan for a thick walled pumpkin and think like a clay sculptor, removing skin and flesh rather than punching holes. Real dried plants pressed into the carved hair add texture and conveniently hide tool marks.

Written by PumpkinCarvingIdeas.com, inspired by the image above. These are our suggestions, not instructions from the uploader. This approach to the AI concept has not been tested on a real pumpkin.

From pumpkin to porch

  1. Pick a thick pumpkin and gut it well

    Choose a large pumpkin with a smooth, dense wall since sculpting eats into the flesh. Cut a lid from the bottom rather than the top so the carved face stays intact and the pumpkin sits flat. Scrape the inside wall behind the face down to about one inch thick so light can glow through the thin areas later. Keep the stem area untouched to preserve the natural twist shown at the top.

  2. Transfer and rough in the face

    Sketch or transfer the troll face onto the front, marking the nose, brow, cheeks, and grinning mouth. Using a loop or ribbon tool, shave away skin around the nose and brow first to make those features stand proud, exactly the anchor the caption suggests. Work slowly and remove thin layers, since you can always take more off but cannot put flesh back. An adult should handle all sharp and looped tools.

  3. Sculpt the deep features

    Deepen the eye sockets, nostril shadows, and the creases beside the smile using smaller detail loops. Round the hooked nose and shape the pointed ears so they read as separate forms, but leave enough flesh at their base so they stay firmly attached and do not snap. Vary your depth constantly, deeper cuts read darker in shadow and shallower shaved areas catch light. Take breaks to step back and check the face from a few feet away.

  4. Shade the skin for glow

    For the cheeks, forehead, and nose tip, peel only the outer skin to expose the flesh, which will glow a soft dim orange when lit. Leave patches of skin intact in the deepest wrinkles and eye hollows so they stay dark and give the face depth. This shading contrast is what makes the expression feel alive. Smooth these peeled zones with the back of a spoon for an even surface.

  5. Carve the flowing beard and hair

    Around the face, cut narrow tapering channels that flow outward like tangled beard vines and mossy hair. Keep thin strands connected with small bridges of skin so nothing crumbles, and save the widest, deepest cutouts near the beard tips for last. These full cutouts are where the most light escapes, framing the face in a warm halo. Let the pumpkin's natural curves guide where the strands wander.

  6. Add foliage and light it

    Press dried leaves, bits of preserved moss, and thin ivy into the carved hair channels to build real texture and cover any tool marks. Set a warm LED light or two inside, never a candle, so the thin peeled zones and cutouts glow evenly. Mist the pumpkin and refrigerate it overnight when not on display to slow shrinking. Photograph it at dusk on a porch or bench for the storybook mood.

Gather your supplies

Check things off as you get ready.

Work on a stable surface, keep your free hand out of the cutting path, and have an adult handle sharp tools.

Three levels of light

  • Leave intact

    Deep eye hollows, nostril shadows, and the creases of the smile stay as untouched skin for dark depth.

  • Peel & shade

    Cheeks, forehead, and the hooked nose are skin-peeled to glow a soft dim orange.

  • Cut through

    The beard tips and outer hair strands are cut through for the brightest framing light.

Learn the carving basics

Before you start cutting

How do I keep the nose and ears from breaking off?

Sculpt them as raised relief rather than fully freestanding pieces, leaving a solid base of flesh where each connects to the pumpkin wall. Round the forms by shaving flesh around them instead of undercutting deeply. If a spot feels fragile, stop removing material there and rely on shading to suggest the shape.

What foliage works best pressed into the beard?

Dried autumn leaves, preserved sheet moss, and thin dried ivy or grass all press well into carved channels. Use dried material rather than fresh so it does not add moisture and speed up rot. Tuck the stems into the deepest cuts so they hold without glue, and add a few bits after lighting to check the look.

How long will a sculpted pumpkin like this last?

Deep sculpting exposes a lot of flesh, so expect two to four days before noticeable shrinking. Mist it and store it in a cool spot or refrigerator overnight to slow drying. A light coat of petroleum jelly on the peeled areas also helps seal in moisture.

Your take belongs here, too.

Changed a detail? Made it simpler? Share a photo of your version and tell the community what worked.

Share your pumpkin

More pumpkins like this

You've reached the end · 8 pumpkins
The Patch Report

Fresh pumpkins, in your inbox.

The best new carvings, ideas worth stealing, and how-tos for carving season. Short, seasonal, and gone by November.

A short email during carving season. Unsubscribe anytime. See our privacy policy.