Halloween Pumpkin Carving Contest Β· Starts October 1st Β· $500 in prizes
← Back to ideas
@ai_concepts
Aug 4, 2026
Ninja Face Jack-O-Lantern With Knotted HeadbandAI
0

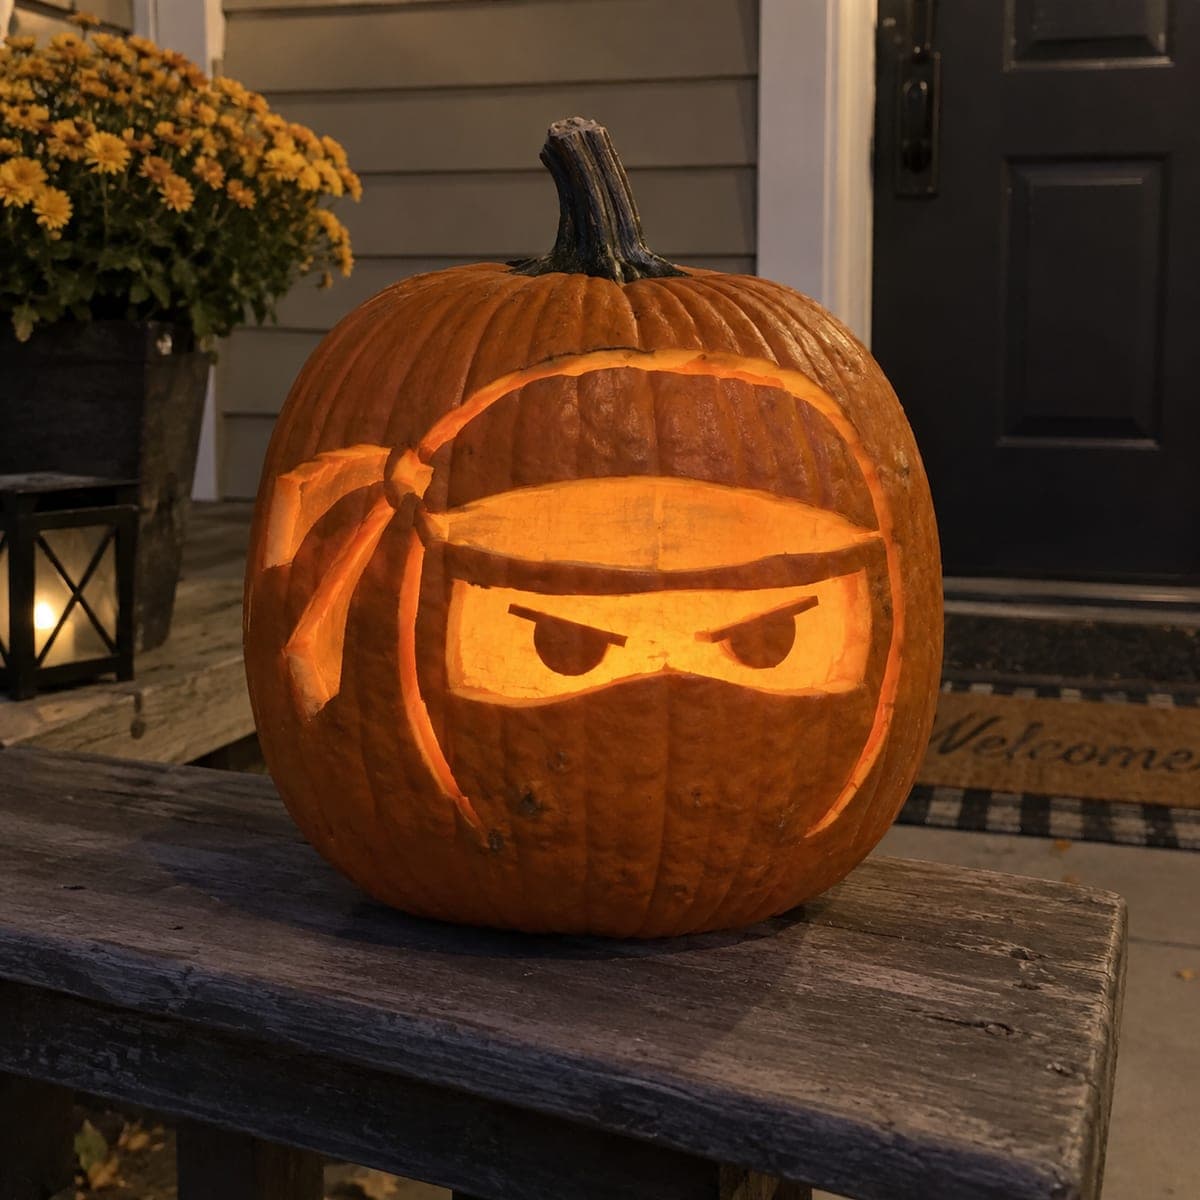
Ninja Face Jack-O-Lantern With Knotted Headband

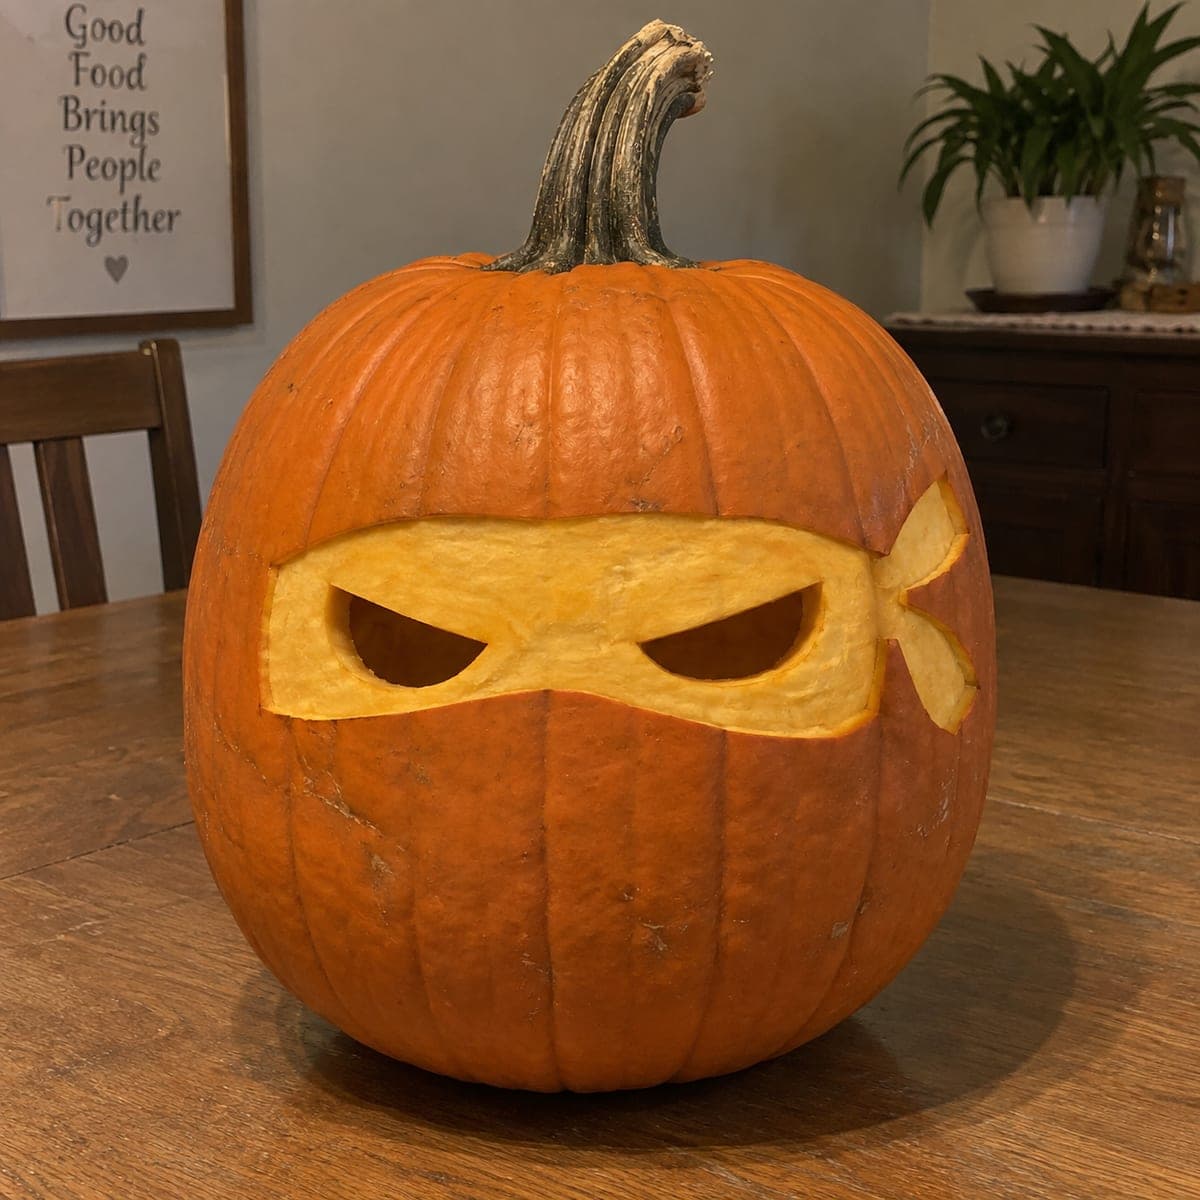
A masked ninja scowls from this jack-o-lantern, with angry angled eyes glowing through an etched headband that knots and trails off to the side. Only the face opening and eye area are carved through; the mask, knot, and tails are shallow skin peels, which keeps the design sturdy enough for repeated candle nights. Great for a kid who has outgrown triangle eyes, and the straight-edged shapes forgive wobbly beginner knife work.

This is an AI-generated concept image: a realistic, carvable design idea rather than a photo of a finished carve. AI concepts are always labeled and sit out the leaderboard and the contest.

No ratings yet Β· Sign in to rate

Comments (0)

  • No comments yet β€” be the first.

Save without an account. Sign in to like or comment.

Our tips for carving a similar design

The whole trick here is contrast: the glowing eyes and the open mask slit are cut all the way through, while the headband, knot, and trailing tails are only shallow skin peels. That layering makes a sturdy design because you keep most of the shell intact and only open two clean shapes. Plan your straight edges first, since the mask relies on hard lines rather than fussy curves.

Written by PumpkinCarvingIdeas.com, inspired by the image above. These are our suggestions, not instructions from the uploader. This approach to the AI concept has not been tested on a real pumpkin.

From pumpkin to porch

  1. Prep and transfer the pattern

    Since this is an AI concept, you are recreating the look on a real pumpkin of your own. Pick a tall, smooth pumpkin and cut a lid or a back door with an adult handling the knife. Scoop the inside until the front wall is about one inch thick so peels glow evenly. Tape your printed ninja pattern flat and poke the outlines with a pin, or trace them lightly with a marker.

  2. Score every outline before removing anything

    With a small detail saw or craft knife, score along all the marked lines to a shallow depth first. Do the headband band, the knot, the two tails, the mask edges, and the angry eyes. Scoring first keeps your shapes crisp and lets you see the whole face before you commit. Keep the eyebrows and the bridge between the eyes as attached bridges so the mask does not collapse into one big hole.

  3. Peel the headband, knot, and tails

    Use a shallow gouge or ribbon tool to scrape away only the orange skin on the headband, the knot in the corner, and the trailing tails. Go about an eighth of an inch deep so the flesh glows soft orange without cutting through. Keep the pressure light and even for a smooth, matte surface. Leave the raised knot lines uncarved so they read as folds in the fabric.

  4. Peel the mask surface

    Skin-peel the wide mask area that covers the lower face the same shallow way. This dim glow separates the mask from the untouched dark pumpkin around it and frames the eyes. Keep your peel edges following your scored lines so the mask stays a clean, straight-sided shape. Do not cut through here; the mask needs to stay solid.

  5. Cut through the eyes and the mask slit last

    Now make your full cutouts. Carve the two angled eyes with their sharp brow line, leaving the small nose bridge intact between them for strength. Then open the narrow horizontal slit above the mask. Cut big openings last so the shell stays rigid while you work, and gently push each piece out from the inside.

  6. Light it and photograph

    Set a battery LED puck or string inside rather than a candle, which keeps the peels safe over repeated nights. Warm white light gives that orange nighttime glow. Set the pumpkin at eye level on a porch step and shoot in the dark with a steady phone. Wipe the cut edges and add a smear of petroleum jelly to slow drying.

Gather your supplies

Check things off as you get ready.

Work on a stable surface, keep your free hand out of the cutting path, and have an adult handle sharp tools.

Three levels of light

  • Leave intact

    The outer pumpkin skin around the head and above the headband stays untouched and dark.

  • Peel & shade

    The headband, the knot and its tails, and the mask covering the lower face are shallow peels for a dim orange glow.

  • Cut through

    The two angled angry eyes and the narrow mask slit are cut through for the brightest light.

Learn the carving basics

Before you start cutting

How do I keep the eyes looking angry and not silly?

The scowl comes from the sharp downward angle where the brows meet the top of each eye. Cut that brow line as a crisp straight edge and keep both eyes matched in angle. Leaving the small bridge of skin between the eyes also holds the shape and reads as the nose.

Can I really light this with a candle like the caption suggests?

We recommend a battery LED instead of an open flame. The shallow peels are thin and a candle adds heat and scorching that shortens the pumpkin's life. An LED puck gives the same warm glow and is safe for repeated nights on a porch.

What if my knot and tails look messy?

Keep them as simple shallow peels and do not try to cut them through. A few clean scored fold lines in the knot sell the fabric look better than deep detail. Straight, confident tail lines are more forgiving than curvy ones, which is why this design suits beginners moving past triangle eyes.

Your take belongs here, too.

Changed a detail? Made it simpler? Share a photo of your version and tell the community what worked.

Share your pumpkin

More pumpkins like this

You've reached the end Β· 8 pumpkins
The Patch Report

Fresh pumpkins, in your inbox.

The best new carvings, ideas worth stealing, and how-tos for carving season. Short, seasonal, and gone by November.

A short email during carving season. Unsubscribe anytime. See our privacy policy.