Halloween Pumpkin Carving Contest · Starts October 1st · $500 in prizes
← Back to ideas
@ai_concepts
Jul 24, 2026
Painted Viking Face No-Carve PumpkinAI
0

Painted Viking Face No-Carve Pumpkin

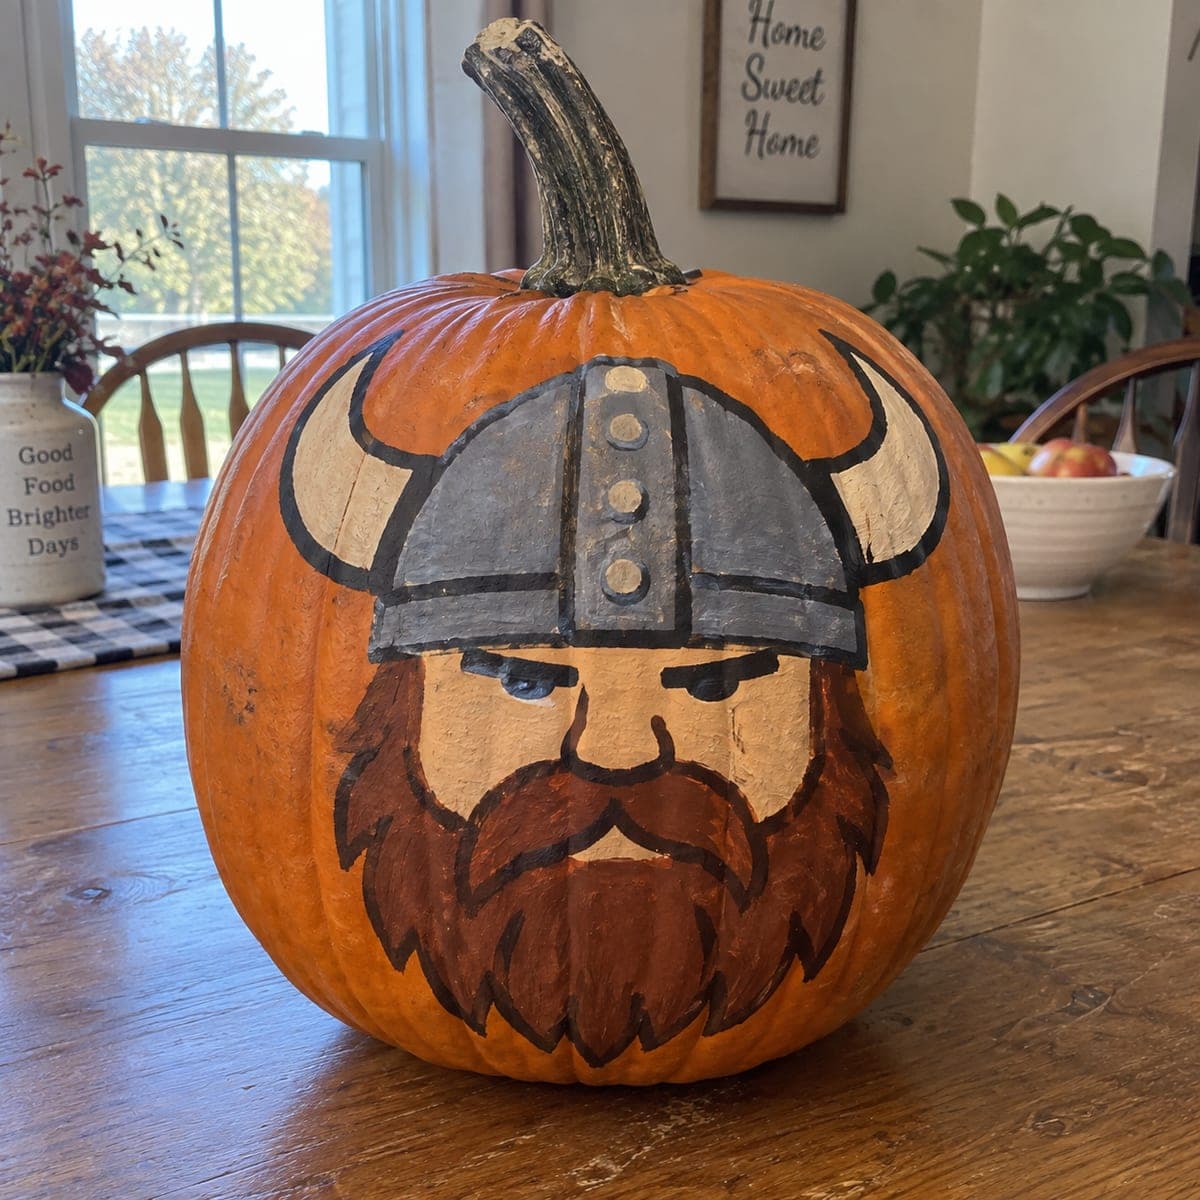
A cartoon Viking warrior with a grey horned helmet, dark blue eyes, and a red-brown beard is painted directly on an orange pumpkin in a bold, graphic style with thick black outlines. This no-carve pumpkin idea works great for sports fans whose team uses a Viking mascot. Use black acrylic to outline all shapes first so color fills stay clean, then layer in the grey, brown, and skin tones. With no cutting involved, it is an accessible family craft that holds its color for weeks indoors.

This is an AI-generated concept image: a realistic, carvable design idea rather than a photo of a finished carve. AI concepts are always labeled and sit out the leaderboard and the contest.

No ratings yet · Sign in to rate

Comments (0)

  • No comments yet — be the first.

Save without an account. Sign in to like or comment.

Our tips for carving a similar design

The core trick here is a strong black outline that locks in every shape before any color goes down, so the grey helmet, blue eyes, and red-brown beard stay crisp and cartoon-like. Since nothing is cut, the whole pumpkin stays intact and lasts for weeks indoors. Plan your layout in pencil first, ink the outlines, then fill from the lightest tones to the darkest.

Written by PumpkinCarvingIdeas.com, inspired by the image above. These are our suggestions, not instructions from the uploader. This approach to the AI concept has not been tested on a real pumpkin.

From pumpkin to porch

  1. Pick and prep the pumpkin

    Choose a tall, round pumpkin with a smooth, pale-orange front panel and few blemishes so the paint reads clearly. Wipe the surface with a damp cloth and let it dry fully. Set it on a towel so it does not roll while you work. A flatter face area gives you the best canvas for the graphic style.

  2. Sketch the layout in pencil

    Lightly draw the horned helmet across the top, the two horns curving out to the sides, then the eyes, nose, and the wide beard filling the lower half. Keep the face centered and leave the skin-tone strip for the cheeks and forehead. Step back often to check symmetry. Pencil wipes off with a damp finger if you need to adjust.

  3. Ink all the black outlines first

    Using black acrylic and a small round brush, trace every shape: helmet edge, rivets, horns, eyebrows, eyes, nose, and the scalloped beard line. Let this dry completely before adding color so the fills stay clean and do not smear into the black. Thick, confident lines give the cartoon look its punch. A steady hand and a paper towel to fix slips will keep things neat.

  4. Fill the large color blocks

    Paint the helmet grey, the horns and cheeks a pale cream skin tone, and the beard a warm red-brown. Work light colors first, then darker ones, and stay just inside your black lines. Two thin coats cover better than one thick one and dry faster. Let each color set before painting a neighboring shape so edges do not bleed.

  5. Add shading and small details

    Mix a touch of darker grey for shadow under the helmet brim and a deeper brown for beard strands to add depth. Fill the eyes dark blue and add tiny cream dots as rivets on the helmet. Keep details simple so the design stays bold from across the room. Touch up any outline that got covered.

  6. Seal and stage the final look

    Once fully dry, brush on a clear acrylic sealer to protect the color, then display on a table or porch. Set a small battery LED puck behind or beside it for an evening glow, since there is nothing carved to light from inside. Snap your photo in soft daylight to show off the crisp outlines. Keep it indoors or sheltered so the paint lasts for weeks.

Gather your supplies

Check things off as you get ready.

Work on a stable surface, keep your free hand out of the cutting path, and have an adult handle sharp tools.

Three levels of light

  • Leave intact

    The full orange pumpkin skin stays untouched and dark; all the character comes from paint, not cutouts.

  • Peel & shade

    For a subtle glow you could lightly peel the skin under the cream cheek areas so they read brighter without cutting through.

  • Cut through

    Optional only: a small vent hole in the back lets an LED spill light around the pumpkin, since the painted front has no openings.

Learn the carving basics

Before you start cutting

Do I need to carve anything for this design?

No, this is a fully painted, no-carve pumpkin. The Viking face is built entirely from acrylic paint, which makes it a safe family project with no knives. If you want an evening glow, set a battery LED beside it or cut one small vent in the back.

How do I keep the black outlines from smearing into the colors?

Paint and fully dry all the black outlines before adding any color. Acrylic dries fast, so give it fifteen to twenty minutes. Then fill each color block staying just inside the lines, and let neighboring shapes dry before painting next to them.

Will the paint last, and can I put it outside?

Sealed with a clear acrylic coat, the paint holds its color for several weeks indoors. Outdoors it will last if kept under a covered porch away from rain and direct sun. A real pumpkin still softens over time, so cooler spots help it last longer.

Your take belongs here, too.

Changed a detail? Made it simpler? Share a photo of your version and tell the community what worked.

Share your pumpkin

More pumpkins like this

You've reached the end · 8 pumpkins
The Patch Report

Fresh pumpkins, in your inbox.

The best new carvings, ideas worth stealing, and how-tos for carving season. Short, seasonal, and gone by November.

A short email during carving season. Unsubscribe anytime. See our privacy policy.