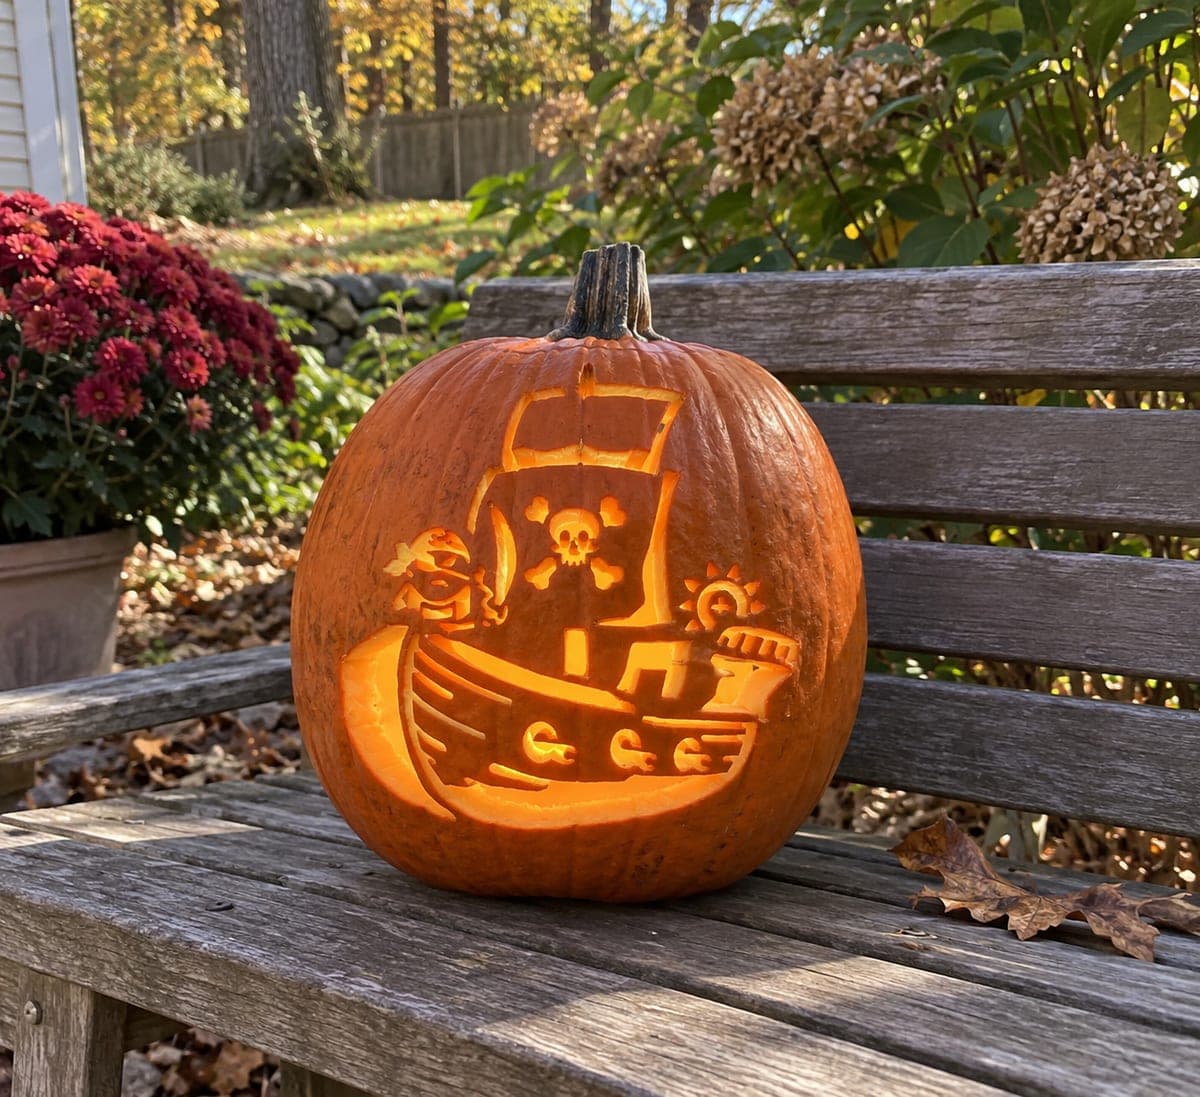
A cartoon pirate ship with a rounded hull, porthole row, and a large sail bearing a skull-and-crossbones motif fills the pumpkin face with a cheerful Halloween scene. This cutout jack-o-lantern pumpkin carving idea has several isolated elements like the portholes and the skull that require tiny bridges to keep them from dropping out. Carve the skull on the sail first while the wall is rigid, leaving the crossbones attached to the sail outline, then open the hull portholes and water line below.
This is an AI-generated concept image: a realistic, carvable design idea rather than a photo of a finished carve. AI concepts are always labeled and sit out the leaderboard and the contest.
The core trick here is holding several isolated shapes in place, the skull, the portholes, and the sail edges, with tiny bridges of skin so nothing drops out once the wall opens up. Work from the rigid top down, carving the skull on the sail first, then the hull details, and save the big water line opening for last so the face stays strong while you cut. Because this is a concept image, treat it as a plan for a real pumpkin and keep every thin bar wide enough to survive.
Written by PumpkinCarvingIdeas.com, inspired by the image above. These are our suggestions, not instructions from the uploader. This approach to the AI concept has not been tested on a real pumpkin.
From pumpkin to porch
1
Prep and transfer the design
Pick a large pumpkin with a broad, fairly flat front so the whole ship fits. Cut a lid from the bottom or the back rather than the top, which keeps the stem intact and makes it easy to seat an LED. Scrape the inside wall behind the design down to about one inch so your tools push through cleanly. Tape the stencil on smoothly and poke the outlines with a transfer tool or pin.
2
Carve the skull and crossbones first
Start high on the sail while the wall is still rigid and unbroken. Cut the skull's eyes, nose, and grin as small full openings, then outline the crossbones but leave short skin bridges where they meet the sail edge so the whole motif stays anchored. Take your time with the little shapes and let the saw do the work instead of forcing it. Keeping this area first means the pumpkin is at its strongest for the finest cuts.
3
Open the sail and mast lines
Cut the tall sail panel around the skull, leaving narrow uncut bars top and bottom so the sail does not sag into one hole. Carve the mast and any rigging lines as thin slots rather than wide gaps. Check that each remaining bridge is at least a quarter inch wide, and widen any that look fragile. Step back often to make sure the sail still reads as one shape.
4
Cut the hull, portholes, and sun
Move down to the rounded hull and carve the row of round portholes, keeping the skin between them intact so they float in a solid band. Add the little sun and its curl on the right the same way, as separate clean openings. The deck rails and cabin can be short cut lines that let light leak through. Work side to side so you are not resting your hand on freshly cut, weakened areas.
5
Open the water line last
Save the large opening below the hull, the bright water arc, for the very end when all the small work is done. This is the biggest single cut, so support the flap with your free hand as it releases. Clean up every edge with a detail blade, angling cuts slightly outward to let more light escape. Bevel the back of the tiny openings so they glow more evenly.
6
Light it and photograph
Drop in a battery LED, warm white or amber, and set it low so light climbs up through the water and hull. Blot the cut edges dry and rub them with a little petroleum jelly to slow browning. Shoot the pumpkin outdoors near dusk, like the bench setting shown, so the carving glows against the fading light. A second small light behind the sail can make the skull pop.
Gather your supplies
Check things off as you get ready.
Work on a stable surface, keep your free hand out of the cutting path, and have an adult handle sharp tools.
Three levels of light
Leave intact
The pumpkin skin around the ship and between the portholes stays untouched and dark.
Peel & shade
The hull planks and sail folds can be shallow skin-peels for a soft mid glow.
Cut through
The skull, portholes, sun, and the water line below the hull are full cutouts for the brightest light.
Carve them as separate round holes and never connect them to each other or to the water line below. Leave a solid band of skin between each porthole and the hull edge. If a section feels loose, stop widening and leave a little extra pumpkin in place.
Why carve the skull before opening the hull?
The skull sits on the sail, which is the most detailed area, and it needs a rigid wall behind it for clean, precise cuts. Once you open the large water line at the bottom the whole face flexes and fine work gets harder. Doing the delicate shapes first, while everything is strong, gives you the best results.
Should the crossbones be fully cut out?
Cut the bone shapes as openings but leave short bridges of skin where they touch the sail outline so the motif stays anchored. Fully freeing every bone would drop the pieces into the pumpkin. Those little bridges read as part of the cartoon and keep the design intact.
Your take belongs here, too.
Changed a detail? Made it simpler? Share a photo of your version and tell the community what worked.
 AI
AI

Comments (0)