@flickerwick
Sep 5, 2026
Porch menace
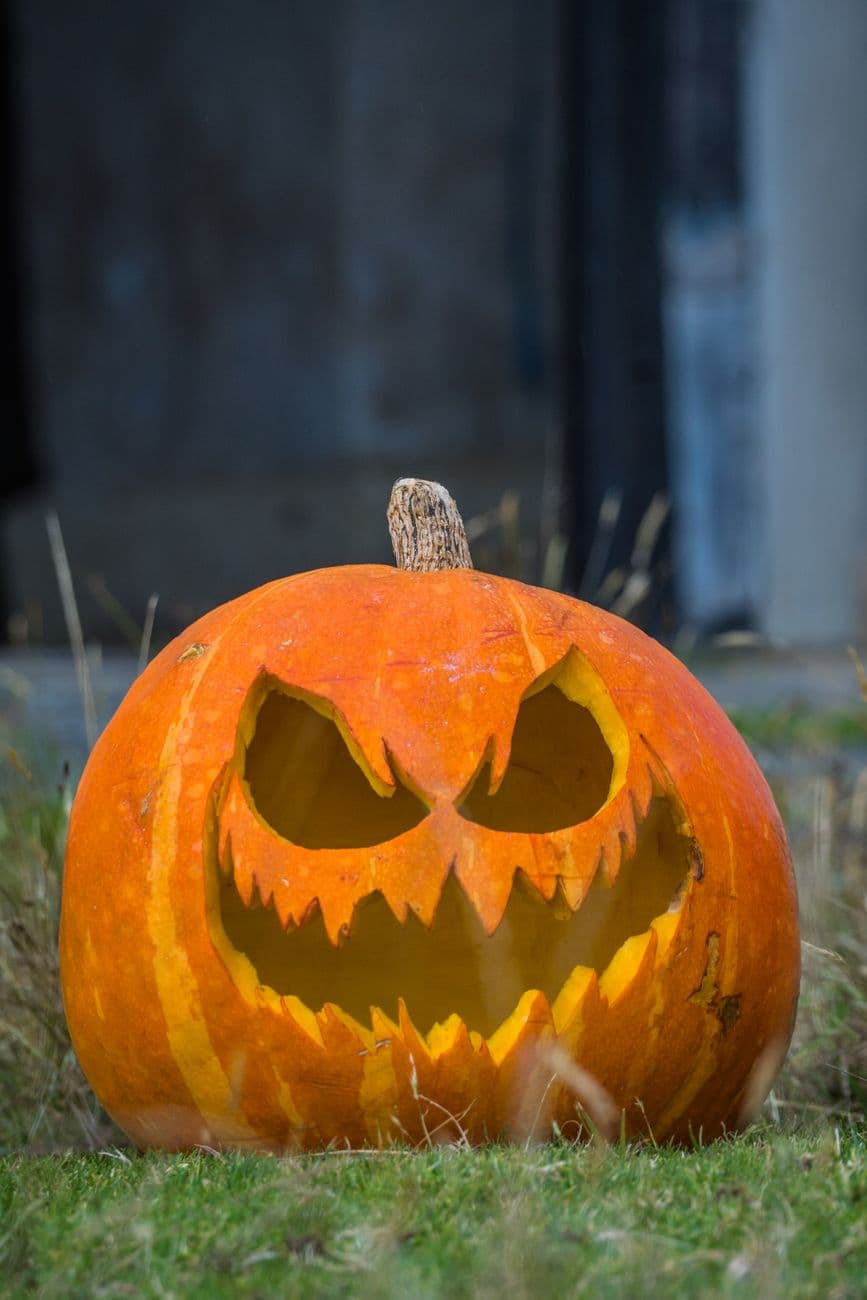
Wispy hooked eyes and a huge ragged grin with needle teeth, sitting in the grass by the front door. The torn edges sell it.
No ratings yet · Sign in to rate
Wispy hooked eyes and a huge ragged grin with needle teeth, sitting in the grass by the front door. The torn edges sell it.
The whole scare comes from clean full cutouts with ragged, torn edges rather than smooth curves. Plan the two hooked eyes and the wide grin as separate openings, keeping every zigzag tooth thick at the base so it stays attached. Cut the big mouth last so the pumpkin wall stays strong while you work the finer teeth.
Written by PumpkinCarvingIdeas.com, inspired by @flickerwick's photo above. These are our suggestions, not instructions from the uploader, and this approach hasn't been tested on their exact carve.
Choose a round, evenly colored pumpkin with a flat enough base to sit steady in grass. Cut a lid from the bottom or the back instead of the top so the stem stays as a handsome accent. Scoop the inside clean and thin the front carving wall down to about one inch. A thinner wall makes the jagged teeth much easier to cut and lets more light through.
Sketch or tape on a stencil with two slanted hooked eyes and a huge grin lined with pointed teeth. Space the eyes wide and angle their inner points down toward the nose for that mean look. Poke through the outline with a pin or transfer tool so you have dots to follow. Double check that each tooth and each hook has a solid base before you start cutting.
Use a small serrated saw to cut the two eye openings, following the hooked shape slowly. Keep the thin curved tips of the hooks a little wider than they look on paper so they do not snap. Push cut pieces out from the inside to avoid tearing the front. Take your time on the pointed corners, sawing straight in and out rather than twisting.
Cut the small nose triangle, then start defining the teeth along the top and bottom of the grin. Work each zigzag as its own clean cut so the points stay sharp. Leave the teeth attached at their wide bases and only open the gaps between them. Remove small waste pieces gently so you do not crack a neighboring tooth.
Now connect the mouth opening between the tooth rows, cutting the largest span at the very end. This keeps the pumpkin rigid while you handle the delicate work. Ease each section out and tidy the inner edges with your saw. If any tooth feels wobbly, trim its back edge to reduce weight rather than forcing it.
To sell the torn look, gently nick and angle the cut edges so they look ragged instead of crisp. Drop in a battery LED light, warm white or orange, and set the pumpkin in the grass by the door. Test it after dark and rotate it until the glow fills the eyes and grin evenly. A dab of petroleum jelly on cut edges slows drying and keeps the sharp teeth looking fresh.
Check things off as you get ready.
Work on a stable surface, keep your free hand out of the cutting path, and have an adult handle sharp tools.
The full orange face and body skin stays untouched and dark, framing the glow.
Shave a thin halo just around the eyes and grin if you want a soft dim outline before the openings.
The two hooked eyes and the ragged toothy grin are cut all the way through for the brightest light.
Keep each tooth wide where it meets the pumpkin and only taper the tip. Cut the gaps between teeth rather than the teeth themselves, and open the large mouth span last so the wall stays strong. If one feels loose, shave weight off its back instead of forcing it.
Cut it from the bottom or the back so the natural stem stays intact as a nice accent, just like in the photo. A bottom opening also lets you set the pumpkin down right over the light. Just make sure the base is still flat and stable enough to sit level in grass.
After the main openings are cut, go back and nick the edges at slight angles with your detail knife so they look torn rather than smooth. Vary the depth so no two edges match. Work slowly and keep the cuts shallow so you do not weaken the teeth.
Changed a detail? Made it simpler? Share a photo of your version and tell the community what worked.
The best new carvings, ideas worth stealing, and how-tos for carving season. Short, seasonal, and gone by November.





Comments (0)