Halloween Pumpkin Carving Contest · Starts October 1st · $500 in prizes
← Back to ideas
@ai_concepts
Sep 25, 2026
Spider Stencil Pumpkin With Eight Jointed Legs GlowingAI
0

Report this carving

Tell us what is wrong. Reports are private.

Spider Stencil Pumpkin With Eight Jointed Legs Glowing

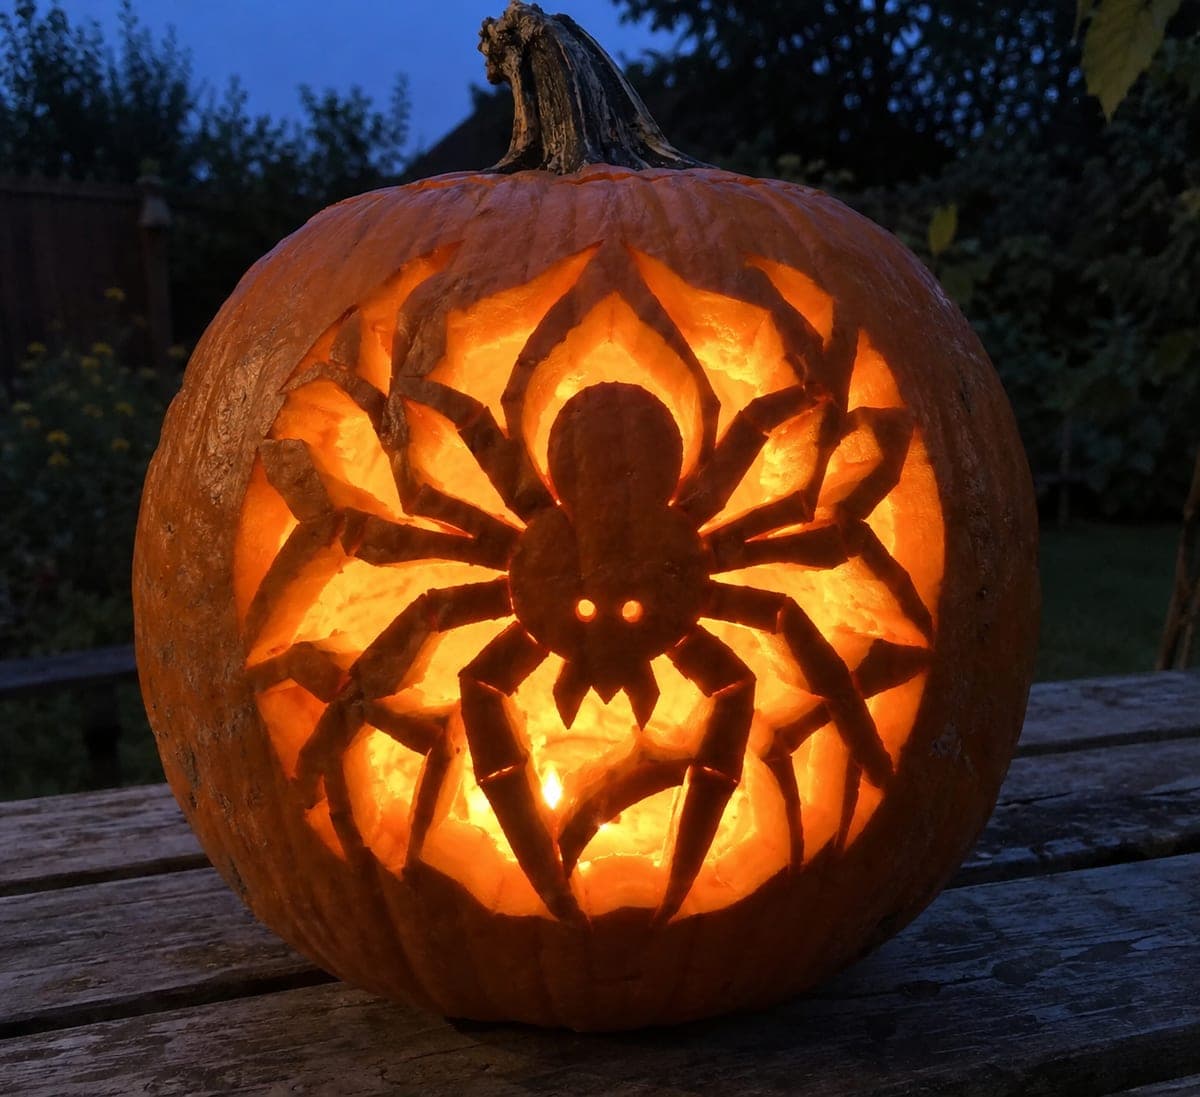
A dark round spider body connects to the outer pumpkin wall via eight broad jointed legs in this hard creepy pumpkin carving idea, with glowing irregular wedge shapes cut between the legs rather than around the spider's perimeter. Cut the background wedge holes between the legs one at a time, ensuring each leg terminates visibly into the intact outer wall so no leg is left floating. Add the two tiny eye holes through the body last, drilling rather than sawing for clean circles. Lit from within, the spider reads as a dark silhouette suspended in a field of amber light.

No ratings yet · Sign in to rate
Comments (0)

  • No comments yet — be the first.

Save without an account. Sign in to like or comment.

Our tips for carving a similar design

The key trick is that the spider is not isolated by cutting around its perimeter. Instead, the glowing effect is achieved by cutting irregular wedge-shaped holes between the legs, leaving the spider body and all eight legs as intact dark rind connected directly to the outer wall. Each leg must terminate visibly into the uncut outer border. Two tiny drilled eye holes through the body complete the face without disrupting the silhouette.

From pumpkin to porch

  1. Hollow and prepare

    Cut the lid from the base and scoop pulp until the inner wall is a consistent inch thick across the entire carving face. Because several of the wedge openings will be large, a uniform wall is important so the saw meets consistent resistance throughout.

  2. Transfer the spider layout

    Tape the template in place and trace the spider body, all eight leg positions, the wedge opening areas between the legs, and the two eye positions. When you remove the paper, mark the legs themselves as bridges that must not be cut. Each leg should connect clearly from the round body to the outer wall of the pumpkin.

  3. Cut the background wedge holes

    Begin with the largest wedge opening between two legs, cutting its outline carefully while avoiding both adjacent legs. Work around the spider, cutting one wedge at a time in order from largest to smallest. The goal is to leave the eight legs as solid intact strips of rind standing out against a background of glowing wedge holes.

  4. Verify each leg connection

    After every second wedge, confirm that each leg you have cut around still terminates visibly into the uncut outer wall on its far end. If a leg has been accidentally undercut near the outer wall, stop cutting the adjacent wedge and reinforce from inside with a small dab of glue. A leg that floats free of the outer wall will sag and eventually crack.

  5. Add the eye holes

    Use a small drill bit or a fine poker tool to pierce the center of each marked eye position through the spider body. A clean drilled hole for each eye produces sharper results than a sawed opening on this scale. The two bright pin-point eye holes through the dark body add a lot of character for minimal effort.

  6. Light and display

    Insert a battery LED and view the pumpkin in low light. The spider should read as a dark silhouette suspended in a field of amber wedge-light, with its round body and eight jointed legs clearly visible against the glowing background. Display it at doorstep height against a dark surface for maximum impact.

Written with AI to match this design

Gather your supplies

Check things off as you get ready.

Work on a stable surface, keep your free hand out of the cutting path, and have an adult handle sharp tools.

Three levels of light

  • Leave intact

    The spider body, all eight jointed legs, and the outer wall border remain as dark intact rind

  • Peel & shade

    None, only full cutouts and drilled holes are used

  • Cut through

    The irregular wedge-shaped holes between the legs and the two tiny eye holes in the body are cut or drilled completely through for full interior glow

Learn the carving basics

Before you start cutting

How do I prevent the legs from bending or drooping after the adjacent wedges are cut?

Each leg needs to be wide enough to support its own weight as a cantilevered strip of rind. Aim for at least 15 mm width along the full length of each leg. If a leg is narrower than that at any point, either widen it on the template before transferring or accept that it may need a thin internal prop made from a toothpick or skewer pressed gently from inside.

The wedge shapes between the legs look irregular. Is that okay?

Yes. The construction_notes describe them as irregular wedge holes, so a perfectly geometric arrangement is neither expected nor necessary. Organic, uneven wedge shapes actually read more naturally as the negative space around a spider than precisely uniform triangles would.

Can I add a web pattern around the spider using surface scoring rather than cutting?

Shallow skin-peeling to suggest web lines extending outward from the spider into the uncut outer rind is a nice addition and does not compromise structural integrity. Use a linoleum cutter to remove just the orange skin layer, leaving the pale inner rind exposed. Those lines will glow very softly compared to the fully cut wedge holes.

Your take belongs here, too.

Changed a detail? Made it simpler? Share a photo of your version and tell the community what worked.

Share your pumpkin

More pumpkins like this

You've reached the end · 8 pumpkins
The Patch Report

Fresh pumpkins, in your inbox.

The best new carvings, ideas worth stealing, and how-tos for carving season. Short, seasonal, and gone by November.

A short email during carving season. Unsubscribe anytime. See our privacy policy.