Halloween Pumpkin Carving Contest Β· Starts October 1st Β· $500 in prizes
← Back to ideas
@ai_concepts
Sep 14, 2026
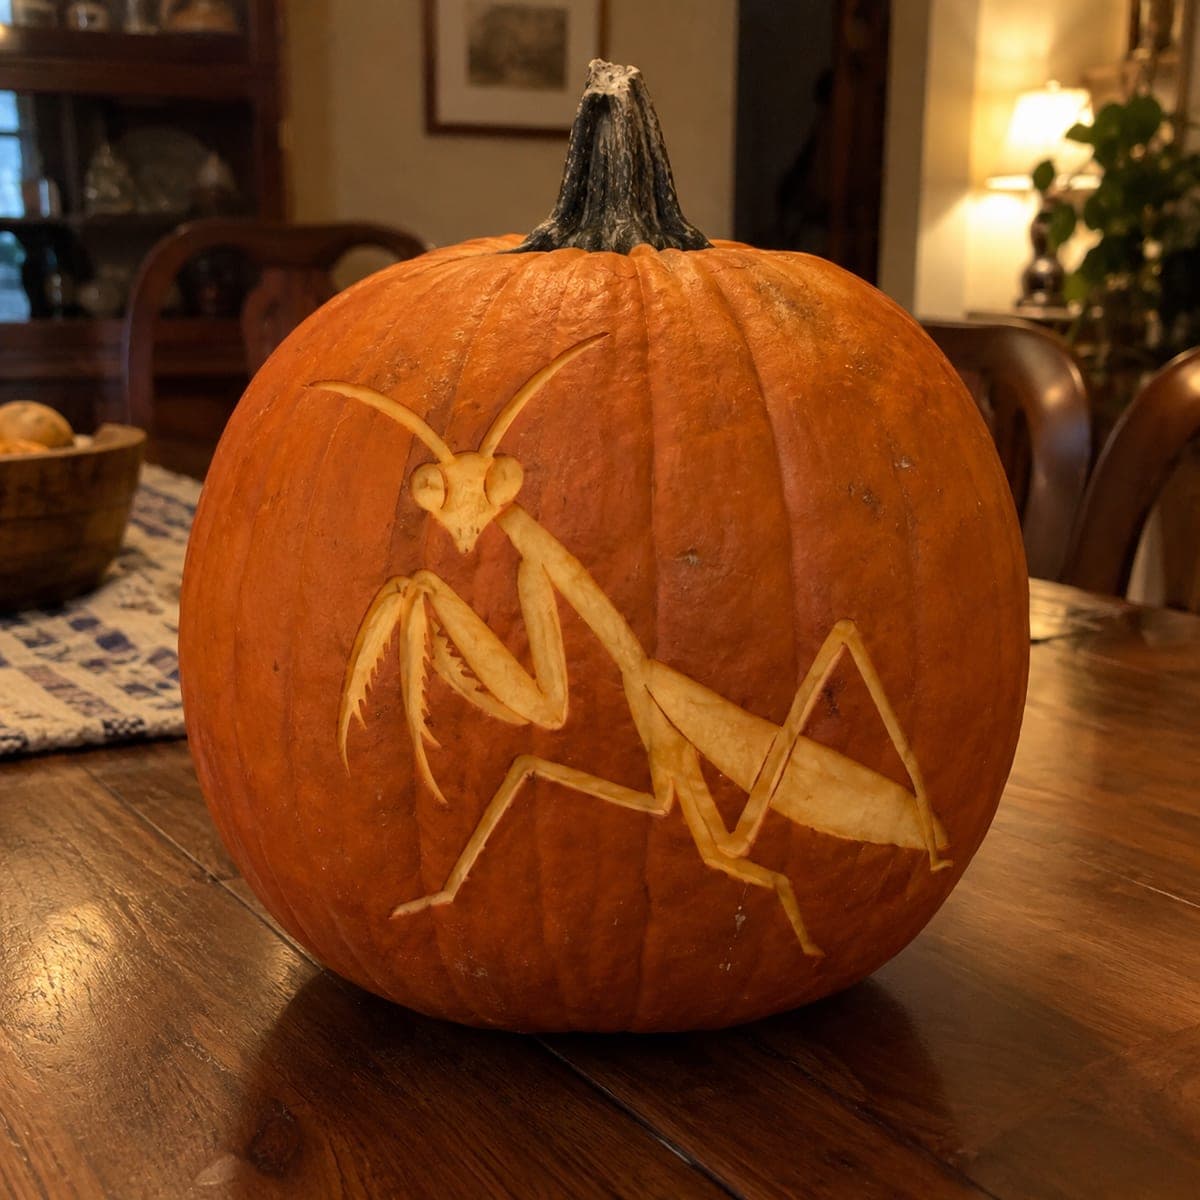
Praying Mantis Line Art Pumpkin EtchingAI
0

Praying Mantis Line Art Pumpkin Etching

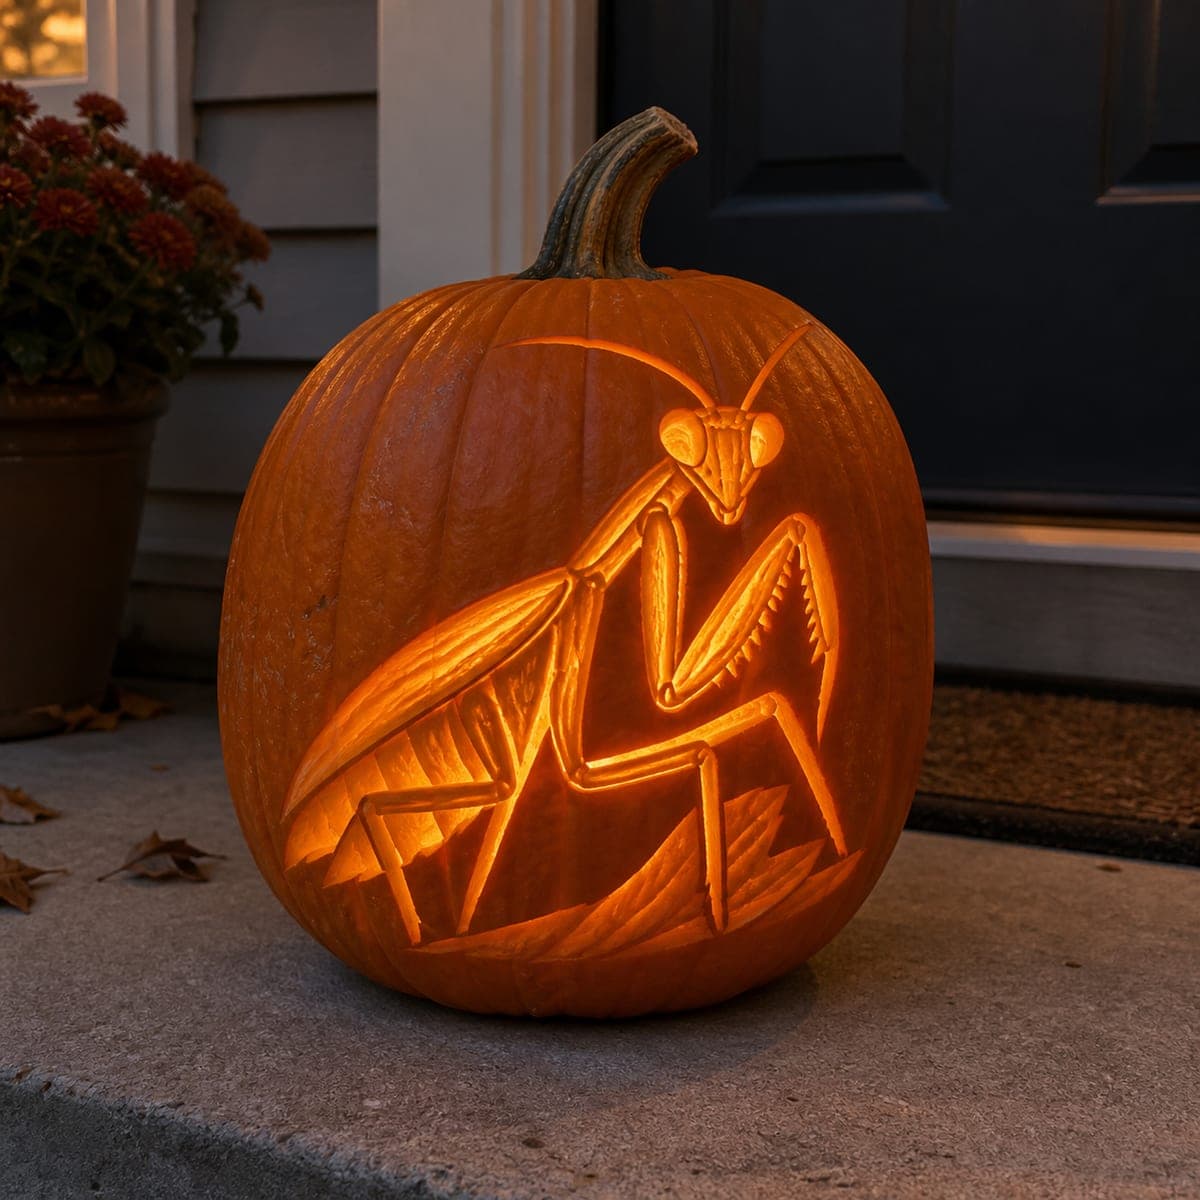
A praying mantis strides across this pumpkin in elegant etched line art, its raptorial front legs, long antennae, and angular back legs traced in pale carved strokes. Each line is a shallow V-cut through the skin, so a single slip shows; draw the insect in washable marker first and follow the lines with a linoleum V-gouge. The segmented body is just a few connected shapes, making this a satisfying pumpkin carving idea for anyone who likes clean linework over gore.

This is an AI-generated concept image: a realistic, carvable design idea rather than a photo of a finished carve. AI concepts are always labeled and sit out the leaderboard and the contest.

No ratings yet Β· Sign in to rate

Comments (0)

  • No comments yet β€” be the first.

Save without an account. Sign in to like or comment.

Our tips for carving a similar design

The whole design lives in the surface, not in cutouts. You draw the mantis in washable marker, then trace every line with a linoleum V-gouge, cutting shallow V grooves that expose the pale flesh just under the orange skin. The trick is keeping each stroke steady and consistent in depth so the insect reads as clean pale line art rather than a glowing cutout.

Written by PumpkinCarvingIdeas.com, inspired by the image above. These are our suggestions, not instructions from the uploader. This approach to the AI concept has not been tested on a real pumpkin.

From pumpkin to porch

  1. Pick and prep a smooth pumpkin

    Choose a pumpkin with a broad, flat, blemish-free side that has few deep ribs, since ribs will distort your lines. Wipe the surface clean and dry it fully. This design uses no lid, so you can leave the pumpkin whole, but if you want interior light you can cut an access hole in the back or bottom. Keep the front panel completely untouched for your artwork.

  2. Transfer the mantis outline

    Sketch or trace the mantis in washable marker, placing the head and antennae high near the shoulder and the long angular back legs sweeping down and to the right. Keep the body as a few connected simple shapes so the linework stays clean. Step back and check the proportions before you cut, because marker wipes off but gouge lines do not. Redraw anything that looks crowded or crooked.

  3. Etch the body and head first

    Have an adult handle the linoleum V-gouge. Start with the central body segments and the head, pulling the gouge slowly along each marker line to carve a shallow V groove through only the skin and a sliver of flesh. Keep your bracing hand behind the blade, never in its path. Consistent shallow depth is what makes the lines look intentional, so practice a stroke or two on the back before committing.

  4. Trace the legs and antennae

    Follow the raptorial front legs, then the long back legs, keeping the gouge moving in smooth continuous pulls rather than short choppy jabs. For the fine spines on the front legs and the thin antennae, use light pressure and a narrower part of the gouge. Because these are grooves and not cutouts, thin details stay fully supported and will not snap. Take your time here, since a single slip shows on line art.

  5. Clean the grooves and add depth accents

    Go back over any faint lines to even out the pale tone, and widen or deepen a few grooves along the body edges to suggest segments and shading. Brush out loose pulp with an old toothbrush so the carved flesh reads bright and crisp. Wipe away any remaining marker with a damp cloth. Rub the exposed lines with a little petroleum jelly to slow browning.

  6. Light it and photograph

    Set a warm LED puck or string inside if you cut a rear access hole, or simply light the pumpkin from the front with a lamp to make the pale grooves pop against the orange skin. Etched line art shows best with strong side or front light rather than a glowing interior. Place it on a table away from foot traffic and snap your photo the same evening, since etched lines darken within a day or two.

Gather your supplies

Check things off as you get ready.

Work on a stable surface, keep your free hand out of the cutting path, and have an adult handle sharp tools.

Three levels of light

  • Leave intact

    The entire orange background and the untouched body of the pumpkin stay dark, framing the insect.

  • Peel & shade

    The mantis lines themselves are shallow V grooves that expose pale flesh, glowing a soft dim tone against the skin.

  • Cut through

    Nothing is cut all the way through on this design, so there are no full-brightness openings unless you add a hidden rear access hole.

Learn the carving basics

Before you start cutting

Do I need to cut all the way through anywhere?

No, this is a surface etching, so every line is a shallow V groove that only removes skin and a thin layer of flesh. You never cut through the wall on the front. If you want interior glow you can add a small access hole in the back or bottom, but the artwork stays intact.

How do I keep the thin antennae and leg spines from breaking?

Because you are etching grooves and not cutting out shapes, the thin details are fully supported by the pumpkin wall around them and cannot snap off. Just use light pressure and a narrow gouge tip for those fine lines. Steady, slow strokes matter more than force here.

Why do my etched lines look faint compared to a normal jack-o-lantern?

Etched line art relies on the contrast between pale carved flesh and darker skin, not on light shining through. Light it from the front or side with a lamp or LED to make the grooves pop. Deepen a few lines slightly if you want stronger contrast, and photograph it soon since the flesh darkens over a day or two.

Your take belongs here, too.

Changed a detail? Made it simpler? Share a photo of your version and tell the community what worked.

Share your pumpkin

More pumpkins like this

You've reached the end Β· 8 pumpkins
The Patch Report

Fresh pumpkins, in your inbox.

The best new carvings, ideas worth stealing, and how-tos for carving season. Short, seasonal, and gone by November.

A short email during carving season. Unsubscribe anytime. See our privacy policy.