Halloween Pumpkin Carving Contest · Starts October 1st · $500 in prizes
← Back to ideas
@ai_concepts
Aug 8, 2026
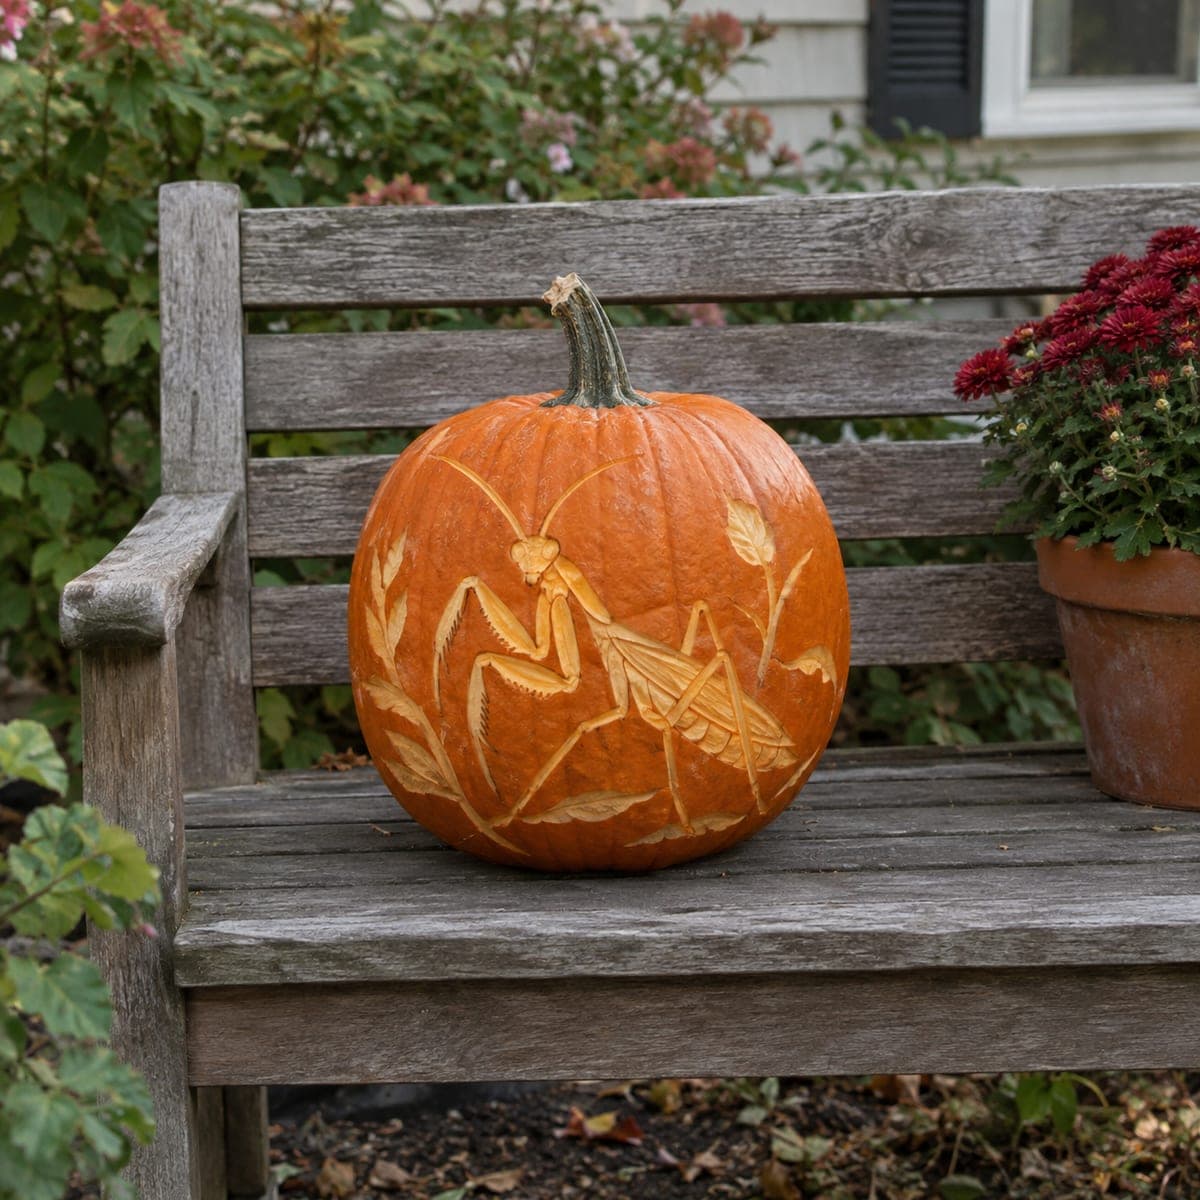
Praying Mantis and Grasshopper Nature Scene PumpkinAI
0

Praying Mantis and Grasshopper Nature Scene Pumpkin

A praying mantis faces a grasshopper amid carved grass and leaf stalks on this pumpkin, the entire scene etched in surface relief rather than cut through, preserving the full structural integrity of the gourd. The composition is a miniature nature illustration that shows what shallow carving can achieve without any candle required. This pumpkin carving idea shines in daylight or under a spotlight; rub a little vegetable oil over the carved areas to keep the lighter flesh from drying out and browning prematurely.

This is an AI-generated concept image: a realistic, carvable design idea rather than a photo of a finished carve. AI concepts are always labeled and sit out the leaderboard and the contest.

No ratings yet · Sign in to rate
Comments (0)

  • No comments yet — be the first.

Save without an account. Sign in to like or comment.

Our tips for carving a similar design

The core trick here is relief carving, where you peel and scrape the skin at different depths instead of cutting all the way through. That keeps the whole pumpkin solid and turns it into a shallow illustration of a mantis facing a grasshopper among grass and leaves. Plan the whole scene as light and shadow, with the darkest areas left as untouched skin and the brightest highlights scraped down to pale flesh.

Written by PumpkinCarvingIdeas.com, inspired by the image above. These are our suggestions, not instructions from the uploader. This approach to the AI concept has not been tested on a real pumpkin.

From pumpkin to porch

  1. Pick and prep a smooth pumpkin

    Choose a large pumpkin with a broad, even front face and as few deep ribs as possible, since flat space makes relief work far easier. Wipe it clean and dry it well. There is no need to open the top or gut it for this design, which is part of what keeps it strong. Set it on a towel at a comfortable working height so the front faces you.

  2. Transfer the scene

    Print or draw the mantis, grasshopper, grass blades, and leaf stalks, then tape the pattern to the front. Use a poking tool to dot along every outline, or trace firmly with a ballpoint pen to leave a light groove. Remove the paper and connect the dots with a washable marker so you can see the full composition. Take a moment to confirm the mantis and grasshopper face each other before you cut.

  3. Outline everything with a shallow score

    With a small detail knife or a lino-style gouge, trace along your marker lines about an eighth of an inch deep. Keep the blade nearly upright and let an adult handle all sharp tools. These score lines act as clean borders so that when you scrape nearby areas the edges stay crisp. Do not cut through the wall at any point in this design.

  4. Scrape the mid-tone areas

    Switch to a loop or ribbon tool and gently peel away just the outer skin on the bodies, legs, and grass, exposing the pale flesh underneath for a soft glow of contrast. Work in the direction of each shape, following the grain of a leaf or the segments of a leg. Leave the surrounding background as dark untouched skin so the insects pop forward. Keep your free hand behind the tool, never in front of it.

  5. Deepen the brightest highlights

    For the lightest touches, the mantis eye, raised forearms, and the tips of the grass, scrape a little deeper and thin the flesh so those spots read almost white. Use light, repeated passes rather than one hard dig to avoid punching through. Vary the depth across the scene to build the three-dimensional, etched look. Step back often to check the balance of light and dark.

  6. Seal, display, and photograph

    Rub a thin coat of vegetable oil over all the carved areas to slow browning and richen the color. Because nothing is cut through, this pumpkin shows best in daylight or under a small spotlight rather than with an interior light. For an evening display you could aim an external LED spotlight across the surface to rake shadows into the relief. Snap your photo within the first day or two while the pale flesh is at its brightest.

Gather your supplies

Check things off as you get ready.

Work on a stable surface, keep your free hand out of the cutting path, and have an adult handle sharp tools.

Three levels of light

  • Leave intact

    The background field around the insects stays as untouched dark skin.

  • Peel & shade

    The mantis and grasshopper bodies, legs, grass blades, and leaves are skin-peeled for a soft mid glow.

  • Cut through

    Nothing is cut through; the brightest look comes from thinning the flesh at the eye, raised forearms, and grass tips.

Learn the carving basics

Before you start cutting

Do I need to hollow out the pumpkin for this?

No, and that is the point of a relief design. Leaving the pumpkin solid keeps the wall strong so your fine legs and grass blades will not sag or crack. You can skip gutting entirely, which also saves a lot of mess.

How do I keep the thin mantis legs from looking broken?

Since you are only scraping the surface and not cutting through, the legs stay physically attached to the pumpkin no matter how thin they look. Just keep your score lines clean and consistent so each leg reads as one continuous shape. Vary the scrape depth slightly to suggest the joints.

Why won't a candle work well here?

There are no cut-through openings for interior light to escape, so a candle or inside LED would do almost nothing. This design relies on surface contrast, so it shines in daylight or under an external spotlight raked across the front. Never use an open flame near a pumpkin anyway.

Your take belongs here, too.

Changed a detail? Made it simpler? Share a photo of your version and tell the community what worked.

Share your pumpkin

More pumpkins like this

You've reached the end · 8 pumpkins
The Patch Report

Fresh pumpkins, in your inbox.

The best new carvings, ideas worth stealing, and how-tos for carving season. Short, seasonal, and gone by November.

A short email during carving season. Unsubscribe anytime. See our privacy policy.