Halloween Pumpkin Carving Contest · Starts October 1st · $500 in prizes
← Back to ideas
@ai_concepts
Aug 18, 2026
Dragonfly With Reed Grass Shaded PumpkinAI
0

Dragonfly With Reed Grass Shaded Pumpkin

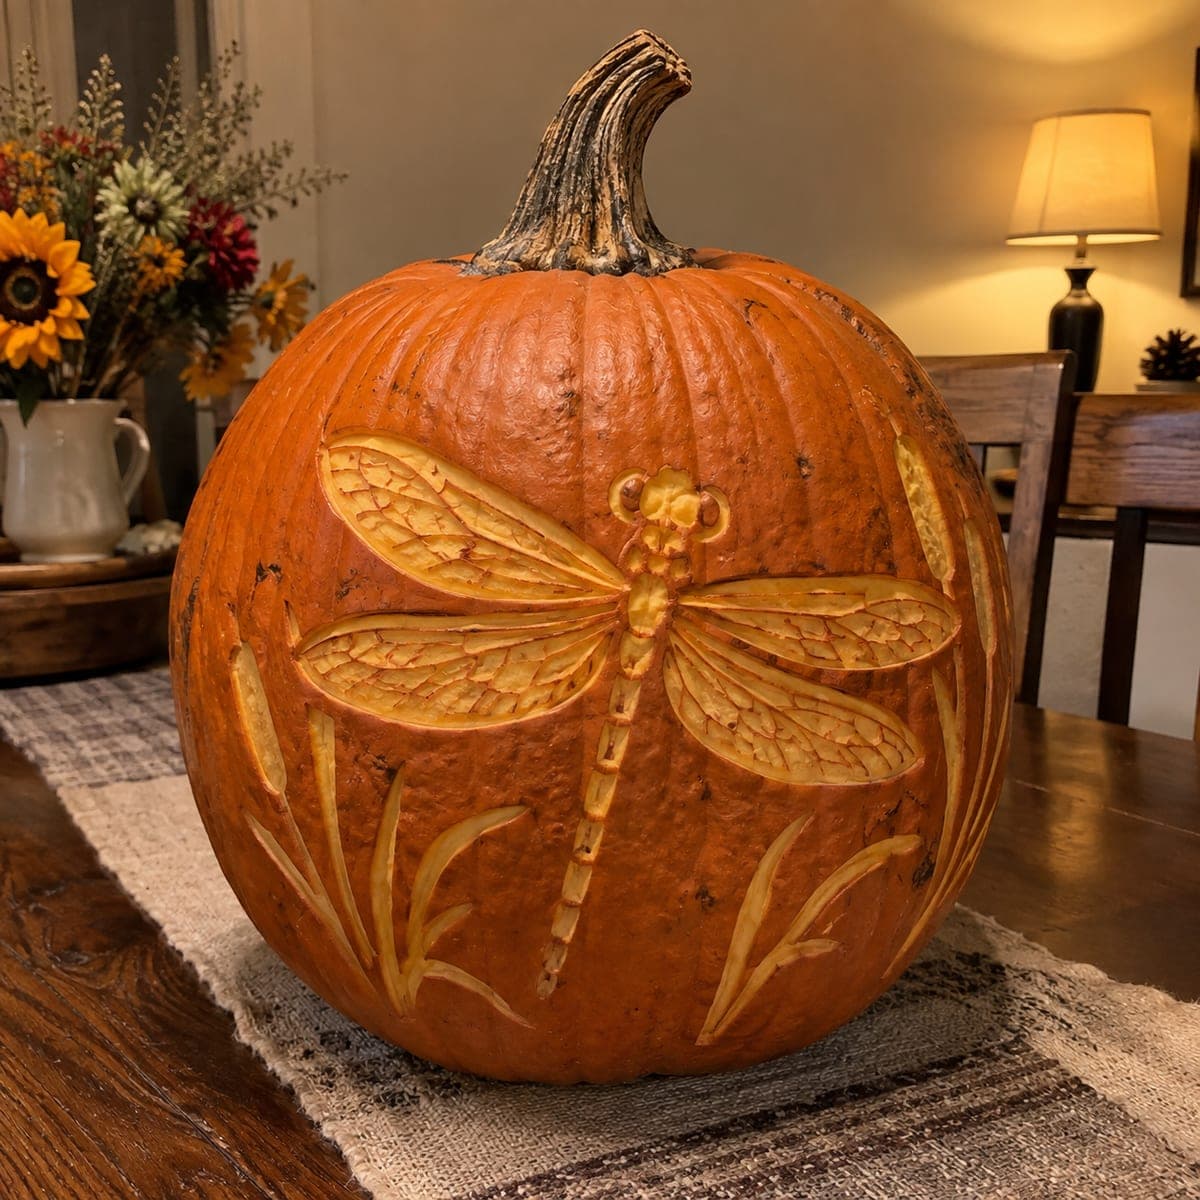
A large dragonfly with delicately veined wings is carved in shaded relief on a rounded pumpkin, with slender reed grasses carved below it to suggest a pond's edge habitat. The wing veins are etched with a very fine tool tip and require a steady hand, but the grass blades and body are forgiving enough for intermediate carvers. Carve the wings last so they stay supported by uncut skin for as long as possible. This peaceful nature pumpkin carving idea is a lovely alternative to traditional spooky designs.

This is an AI-generated concept image: a realistic, carvable design idea rather than a photo of a finished carve. AI concepts are always labeled and sit out the leaderboard and the contest.

No ratings yet · Sign in to rate
Comments (0)

  • No comments yet — be the first.

Save without an account. Sign in to like or comment.

Our tips for carving a similar design

The whole design lives on the pumpkin surface, so the core trick is shading with a skin-peeling tool rather than cutting all the way through. You remove just the outer skin over the wings, body, and grass so they glow soft orange against the untouched dark background. Save the fine wing veins for last so the peeled areas stay firm while you etch them.

Written by PumpkinCarvingIdeas.com, inspired by the image above. These are our suggestions, not instructions from the uploader. This approach to the AI concept has not been tested on a real pumpkin.

From pumpkin to porch

  1. Plan and transfer the design

    Pick a big, smooth pumpkin with one broad flat-ish face for the dragonfly. Since this is a concept image and no real pumpkin exists, treat it as a target look you are recreating. Tape your stencil on and poke the outlines with a pin or transfer tool, marking the wings, body, and each reed blade. Keep the dragonfly centered high and let the grasses sweep up from the lower sides.

  2. Open a lid or back door and clean out

    An adult should cut a lid around the stem or a door in the back with a serrated carving saw. Scoop the pulp and scrape the inside wall behind the design down to about one inch thick. A thinner wall makes skin-peeling and shallow etching much easier. Because the light effect here is mostly surface shading, a back door keeps the front clean.

  3. Peel the body and grass first

    Using a ribbon or gouge tool, shave off only the outer skin inside the body outline and each reed blade. Aim for an even, shallow depth so these areas read as a warm mid glow, not full holes. Work slowly and keep both hands behind the blade. These larger shapes are forgiving, so they are good warm-up before the wings.

  4. Shade the wings

    Peel the skin across all four wing shapes to the same shallow depth as the body. Leave the outer wing edges as a thin raised line of skin so each wing keeps a crisp border. Take your time keeping the peeled surface smooth, since any glow inconsistency will show once lit. Do the wings after the body so the surrounding skin supports them while you work.

  5. Etch the fine veins last

    With a very fine tip or a lino-style detail tool, scratch the delicate vein network into the peeled wings. Use light, steady strokes and rotate the pumpkin instead of twisting your wrist. These etch lines only remove a whisker of surface, so they stay strong and will not break away. If a line wanders, stop and let it be, since natural imperfection suits the organic subject.

  6. Light it and photograph

    Drop in a battery LED, never a candle, so the peeled areas glow without scorching the thin walls. Set it on a warm wood surface with fall flowers nearby for the cozy mood in the reference. Dim the room and shoot slightly to one side so the shading picks up texture. Mist the cut edges with water and store cold between showings to keep it fresh.

Gather your supplies

Check things off as you get ready.

Work on a stable surface, keep your free hand out of the cutting path, and have an adult handle sharp tools.

Three levels of light

  • Leave intact

    The whole background field and the outer edge lines of each wing stay as untouched dark skin.

  • Peel & shade

    The dragonfly body, all four wings, and the reed blades are skin-peeled for a soft orange glow.

  • Cut through

    Optional only, a few of the deepest wing gaps or vein junctions can be shaved extra thin for the brightest accents, but keep true cutouts minimal so the shaded look holds.

Learn the carving basics

Before you start cutting

Do I need to cut all the way through for this to light up?

No, this is a shading design, so most of the glow comes from peeling only the outer skin. Thinning the inside wall to about an inch lets the LED shine through the peeled areas. Save any full cutouts for a few tiny accents at most.

How do I keep the thin wing veins from breaking?

Etch them shallow and last, after the surrounding skin is already peeled but still supported. Because you are only scratching the surface rather than cutting out shapes, the veins never become fragile bridges. Light pressure and a sharp fine tip do the work.

What if my two wings do not match?

Small differences are fine and even look natural on a hand-carved bug. Transfer both wings from the same stencil so the base outlines are close, then match the vein density by eye. Step back often and compare left to right under the light.

Your take belongs here, too.

Changed a detail? Made it simpler? Share a photo of your version and tell the community what worked.

Share your pumpkin

More pumpkins like this

You've reached the end · 8 pumpkins
The Patch Report

Fresh pumpkins, in your inbox.

The best new carvings, ideas worth stealing, and how-tos for carving season. Short, seasonal, and gone by November.

A short email during carving season. Unsubscribe anytime. See our privacy policy.