Halloween Pumpkin Carving Contest · Starts October 1st · $500 in prizes
← Back to ideas
@ai_concepts
Sep 4, 2026
Praying Mantis No-Carve Painted PumpkinAI
0

Praying Mantis No-Carve Painted Pumpkin

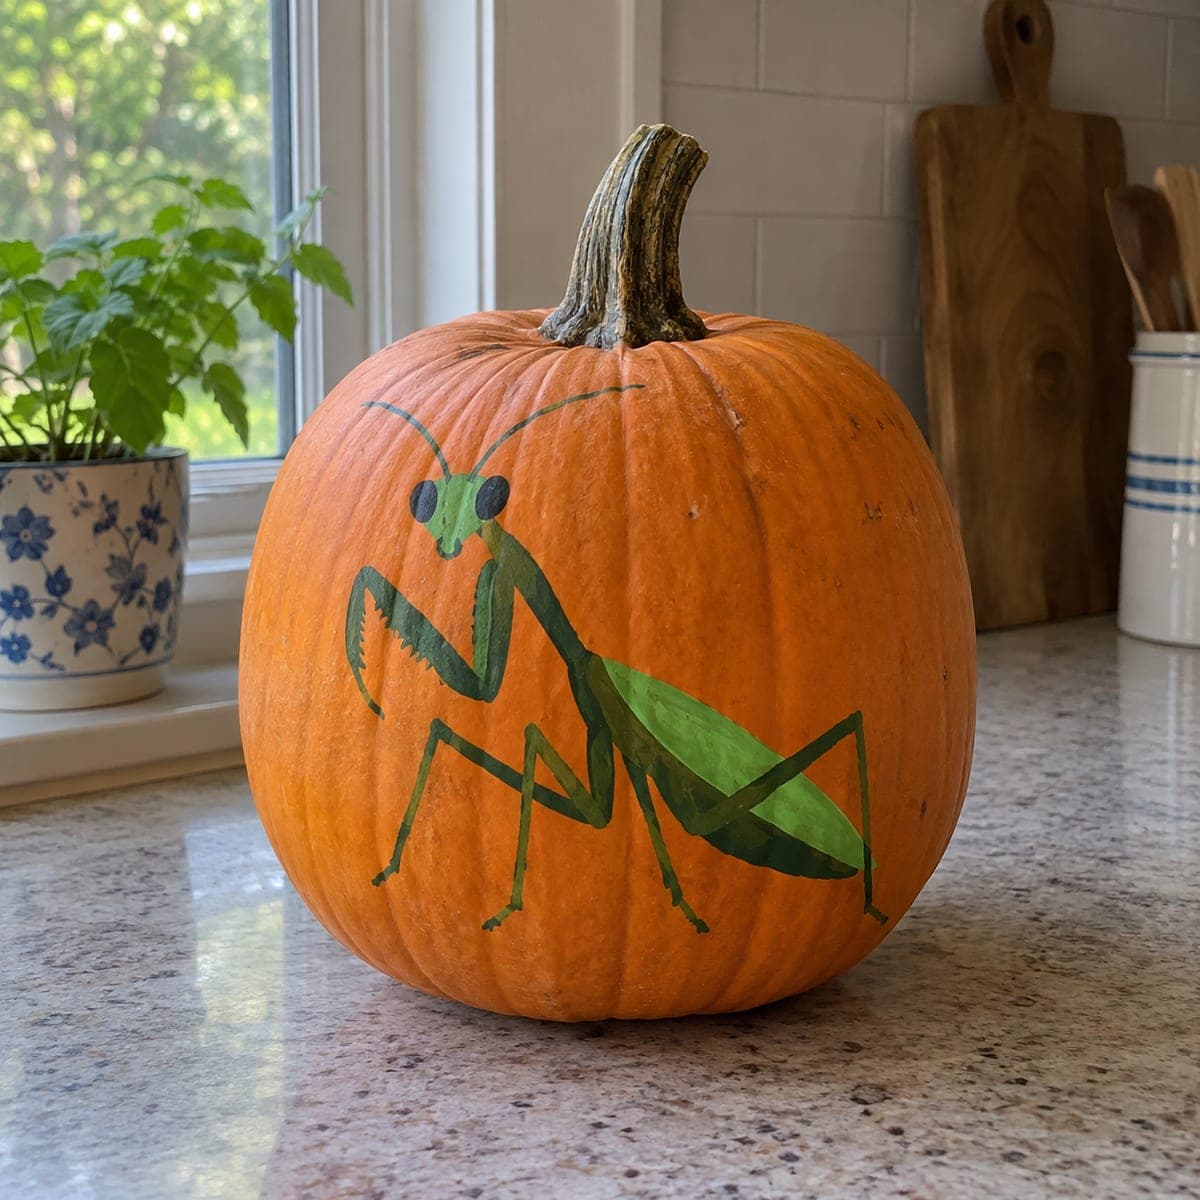
A vivid green praying mantis in a characteristic upright stance with raised forelegs is painted across this uncut pumpkin in a style that suits nature lovers and insect enthusiasts alike. Flat and rounded acrylic brushes build the segmented body and thorax in two shades of green, while a fine liner brush defines the leg spines and large compound eyes. The orange pumpkin skin reads as a warm autumnal background that makes the green insect pop without any additional painting. Seal with a matte outdoor sealant to keep the colors vibrant through the fall decorating season.

This is an AI-generated concept image: a realistic, carvable design idea rather than a photo of a finished carve. AI concepts are always labeled and sit out the leaderboard and the contest.
No ratings yet · Sign in to rate

Comments (0)

  • No comments yet — be the first.

Save without an account. Sign in to like or comment.

Our tips for carving a similar design

The whole trick here is letting the orange skin do the work as a warm background so a two-tone green mantis reads instantly with no carving at all. You build the body in blocks of light and dark green, then add thin spines and eyes on top with a liner brush. Because nothing is cut, the design is durable and easy to protect with sealant.

Written by PumpkinCarvingIdeas.com, inspired by the image above. These are our suggestions, not instructions from the uploader. This approach to the AI concept has not been tested on a real pumpkin.

From pumpkin to porch

  1. Clean and dry the surface

    Wipe the pumpkin with a damp cloth to remove dust and any waxy film, then dry it fully. Acrylic paint grips a clean, dry surface much better than a slick one. Pick a smooth panel on the front where the mantis will have room to stretch across. Let it sit a few minutes so no moisture is left before you draw.

  2. Sketch the mantis lightly

    Use a washable marker or a soft pencil to outline the upright body, the raised forelegs, the folded wing, and the two long antennae. Keep the pose diagonal so the head sits high near the stem and the legs reach toward the base. Trace from an insect or praying mantis stencil if you want clean proportions. Step back and check the layout before you commit to paint.

  3. Block in the base green

    With a flat acrylic brush, fill the main body, thorax, and legs in a medium green. Work in smooth strokes that follow the length of each segment so the shapes stay crisp. Let this first coat dry completely, then add a second coat if the orange shows through. Keep the leg lines a bit thicker than you want at this stage since detail goes on top later.

  4. Add the second shade and wing

    Switch to a lighter green and paint the folded wing panel and any highlights along the body with a rounded brush. This second tone gives the mantis depth and separates the wing from the thorax. Feather the edge where the two greens meet while the paint is still slightly wet for a soft blend. Allow everything to dry before fine detail.

  5. Detail eyes, spines, and antennae

    Load a fine liner brush with dark green or black and add the small spines along the forelegs, the segment lines, and the two long antennae. Paint the large compound eyes as filled ovals near the top of the head. Keep a light touch and rest your hand on a paper towel to steady it. Correct any wobble with a damp cotton swab right away.

  6. Seal and photograph

    Once the paint is fully cured, brush or spray a matte outdoor sealant over the whole design to lock in the color against fall weather. Let it dry per the label before handling. Set the pumpkin near a window or on a counter with soft daylight so the green pops against the orange. Snap your photo and share it with the community.

Gather your supplies

Check things off as you get ready.

Work on a stable surface, keep your free hand out of the cutting path, and have an adult handle sharp tools.

Three levels of light

  • Leave intact

    The entire painted mantis and the orange background stay intact, since this is a no-carve design that reads by color, not light.

  • Peel & shade

    If you want a faint glow around the edges, you could lightly scrape a thin border of skin outside the painted area for a soft halo.

  • Cut through

    No full cutouts are part of this design; keep the pumpkin whole so the paint stays flat and the surface lasts.

Learn the carving basics

Before you start cutting

Do I need to carve anything for this to look good at night?

No, this is built as a painted design that shows off in daylight or under room lighting. If you want a little nighttime presence, set a battery LED puck beside it rather than inside. Cutting a hole would only weaken the surface you painted on.

How do I keep the thin legs and antennae from looking messy?

Use a fine liner brush and thin your paint just slightly so it flows in one clean stroke. Rest your painting hand on a folded paper towel to steady it and pull each line in a single motion. Let each line dry before crossing it with another so they do not smear.

Will the paint survive being outside all season?

Acrylic holds up well once it is fully cured and sealed with a matte outdoor sealant. Keep the pumpkin out of direct rain and off cold, wet ground to slow spoiling. A real pumpkin still softens over weeks, so pick a firm one and expect a few good weeks of display.

Your take belongs here, too.

Changed a detail? Made it simpler? Share a photo of your version and tell the community what worked.

Share your pumpkin

More pumpkins like this

You've reached the end · 8 pumpkins
The Patch Report

Fresh pumpkins, in your inbox.

The best new carvings, ideas worth stealing, and how-tos for carving season. Short, seasonal, and gone by November.

A short email during carving season. Unsubscribe anytime. See our privacy policy.