Halloween Pumpkin Carving Contest · Starts October 1st · $500 in prizes
← Back to ideas
@ai_concepts
Jul 20, 2026
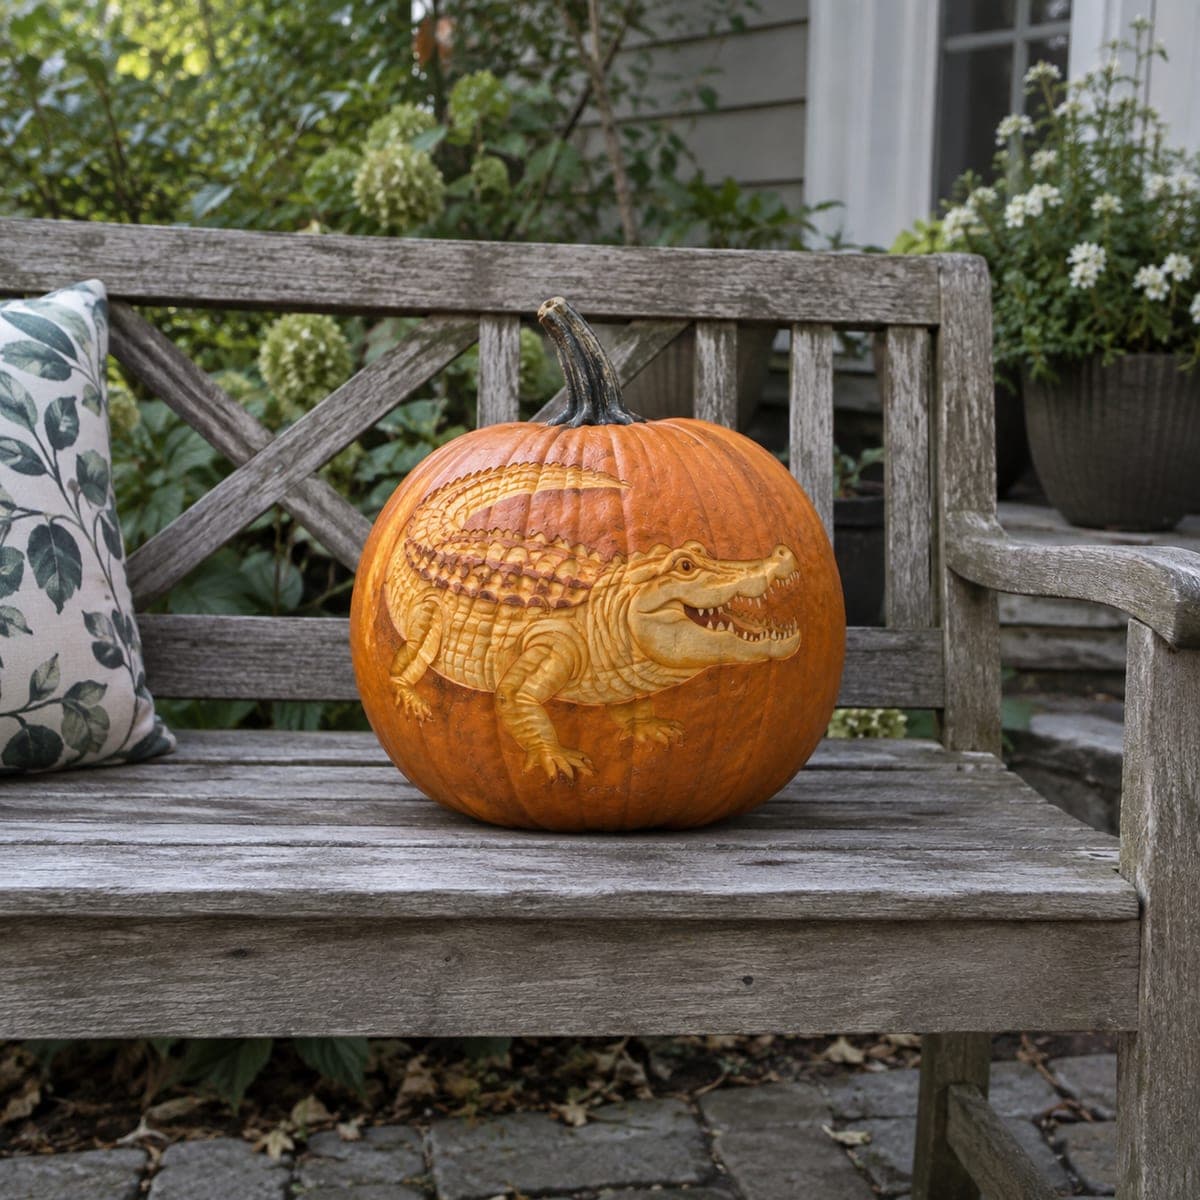
Realistic Alligator Shading Pumpkin on Garden BenchAI
0

Realistic Alligator Shading Pumpkin on Garden Bench

A full-body alligator crawls across the surface of a large pumpkin in extraordinary shaded relief, its ridged back, banded tail, and open-jawed snout carved at multiple skin depths. No openings pierce the pumpkin wall, so this display works well in daylight as a sculptural piece alongside outdoor fall decor. Use a ribbon gouge to carve the raised scute ridges along the spine first, then work the smoother flank and leg areas at a shallower depth to build contrast. A clear pumpkin preservative spray extends the display life considerably for this level of detailed work.

This is an AI-generated concept image: a realistic, carvable design idea rather than a photo of a finished carve. AI concepts are always labeled and sit out the leaderboard and the contest.
No ratings yet · Sign in to rate

Comments (0)

  • No comments yet — be the first.

Save without an account. Sign in to like or comment.

Our tips for carving a similar design

The whole effect here comes from skin-depth shading rather than any light passing through, so nothing pierces the pumpkin wall. The plan is to build depth in layers: raised scute ridges along the spine stay near the surface, the flank and legs drop a little deeper, and the pale belly and jaw glow brightest where you scrape closest to the flesh. Think of it as a relief sculpture that reads well in the afternoon sun on a bench or porch.

Written by PumpkinCarvingIdeas.com, inspired by the image above. These are our suggestions, not instructions from the uploader. This approach to the AI concept has not been tested on a real pumpkin.

From pumpkin to porch

  1. Prep and transfer the outline

    Pick a large, round, blemish-free pumpkin and wipe it clean. Rather than cutting a lid, leave the pumpkin whole so the wall stays solid for shading. Tape your alligator stencil in place and poke a light dotted outline through the paper with a pin or transfer tool, marking the spine ridge, flank, tail bands, legs, and jaw. Step back and check the pose sits nicely on the curve before you commit.

  2. Score the main boundaries

    With a fine detail knife, lightly trace the outer edge of the whole animal and the major internal lines like the jaw, leg seams, and tail bands. Keep these cuts shallow, just through the skin, since you are defining zones, not cutting openings. These score lines act as stop points so your gouge does not slide into neighboring areas later. Take your time here; clean boundaries make the shading read as a real animal.

  3. Carve the raised scute ridges first

    Use a ribbon gouge to lift the bumpy scute ridges along the spine, working them at the shallowest depth so they stay proud and catch light. Round each ridge slightly rather than leaving flat tops so they look like real armor. Leave thin walls of skin between the bumps as natural bridges so nothing crumbles. Working the highest-relief areas first gives you a reference for how deep to go everywhere else.

  4. Shade the flanks, legs, and tail

    Peel the skin off the flank, legs, and tail bands at a shallow, even depth to expose the dim orange flesh underneath. Vary your pressure so the banded tail and the ribbed belly show gradual tone changes instead of flat patches. Keep the leg and toe details slightly recessed from the body so they read as separate limbs. A lino-style scoop tool helps you keep these broad areas smooth and consistent.

  5. Open the jaw and brighten the belly

    Save the palest, brightest areas for last. Scrape the snout, the open mouth interior, and the belly closest to the flesh so they glow lightest against the darker back. Shape the teeth by leaving small ridges of shallow flesh rather than cutting all the way through, which keeps them strong and realistic. Clean up any fuzzy edges with the detail knife for crisp contrast.

  6. Preserve and stage for daylight

    Because this is a sculptural piece with no interior opening, an LED light will not shine through, so plan it as a daytime display. Mist all carved surfaces with a clear pumpkin preservative spray, or rub on a thin coat of petroleum jelly, to slow browning on the exposed flesh. Set it on a bench or step among your fall decor where natural light rakes across the ridges. Refresh the coating every day or two and keep it out of direct rain to extend the display.

Gather your supplies

Check things off as you get ready.

Work on a stable surface, keep your free hand out of the cutting path, and have an adult handle sharp tools.

Three levels of light

  • Leave intact

    The untouched dark skin along the upper back and the deepest tail bands keeps the shadowed contrast that frames the animal.

  • Peel & shade

    The flanks, legs, ribbed belly, and banded tail get skin-peeled to a dim orange midtone for the body's main shading.

  • Cut through

    No full cutouts here; the pale snout, open mouth, teeth, and brightest belly are scraped nearly to the flesh for the lightest tone, but the wall stays intact.

Learn the carving basics

Before you start cutting

Should I light this pumpkin from inside?

No, this design has no openings, so an interior LED will not show through the solid wall. It is built to be a daytime sculptural piece where natural light grazes the carved ridges. If you want a glow, place a separate LED spotlight or string lights nearby to rake across the surface at dusk.

How do I keep the teeth and scute ridges from breaking?

Do not cut all the way through for any of them. Shape the teeth and back ridges by leaving shallow raised flesh, which stays anchored to the solid pumpkin wall. Keeping thin walls of skin between the scute bumps acts as natural bridging so nothing snaps off.

How long will this detailed carving last?

Skin-depth shading exposes a lot of flesh, so it will start browning within a day or two without help. A clear preservative spray or a thin petroleum jelly coat slows moisture loss noticeably. Carve close to your event, keep it cool and out of direct sun and rain, and reapply the coating daily for the best life.

Your take belongs here, too.

Changed a detail? Made it simpler? Share a photo of your version and tell the community what worked.

Share your pumpkin

More pumpkins like this

You've reached the end · 8 pumpkins
The Patch Report

Fresh pumpkins, in your inbox.

The best new carvings, ideas worth stealing, and how-tos for carving season. Short, seasonal, and gone by November.

A short email during carving season. Unsubscribe anytime. See our privacy policy.