Halloween Pumpkin Carving Contest · Starts October 1st · $500 in prizes
← Back to ideas
@ai_concepts
Aug 16, 2026
Realistic Wolf Face Etched Pumpkin PortraitAI
0

Realistic Wolf Face Etched Pumpkin Portrait

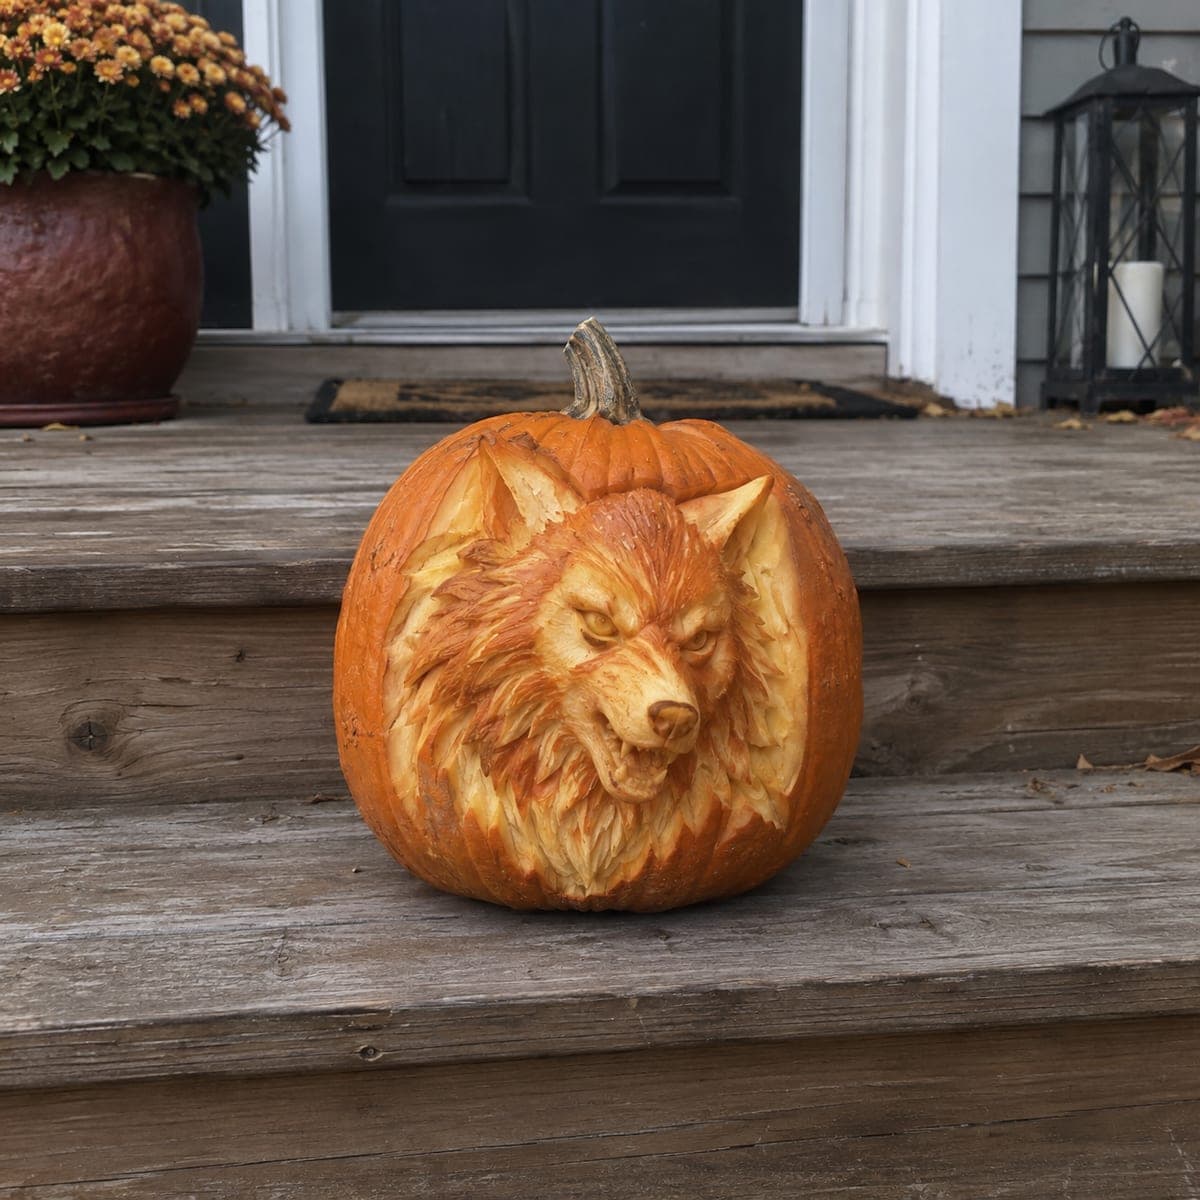
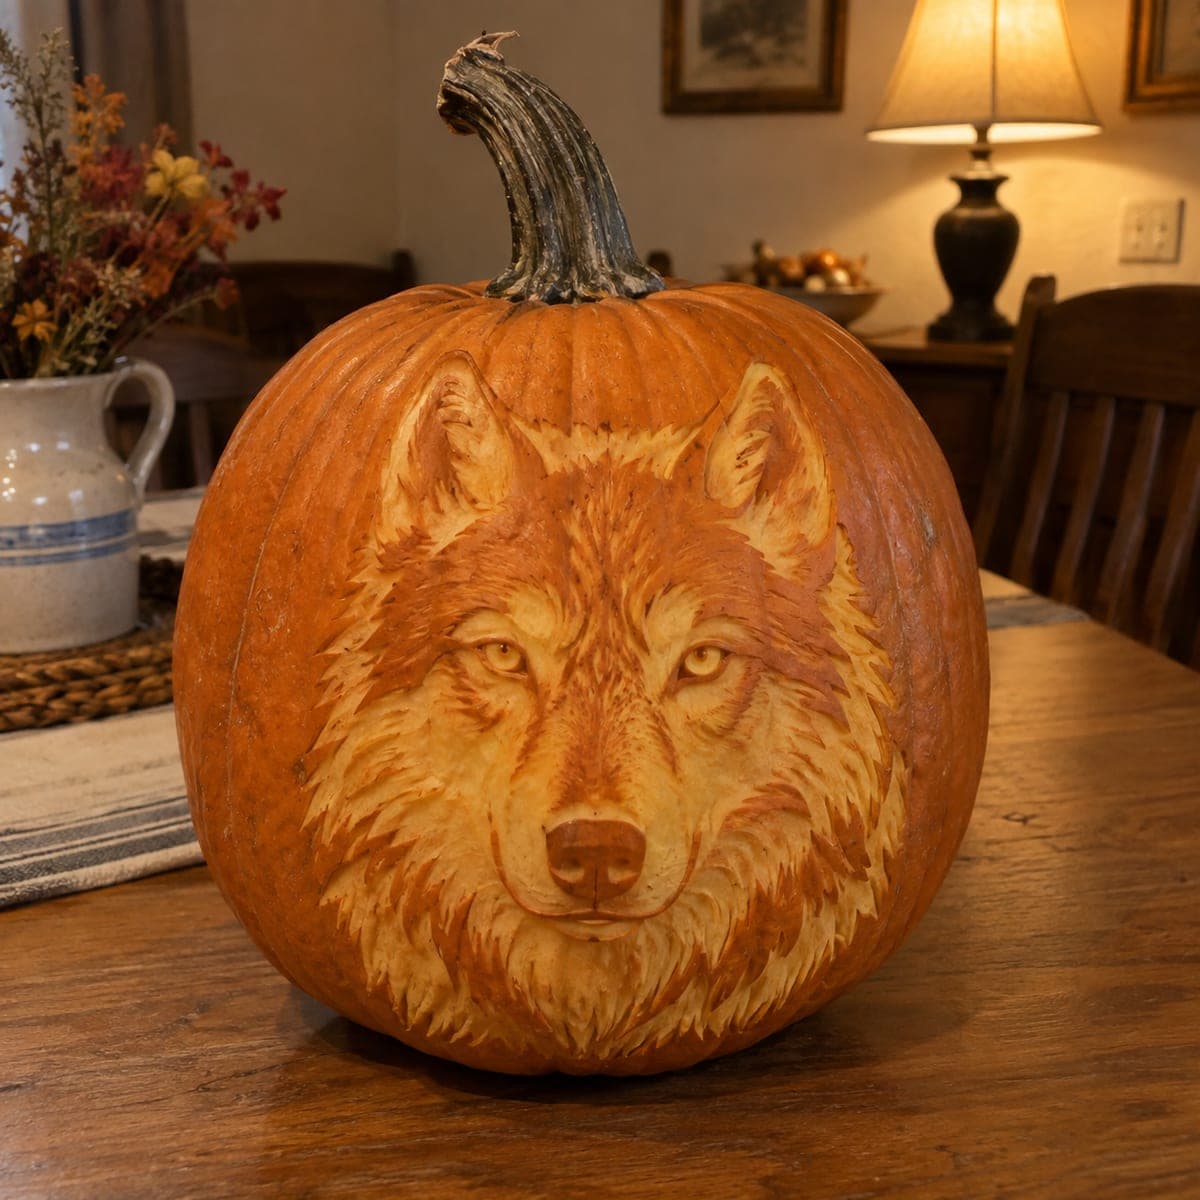
A majestic wolf portrait fills the entire face of this large pumpkin, its amber eyes and thick fur coat rendered through deep, multi-depth etching that gives the image a photorealistic quality. The fur texture was created by making short, directional strokes with a linoleum cutter, layering multiple passes to achieve dark and medium gray tones. This is an advanced pumpkin carving idea best suited for experienced carvers comfortable with loop tools. Place indoors under warm directional lighting to bring out the full tonal range without a candle.

This is an AI-generated concept image: a realistic, carvable design idea rather than a photo of a finished carve. AI concepts are always labeled and sit out the leaderboard and the contest.

No ratings yet · Sign in to rate

Comments (0)

  • No comments yet — be the first.

Save without an account. Sign in to like or comment.

Our tips for carving a similar design

The whole effect here comes from etching rather than cutting, using layered depths of skin removal to paint the wolf in orange tones. The core trick is treating the pumpkin like a scratchboard, where shallow scrapes glow faintly and deeper removal glows brighter, so the fur, muzzle, and amber eyes read as one continuous portrait. Since this is a concept image with no real pumpkin behind it, think of this as a plan you could follow to build a similar shaded wolf face.

Written by PumpkinCarvingIdeas.com, inspired by the image above. These are our suggestions, not instructions from the uploader. This approach to the AI concept has not been tested on a real pumpkin.

From pumpkin to porch

  1. Pick a wide pumpkin and prep it

    Choose a large pumpkin with a broad, smooth front so the whole face has room to sit. Cut a lid from the bottom rather than the top so the stem stays intact, then hollow the shell and thin the carving wall to about one inch. A thinner wall lets peeled areas glow evenly under light. Wipe the surface clean and dry before transferring your design.

  2. Transfer the wolf and map your tones

    Tape a wolf portrait stencil to the front and poke through the main outlines with a pin or transfer tool. Before carving, lightly mark which zones stay dark, which get a shallow scrape, and which get deeper removal. Planning your light map first keeps the eyes, muzzle, and fur edges from blending together. Work in soft pencil so stray marks scrape away later.

  3. Establish the darkest fur and eyes first

    Leave the outer fur tips, the eye outlines, and the shadow between muzzle and cheeks as untouched skin. These dark anchors give the portrait its structure and depth. Resist the urge to scrape everything early, since the contrast between bare skin and peeled areas is what makes the wolf pop. An adult should handle all blades and loop tools throughout.

  4. Etch the fur with short directional strokes

    Use a small loop or linoleum-style tool to make short strokes that follow the direction the fur grows, curving out from the nose and down the cheeks. Layer several light passes to build medium tones rather than gouging deep in one stroke. Keep strokes attached to one another so no thin skin bridge fully breaks away. Rotate the pumpkin so you are always pulling the tool comfortably toward you.

  5. Deepen the highlights and shape the muzzle

    For the brightest areas, the nose bridge, forehead blaze, and inner ears, scrape closer to the flesh so light passes through more strongly. Round the muzzle and eye ridges by varying how deep you go, blending from dark skin to bright peel. Take your time near the amber eyes, keeping them slightly recessed so they catch a warm glow. Step back often to check the tonal balance from a few feet away.

  6. Light it and photograph

    Set a warm white LED puck or a small directional LED inside, then aim a soft lamp across the front to bring out the etched texture. Because this design has few true cutouts, side lighting reveals the fur far better than a bulb glowing straight through. Mist the surface lightly and refrigerate between displays to slow drying. Snap your photo in a dim room so the tonal range shows.

Gather your supplies

Check things off as you get ready.

Work on a stable surface, keep your free hand out of the cutting path, and have an adult handle sharp tools.

Three levels of light

  • Leave intact

    Outer fur tips, eye outlines, and the deep shadows around the muzzle stay as untouched skin for the darkest tones.

  • Peel & shade

    The main coat, cheeks, and forehead get shallow scraping for a soft mid orange glow.

  • Cut through

    The nose bridge, forehead blaze, and eye highlights get the deepest removal for the brightest points, with no full openings needed.

Learn the carving basics

Before you start cutting

Do I need to cut any holes all the way through?

Not really. This is an etched portrait, so almost all of the work is surface scraping at different depths. If you want the eyes to shine a little more, you can thin the flesh there until it is nearly translucent, but full cutouts would break the realistic look.

How do I keep the fur strokes from looking random?

Always follow the direction the fur actually grows, flowing outward from the nose and down along the cheeks and neck. Work in short overlapping strokes and layer several light passes instead of one deep gouge. Stepping back every few minutes helps you catch spots where the flow drifts off.

Why side lighting instead of a light inside?

Since there are few true cutouts, a bulb glowing straight through would wash out the fine tonal work. A warm lamp aimed across the surface casts tiny shadows in every etched stroke, which is what makes the texture read as fur. Use an LED inside only for a gentle background glow.

Your take belongs here, too.

Changed a detail? Made it simpler? Share a photo of your version and tell the community what worked.

Share your pumpkin

More pumpkins like this

You've reached the end · 8 pumpkins
The Patch Report

Fresh pumpkins, in your inbox.

The best new carvings, ideas worth stealing, and how-tos for carving season. Short, seasonal, and gone by November.

A short email during carving season. Unsubscribe anytime. See our privacy policy.