Halloween Pumpkin Carving Contest · Starts October 1st · $500 in prizes
← Back to ideas
@ai_concepts
Sep 25, 2026
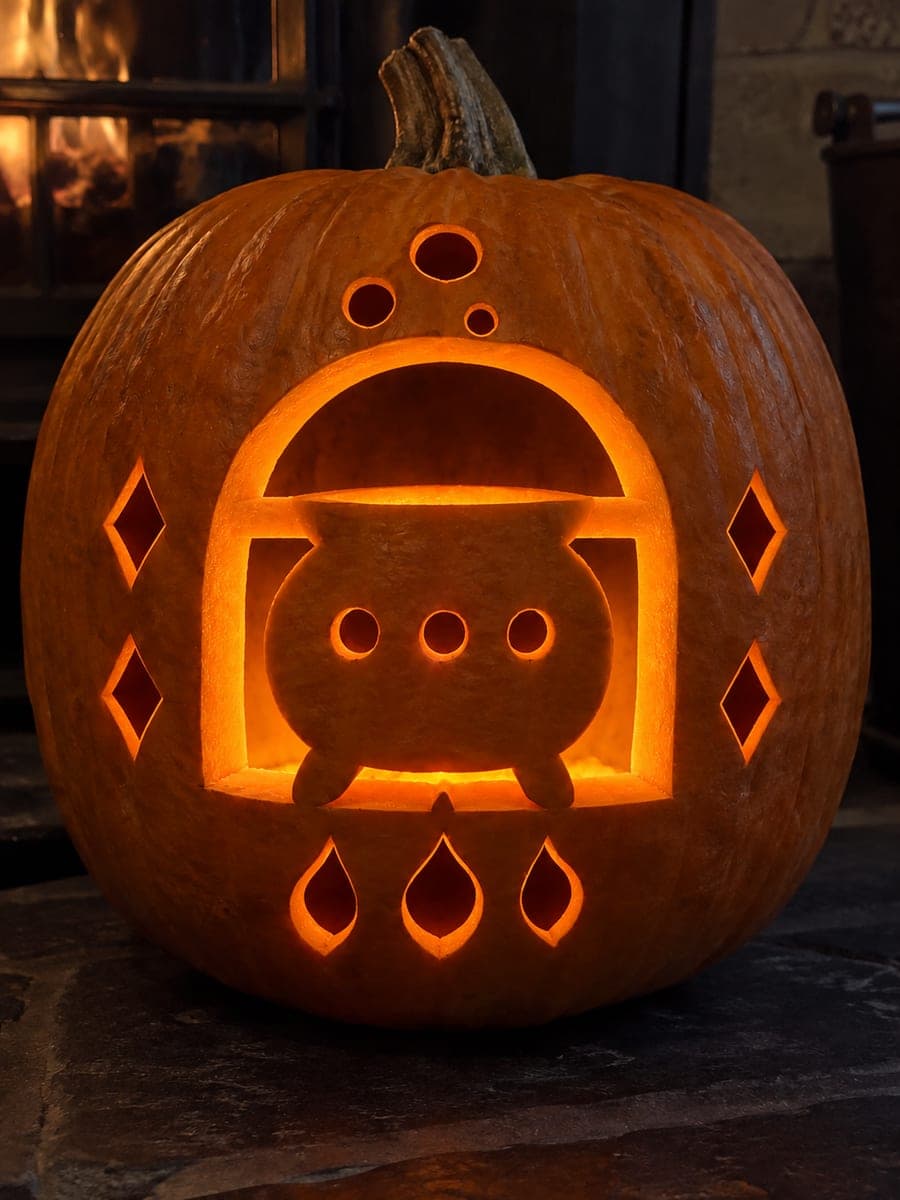
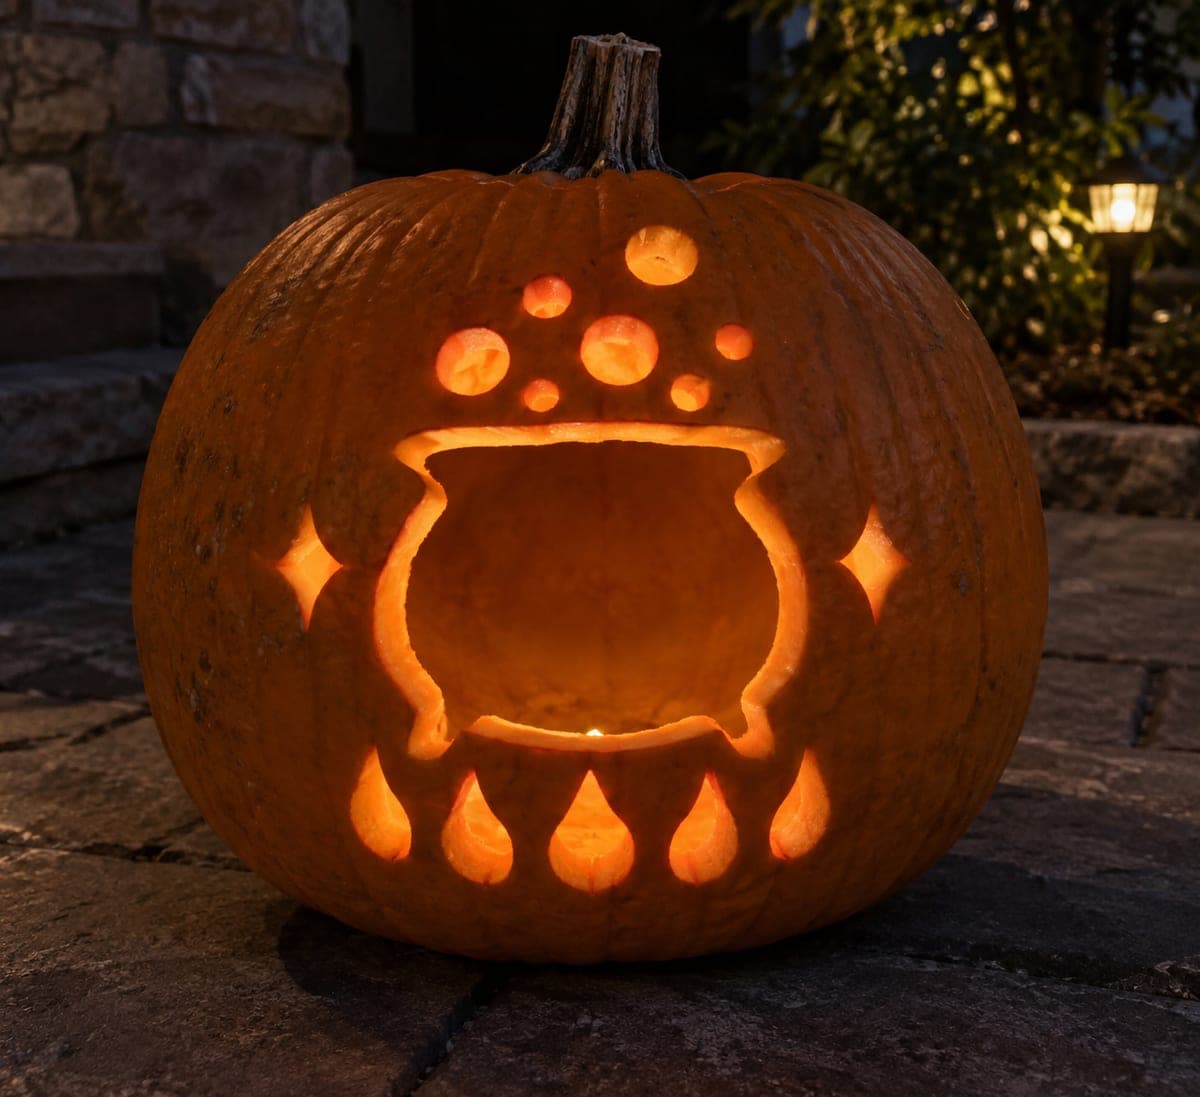
Retained Cauldron in Arch Window Pumpkin LanternAI
0

Report this carving

Tell us what is wrong. Reports are private.

Retained Cauldron in Arch Window Pumpkin Lantern

A retained solid orange cauldron sits inside a broad arch-shaped cut-through window with its wide feet attached to the bottom frame and its rim connecting both sides of the arch, plus three circle holes in the cauldron body, separate round bubbles above, teardrop flames below, and diamond accents outside. Cut the full arch opening first, then remove the background inside the arch around the cauldron, working from the arch edges inward toward the cauldron outline to keep maximum control.

No ratings yet · Sign in to rate

Comments (0)

  • No comments yet — be the first.

Save without an account. Sign in to like or comment.

Our tips for carving a similar design

The cauldron is kept as solid orange rind inside a broad arch-shaped opening, with its wide feet attached to the bottom frame and its rim connecting both sides of the arch. Three circle holes punched through the retained cauldron body, plus separate bubbles above, flames below, and diamonds outside, create multiple layers of light. The arch must be cut first to establish the frame, and every subsequent cut works inward from the arch edge toward the retained cauldron.

From pumpkin to porch

  1. Select and prep the pumpkin

    A large pumpkin with walls at least an inch and a quarter thick is required. Hollow through the back lid and confirm uniform thickness throughout the carving zone with a skewer. Transfer the full template and perforate all outlines.

  2. Cut the arch opening

    Carve the full arch outline and remove the arch section as one piece. You now have an open window with a curved top and flat bottom edges. This gives you clear access to work the retained figure inside.

  3. Mark cauldron connections and cut background

    Re-tape the cauldron template inside the arch, confirming that the feet overlap the bottom edge and the rim overlaps both sides. Mark connection zones with marker dots, then remove background rind from inside the arch around the cauldron, working from the arch wall inward.

  4. Cut the three circle holes in the retained cauldron

    With the retained cauldron confirmed stable, drill or saw the three small circle holes within the cauldron body. Each hole must be surrounded by at least a quarter inch of cauldron rind on all sides.

  5. Add bubbles, flames, and diamonds outside the arch

    Drill the round bubble holes above the arch, cut the teardrop flame holes below the arch feet zone, and cut the diamond accents in the broad outer rind. Work one cluster at a time, confirming rind between each hole and the arch edge.

  6. Light and display

    Center the LED inside, replace the lid, and display on a dark hearth. The cauldron glows as an orange silhouette against the bright arch, with the three body holes punching dots of full light through the retained figure.

Written with AI to match this design

Gather your supplies

Check things off as you get ready.

Work on a stable surface, keep your free hand out of the cutting path, and have an adult handle sharp tools.

Three levels of light

  • Leave intact

    The retained orange cauldron inside the arch and all outer shell rind

  • Peel & shade

    None

  • Cut through

    The arch background around the cauldron, three circle holes in the cauldron body, round bubble holes above, teardrop flame holes below, and diamond accent holes outside

Learn the carving basics

Before you start cutting

The arch background has to be removed carefully around the cauldron. How do I avoid nicking the cauldron outline?

Cut the background in strips, working from the arch edge inward and stopping about an eighth of an inch short of the cauldron outline. Then use a narrow detail saw or carving knife to trim precisely to the cauldron edge in a final clean-up pass.

The three circle holes in the retained cauldron are cut all the way through. Will they weaken the retained figure?

Three small circles surrounded by at least a quarter inch of rind are structurally sound as long as the cauldron's perimeter connections at the arch are maintained. Do not cut the holes too close together or too near the cauldron edge.

How do I keep the bubble holes above the arch from looking disconnected from the main scene?

Cluster the bubble holes just above the apex of the arch and let them arc upward and outward, following the same radius as the arch curve. This makes them feel like they are rising from inside the arch rather than floating independently.

Your take belongs here, too.

Changed a detail? Made it simpler? Share a photo of your version and tell the community what worked.

Share your pumpkin

More pumpkins like this

You've reached the end · 8 pumpkins
The Patch Report

Fresh pumpkins, in your inbox.

The best new carvings, ideas worth stealing, and how-tos for carving season. Short, seasonal, and gone by November.

A short email during carving season. Unsubscribe anytime. See our privacy policy.