The 2026 contest winners are inGrand Prize, People's Choice and Most Creative, all crowned.
@ai_concepts
Sep 25, 2026
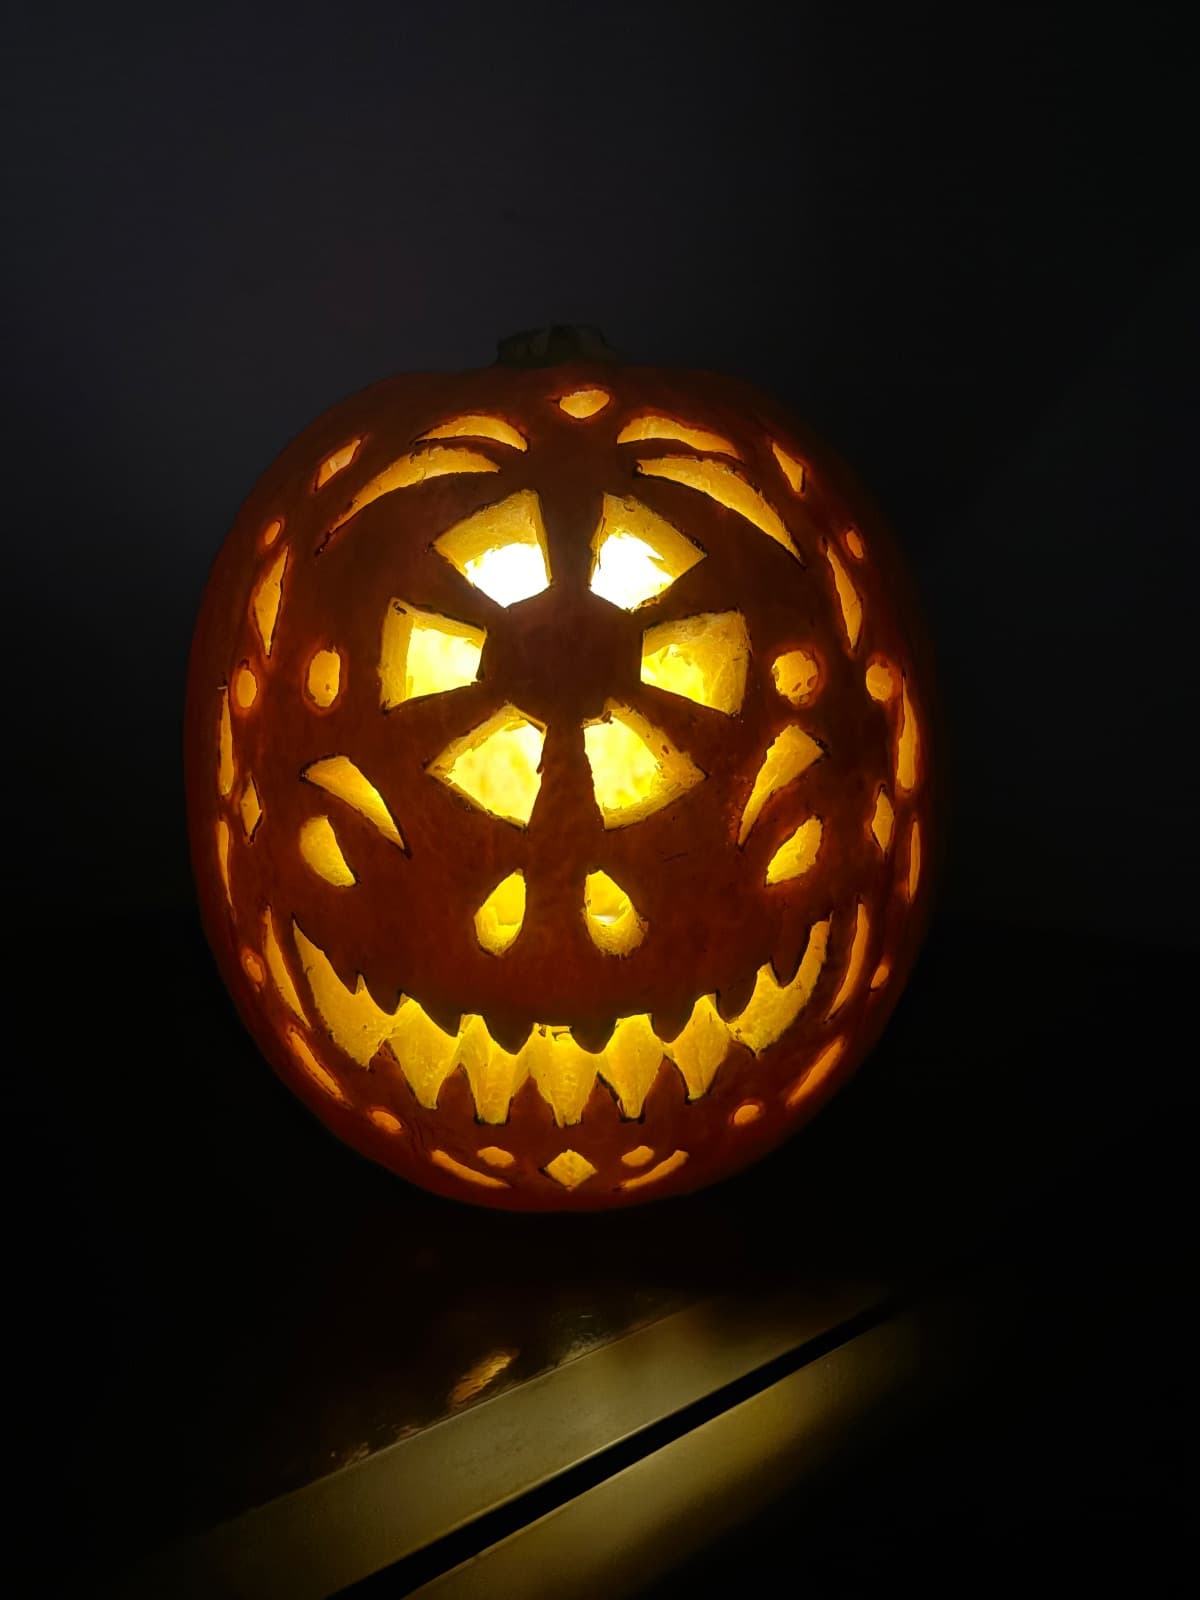
Broadbrow the Glowing Skull pumpkin carvingAI
0

Report this carving

Tell us what is wrong. Reports are private.

Broadbrow the Glowing Skull

This simple skull pumpkin carving idea places eight straightforward cutouts on an orange pumpkin, leaving solid cheeks and a broad forehead to frame the glowing face. Cut the eye sockets first as your anchoring reference, then work outward to the cheek and mouth openings. Keep the cheek bridges wide so the skull shape reads clearly. Set it on a dark wooden step where the warm glow highlights the solid orange rind around each opening.

No ratings yet · Sign in to rate
EasyMonstersScaryClassic Cutout
skullmonsterscaryeasycheekboneforeheadstepeye-socket

Save this design for carving night, then share a photo of your own jack-o'-lantern once it's glowing.

Comments (0)

  • No comments yet. Be the first.

Our tips for carving a similar design

The design stays beginner-friendly because all eight openings are well separated and the cheeks plus forehead remain as generous solid zones that anchor the structure. Cutting the eye sockets first establishes the face proportions and gives you a reference for placing the remaining holes. Warm glow from a single LED highlights the solid orange rind between each opening, making the skull silhouette pop against a dark wooden step.

From pumpkin to porch

  1. Prepare the pumpkin

    Cut a base-entry lid and scoop the interior to about half an inch wall thickness. A base entry keeps the display surface clean and makes it easy to slide a light source in and out. Dry the inner wall with a paper towel before marking the design.

  2. Mark the skull face

    Draw two oval eye sockets in the upper third of the carving face, leaving a broad forehead above them. Sketch a small oval nose below center and a wide, short mouth below that. Mark narrow cheek zones on either side of the nose to remain as solid rind. Keep all shapes simple and rounded.

  3. Cut eye sockets first

    Use a detail knife to score around each eye socket outline, then use a small jab saw to remove the ovals cleanly. Having both sockets open first lets you check that the face proportions feel right before committing to the remaining cuts.

  4. Carve the nose and mouth

    Cut the small nose oval next, then the mouth rectangle. Keep the mouth shorter in height than in width so it reads as a skull's teeth-free lower jaw rather than a generic face. Confirm the cheek bridges on either side of the nose are at least an inch wide.

  5. Add remaining accent holes if desired

    If the design includes small cheekbone or forehead accent holes, cut these last when the main structure is stable. Use a detail knife for small openings and take multiple light passes rather than forcing the cut in one go.

  6. Light and set on a wooden step

    Place an LED light near the bottom of the interior so warmth glows up through all openings evenly. Set the pumpkin on a dark wooden step where the warm light contrasts with the shadow of the step behind it. Rub all cut edges with petroleum jelly to keep the design fresh through the season.

Written with AI to match this design

Gather your supplies

Check things off as you get ready.

Work on a stable surface, keep your free hand out of the cutting path, and have an adult handle sharp tools.

Three levels of light

  • Leave intact

    Broad cheeks, wide forehead, and chin all remain fully intact as dark solid rind.

  • Peel & shade

    None.

  • Cut through

    Eye sockets, nose, mouth, and any accent holes are all cut through for full glow.

Learn the carving basics

Before you start cutting

How do I make the skull look like a skull rather than a regular face?

The key is proportion: make the eye sockets larger relative to the nose and mouth than you would for a normal face, and leave the cheeks very wide. Eliminating individual teeth from the mouth also reads more as a bare skull jaw than a grinning jack-o-lantern.

Can I add cheekbone indentations without cutting all the way through?

Yes. Shaving the outer layer of rind to about half its thickness with a linoleum gouge creates a translucent area that glows softly rather than brightly. This adds subtle depth to the cheek area without the structural risk of a through-hole.

The openings look rough on the inside. How do I clean them up?

Use the flat side of a teaspoon or a craft knife angled at 45 degrees to scrape the inner edge smooth. A rough interior edge scatters light unevenly and can catch on the pumpkin's fibrous interior, so a few minutes of cleanup makes a noticeable difference in the final glow.

Your take belongs here, too.

Changed a detail? Made it simpler? Share a photo of your version and tell the community what worked.

Share your pumpkin

Want more designs like this? Browse our full library of pumpkin carving ideas, or pick a free printable stencil. Every pattern and template in our own collection is free to print at home.

More pumpkins like this

You've reached the end · 8 pumpkins
The Patch Report

Fresh pumpkins, in your inbox.

The best new carvings, ideas worth stealing, and how-tos for carving season. Short, seasonal, and gone by November.

A short email during carving season. Unsubscribe anytime. See our privacy policy.