Halloween Pumpkin Carving Contest · Starts October 1st · $500 in prizes
← Back to ideas
@ai_concepts
Sep 25, 2026
Skull-and-Bones Pumpkin Glowing on a Concrete StepAI
0

Report this carving

Tell us what is wrong. Reports are private.

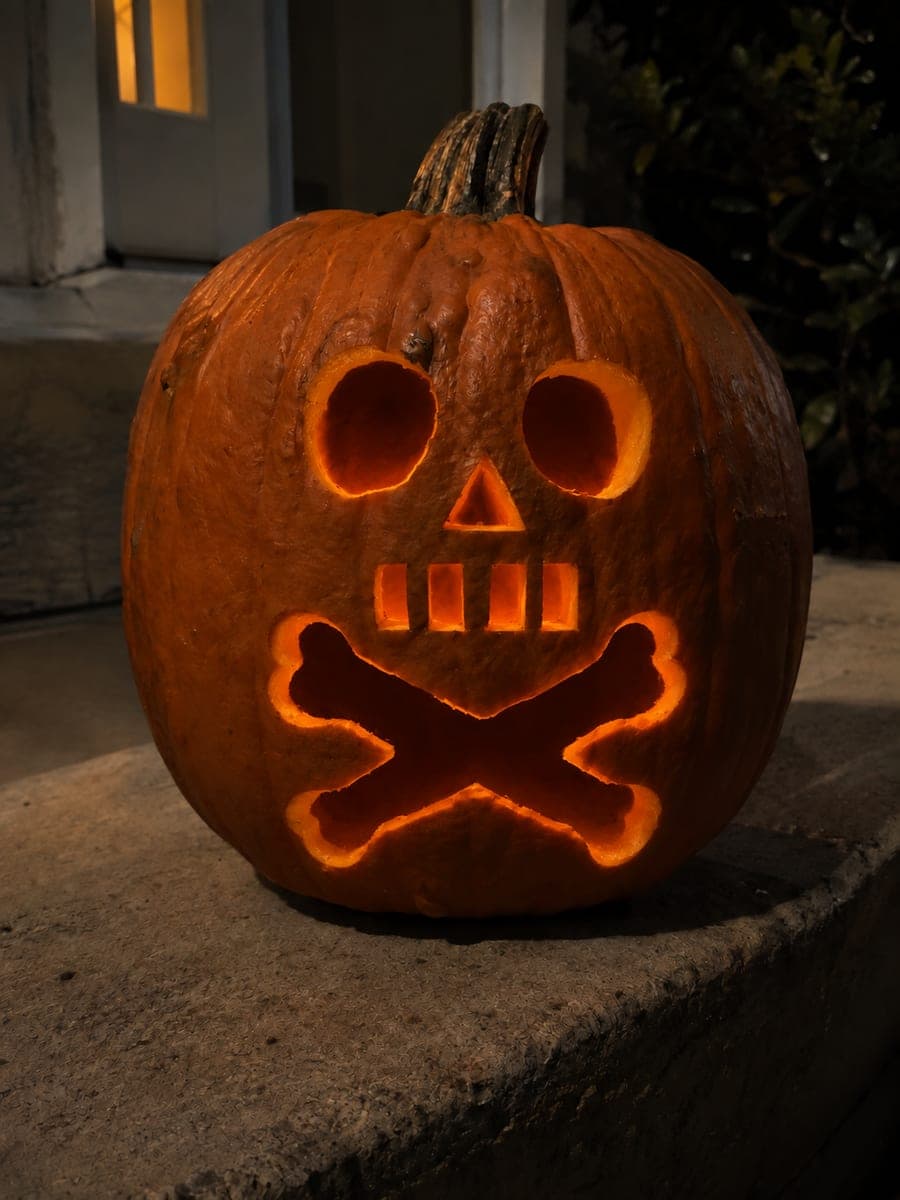
Skull-and-Bones Pumpkin Glowing on a Concrete Step

A simple skull face paired with two bone-shaped cutouts below makes this skeleton pumpkin carving idea immediately recognizable, even at a distance. Cut the face openings first to establish placement, then add the two separated bone shapes below without connecting them to each other. Wide rind between every element prevents cracking on this easy pumpkin carving idea. Concrete steps make an ideal display spot since the glow reflects off the pale surface.

No ratings yet · Sign in to rate
Comments (0)

  • No comments yet — be the first.

Save without an account. Sign in to like or comment.

Our tips for carving a similar design

The design works because the skull face and the two bone shapes below it are all independent openings with wide rind around them, so there is nothing fragile to crack. Establishing the face holes first lets you adjust the bone placement so the overall composition reads as a classic skull-and-crossbones motif at a glance. Concrete steps reflect the warm glow cleanly, amplifying the effect without any extra effort.

From pumpkin to porch

  1. Prepare and gut the pumpkin

    Cut a base lid and scoop the interior to a half-inch wall. Dry the inner surface before marking. A base-entry approach keeps the carving face unobstructed and lets you place the LED behind the opening for maximum coverage.

  2. Mark the skull face

    Sketch two round eye sockets in the upper half of the carving face, a small nose hole below, and a short wide mouth below that. Keep the face openings grouped tightly in the upper two-thirds of the pumpkin so there is room for the bones below.

  3. Cut the face openings

    Use a detail knife and small jab saw to cut each facial opening cleanly. Work from the eye sockets downward to the mouth. Confirm that the rind between each opening is at least an inch wide before moving on.

  4. Sketch and cut the bone shapes

    Draw two bone shapes below the face, angled slightly apart from each other and not touching. A classic dumbbell bone shape works well: an elongated center bar with rounded lobes at each end. Cut each bone as a single through-hole, keeping at least an inch of uncut rind between the bones and between each bone and the face above.

  5. Clean all edges

    Scrape the interior edge of each opening smooth with a spoon or flat knife. Rough edges scatter light unevenly and can trap moisture that speeds up decomposition. Apply a thin coat of petroleum jelly to every cut surface.

  6. Display on a concrete step

    Place a battery-powered LED tea light inside pointing toward the face and bone openings. Set the pumpkin on a concrete step where the pale surface will pick up and amplify the warm glow around the design. The simple shapes read well from across a yard.

Written with AI to match this design

Gather your supplies

Check things off as you get ready.

Work on a stable surface, keep your free hand out of the cutting path, and have an adult handle sharp tools.

Three levels of light

  • Leave intact

    All rind between and around the openings stays dark and solid.

  • Peel & shade

    None.

  • Cut through

    Eye sockets, nose, mouth, and both bone-shaped holes are all cut through.

Learn the carving basics

Before you start cutting

How do I make the bone shapes look like bones rather than ovals?

Sketch a narrow rectangular center bar with a wider lobe at each end, similar to a barbell. The lobes should be roughly twice the width of the center bar. Even a roughly cut version reads as a bone from more than a few feet away once it is glowing.

Can I carve the bones crossing each other like a classic crossbones motif?

Overlapping bones on a pumpkin would require one shape to pass through the other, which is not possible as a through-cut. Instead, place the two bone shapes side by side at slight angles pointing outward so they imply the crossbones arrangement without intersecting.

Why cut the face first rather than the bones?

Cutting the face first gives you anchor reference points for spacing the bones below. If you cut the bones first and then find the face openings do not fit above them without crossing, you have much less room to adjust. Face first keeps your options open.

Your take belongs here, too.

Changed a detail? Made it simpler? Share a photo of your version and tell the community what worked.

Share your pumpkin

More pumpkins like this

You've reached the end · 8 pumpkins
The Patch Report

Fresh pumpkins, in your inbox.

The best new carvings, ideas worth stealing, and how-tos for carving season. Short, seasonal, and gone by November.

A short email during carving season. Unsubscribe anytime. See our privacy policy.