Halloween Pumpkin Carving Contest · Starts October 1st · $500 in prizes
← Back to ideas
@ai_concepts
Jul 17, 2026
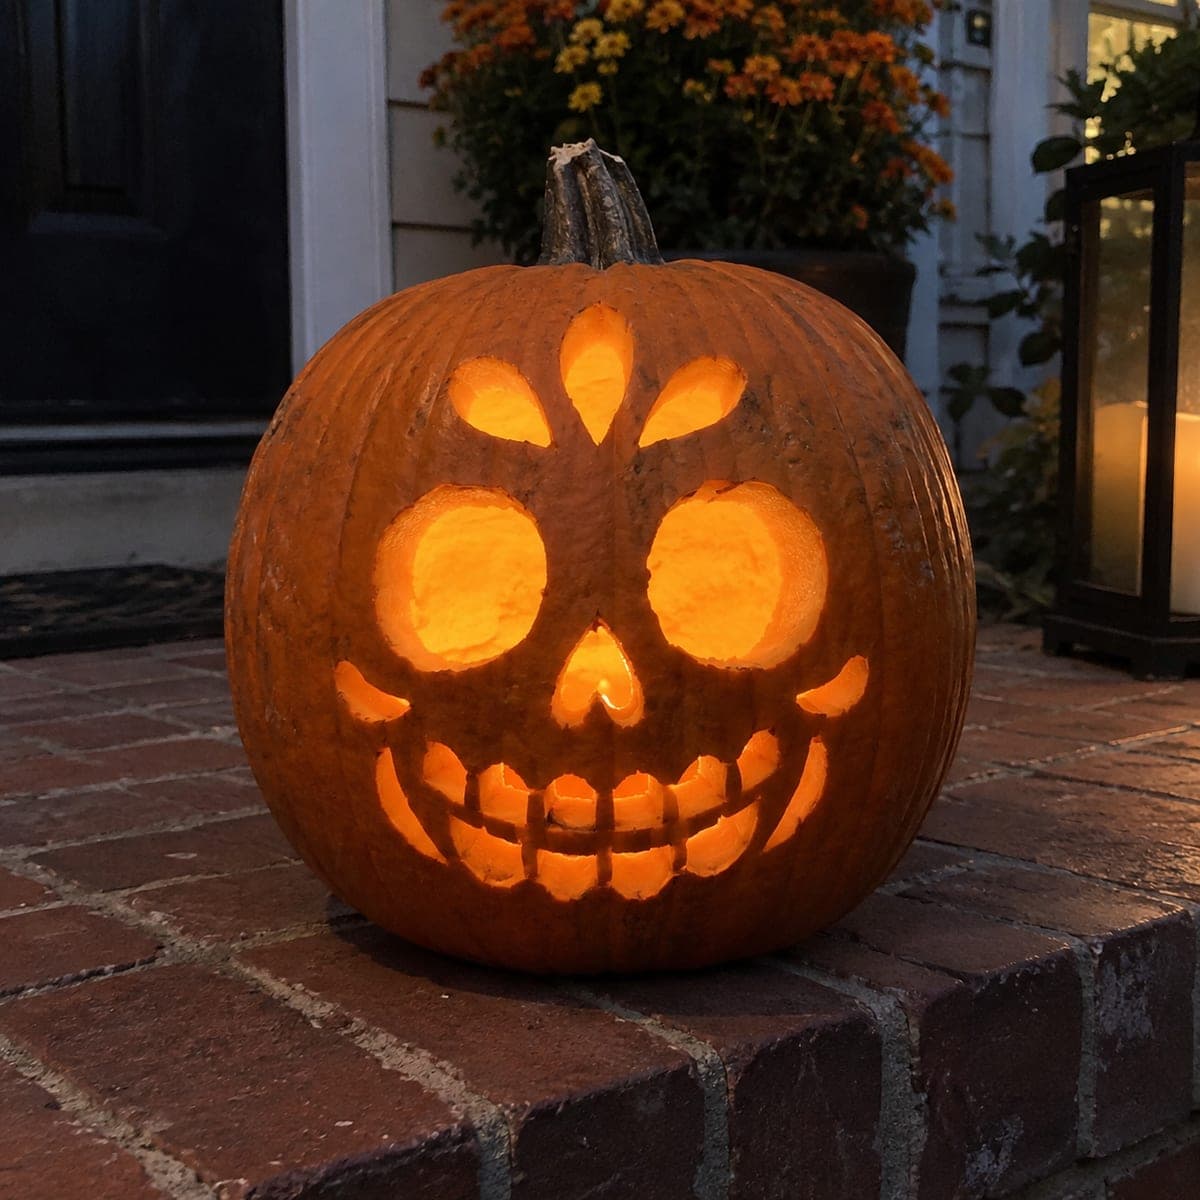
Skull Jack-O-Lantern with Stitches and Square TeethAI
0

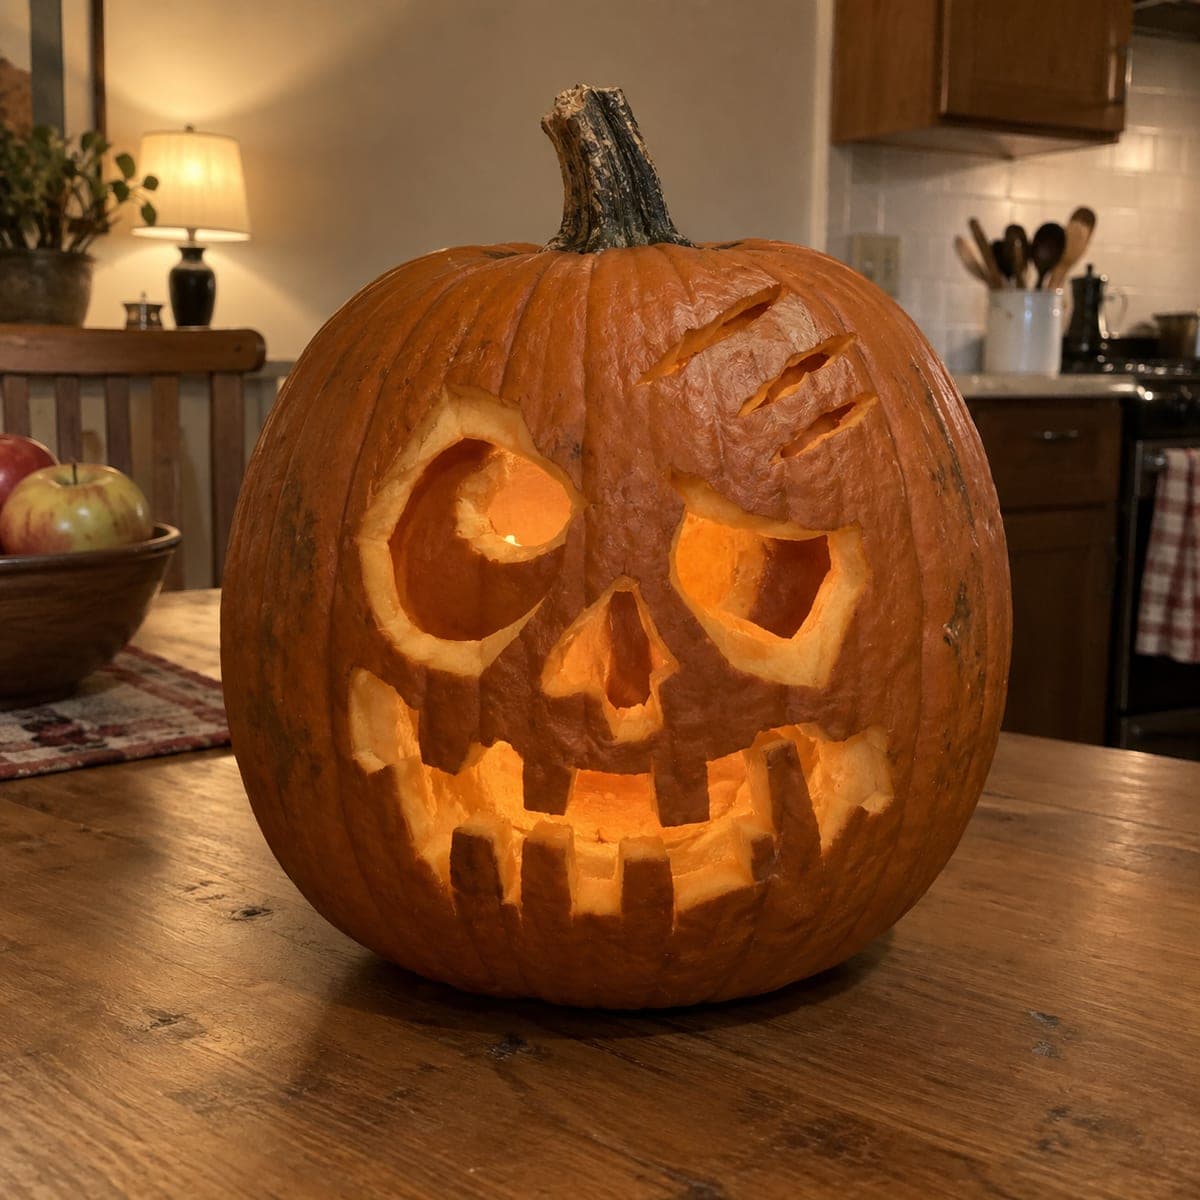
Skull Jack-O-Lantern with Stitches and Square Teeth

Round skull-style eye sockets, a small nasal cavity cutout, and a wide rectangular tooth grin give this pumpkin a Day-of-the-Dead skull feel, with scratch marks carved above the eyes for extra character. The blocky teeth are evenly spaced so the glow is uniform across the bottom of the face. Carve the stitches by dragging a V-tool in short parallel strokes, then open the eye and nose holes before finishing with the teeth. This skull pumpkin carving idea sits naturally in a kitchen or dining room as part of a Halloween tablescape.

This is an AI-generated concept image: a realistic, carvable design idea rather than a photo of a finished carve. AI concepts are always labeled and sit out the leaderboard and the contest.

No ratings yet · Sign in to rate
Comments (0)

  • No comments yet — be the first.

Save without an account. Sign in to like or comment.

Our tips for carving a similar design

The core trick here is contrast between clean cutouts and shallow surface lines. Big round eye sockets, a small nose, and blocky teeth do the heavy lifting for the glow, while short V-tool stitches and scratch marks above the eyes add skull character without weakening the shell. Plan the face first, carve the fine lines while the pumpkin is still solid, then open the large holes in order from small to large.

Written by PumpkinCarvingIdeas.com, inspired by the image above. These are our suggestions, not instructions from the uploader. This approach to the AI concept has not been tested on a real pumpkin.

From pumpkin to porch

  1. Prep the pumpkin and plan the face

    Pick a tall, round pumpkin with a broad flat front so the face reads clearly. Cut a lid from the bottom or the back rather than the top so the stem stays intact, then scoop the inside until the front wall is about one inch thick. Sketch the two round eye sockets, the small nose, the tooth grin, and the scratch marks with a washable marker. Step back and check that everything is centered and evenly spaced before you cut.

  2. Carve the stitches and scratch marks first

    While the shell is still solid it holds detail best, so start with the shallow lines. Drag a V-tool in short parallel strokes to make the stitch marks, and pull three or four angled scratch lines above one eye for that clawed look. Keep these cuts shallow so they only peel or barely pierce the skin. Working these details before the big openings keeps the pumpkin sturdy under your hand.

  3. Peel the socket edges for depth

    To mimic the sunken look of a real skull, use a lino or ribbon tool to shave away just the outer skin around the inner rim of each eye socket. This peeled band glows dim orange and makes the round holes feel deeper. Keep the peeled zone thin and even so both eyes match. Do not cut all the way through yet.

  4. Open the nose and eyes

    Now switch to a fine detail saw and cut out the small nose first since it is the most delicate. Then cut the two round eye sockets, sawing slowly and letting the blade do the work rather than forcing it. Support the shell with your free hand as pieces come free, and clean the edges from the inside for a crisp line. Save the largest openings for last.

  5. Cut the square-tooth grin

    Draw the wide mouth, then mark evenly spaced vertical gaps so the teeth stay uniform. Cut the mouth outline, then remove the small rectangles between teeth one at a time, leaving each blocky tooth firmly attached top and bottom. Even spacing is what makes the glow read evenly across the grin. Go slow so a tooth does not snap loose.

  6. Light it and photograph

    Set a battery LED puck or a short string of LED lights inside, never a candle, since the flame can scorch the thin socket edges. Aim the light upward so it fills the eyes, nose, and each tooth gap. Dab petroleum jelly on the cut edges to slow drying and keep the lines sharp for a few days. Snap your photo in a dim kitchen or dining room for that cozy tablescape glow.

Gather your supplies

Check things off as you get ready.

Work on a stable surface, keep your free hand out of the cutting path, and have an adult handle sharp tools.

Three levels of light

  • Leave intact

    The main face and skin around the stitch lines stay untouched and dark, holding the skull's shape.

  • Peel & shade

    The shaved rims inside the eye sockets and the shallow scratch marks glow a soft mid orange.

  • Cut through

    The round eyes, small nose, and the gaps between the square teeth are cut through for the brightest light.

Learn the carving basics

Before you start cutting

How do I keep the square teeth from breaking off?

Leave each tooth attached at both the top and bottom of the mouth so it acts like a little bridge. Cut only the narrow gaps between teeth, not one long slot. Work slowly with a fine saw and support the surrounding shell with your free hand as each piece drops out.

Should I cut the stitches all the way through?

No, keep the stitch marks shallow so they only score or lightly peel the skin. That way they glow faintly and read as texture rather than open slots. Deep cuts there would weaken the face and let too much light leak out.

This is a concept image, so can a real pumpkin actually look like this?

Yes, every element here is achievable on a real pumpkin as long as you keep the walls about an inch thick and the teeth attached top and bottom. Carve the shallow stitches and scratches first, then open the small nose, the eyes, and the mouth in that order. The uniform glow comes from even spacing and an LED light aimed upward.

Your take belongs here, too.

Changed a detail? Made it simpler? Share a photo of your version and tell the community what worked.

Share your pumpkin

More pumpkins like this

You've reached the end · 8 pumpkins
The Patch Report

Fresh pumpkins, in your inbox.

The best new carvings, ideas worth stealing, and how-tos for carving season. Short, seasonal, and gone by November.

A short email during carving season. Unsubscribe anytime. See our privacy policy.