Halloween Pumpkin Carving Contest · Starts October 1st · $500 in prizes
← Back to ideas
@ai_concepts
Sep 14, 2026
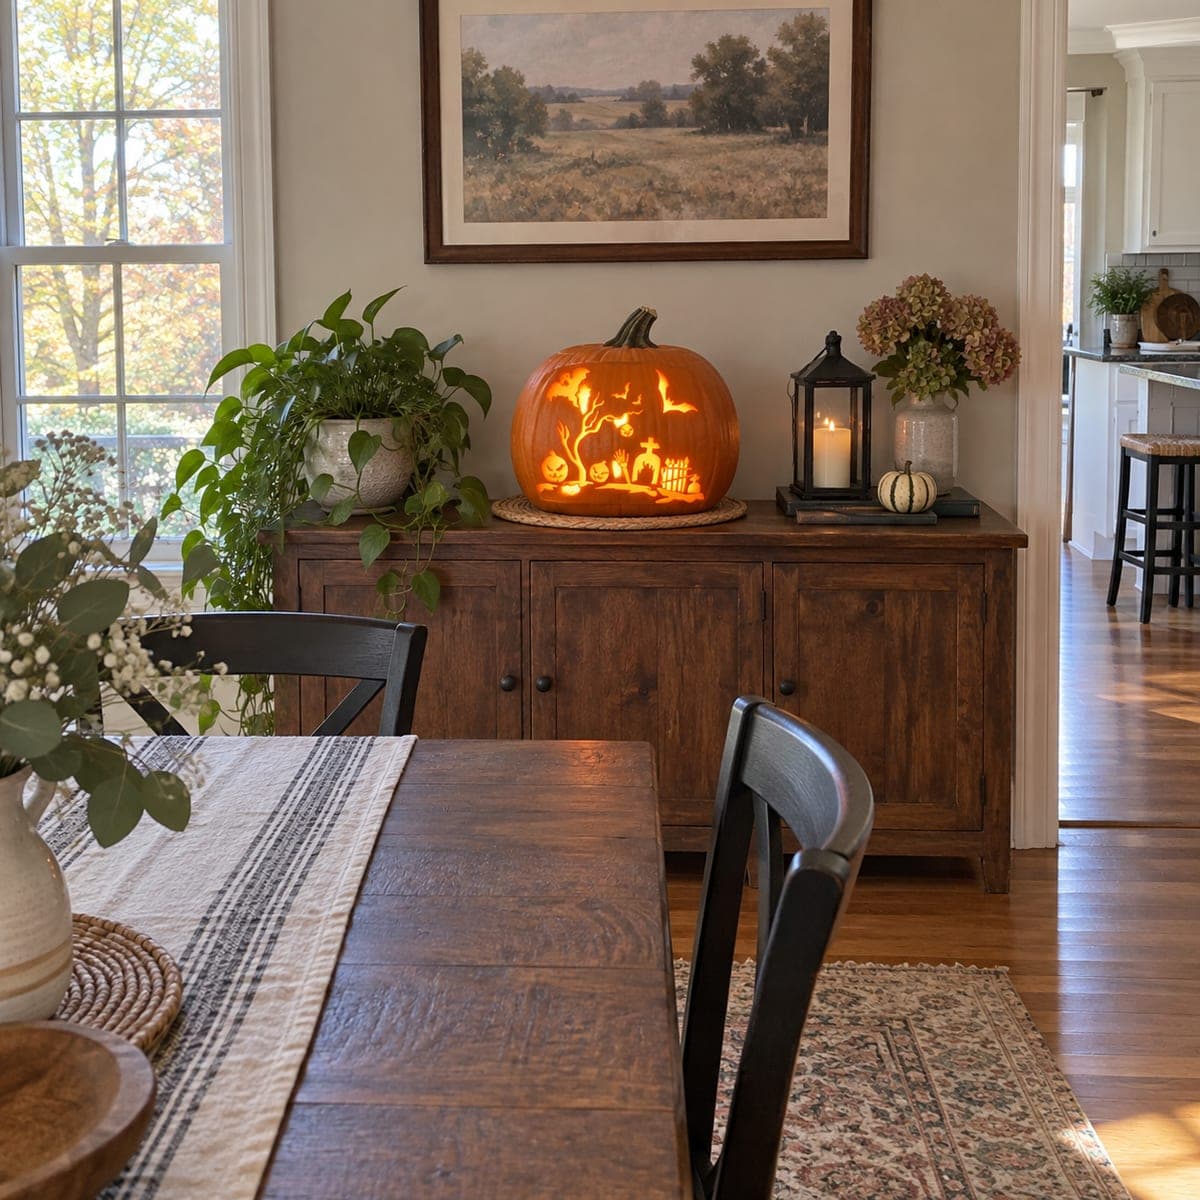
Small Glowing Graveyard Tabletop PumpkinAI
0

Small Glowing Graveyard Tabletop Pumpkin

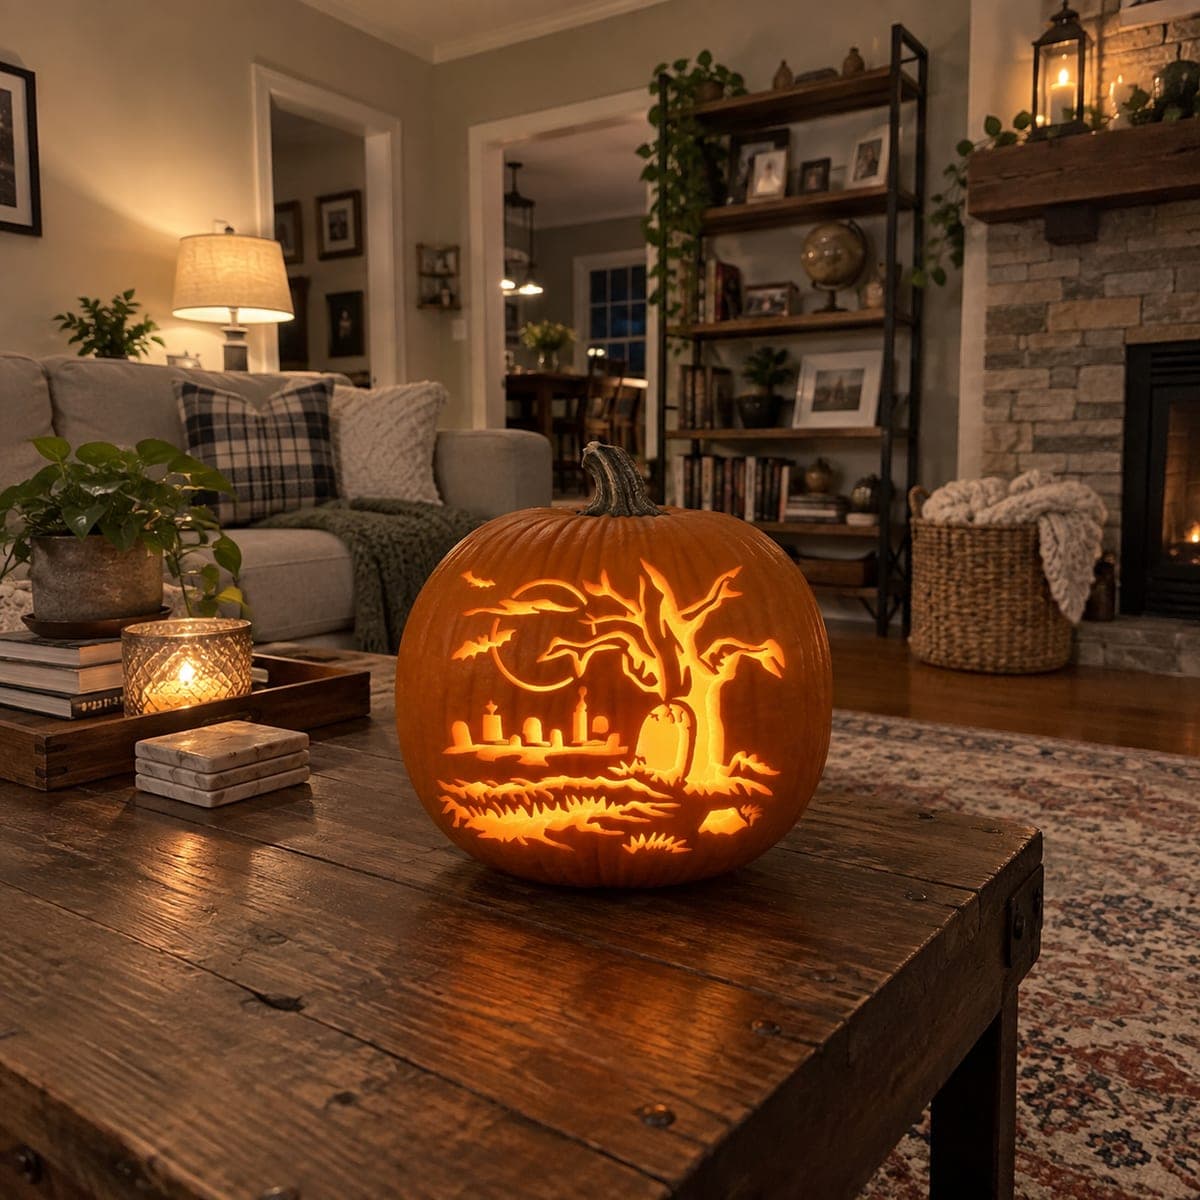
A compact graveyard scene fills the front of this pumpkin, featuring a gnarled tree, flying bats, a jack-o-lantern face near the ground, and clustered headstones that all glow together on an indoor sideboard. Every element is pierced through as a cutout, so the backlit amber light unites the whole composition. Cut the smallest details, like the bat wings and the tiny pumpkin face at ground level, before opening the large background areas, which prevents the rind from flexing and cracking delicate cuts already made.

This is an AI-generated concept image: a realistic, carvable design idea rather than a photo of a finished carve. AI concepts are always labeled and sit out the leaderboard and the contest.

No ratings yet · Sign in to rate
Comments (0)

  • No comments yet — be the first.

Save without an account. Sign in to like or comment.

Our tips for carving a similar design

This is a whole scene in one glow: a gnarled tree, flying bats, clustered headstones, and a little jack-o-lantern face near the ground all pierced as cutouts so the backlight unites them. The trick is cutting the tiniest details, the bat wings and the small pumpkin face, before opening the big background, so the wall never flexes and cracks your fine cuts.

Written by PumpkinCarvingIdeas.com, inspired by the image above. These are our suggestions, not instructions from the uploader. This approach to the AI concept has not been tested on a real pumpkin.

From pumpkin to porch

  1. Choose a smooth pumpkin for indoor display

    This scene is detailed, so pick a pumpkin with a broad, smooth front and a comfortable size for a sideboard or table. Open it from the bottom and hollow it well. Thin the front wall so the many small cuts go cleanly.

  2. Transfer the full scene

    Print the graveyard scene to fit and tape it on, snipping the paper to the curve. Poke every element through with a pin tool: tree, bats, headstones, and the ground-level pumpkin face. Mark the thin bridges (tree branches, headstone gaps) you must keep.

  3. Cut the smallest details first

    Start with the bat wings, the little jack-o-lantern face, and the fine tree branches while the wall is fully solid. These tiny cuts are the most fragile, so do them before anything large is open. Take short, patient strokes with a craft knife.

  4. Open the headstones and midground

    Cut the clustered headstones and any midsize gaps, leaving rind bridges so the stones read as separate shapes. Remove waste in small sections. Keep the branch bridges intact so the tree holds together.

  5. Open the large background last, then light it

    Cut the big sky and ground openings last so the pumpkin stays rigid through the detailed work. Bevel inside edges so the whole scene glows evenly. Set a warm LED inside and view it in a dim room so the amber light ties the scene together.

Gather your supplies

Check things off as you get ready.

Work on a stable surface, keep your free hand out of the cutting path, and have an adult handle sharp tools.

Three levels of light

  • Leave intact

    Dark rind forms the tree trunk, branches, and the gaps between headstones.

  • Peel & shade

    Optional: shave the moon or a headstone thin for a softer mid glow.

  • Cut through

    The sky, bats, headstone shapes, and little pumpkin face are cut through.

Learn the carving basics

Before you start cutting

Why cut the tiny pieces before the big openings?

The pumpkin wall is strongest when it is mostly intact. Doing the bat wings, tiny face, and thin branches first, then opening the large background last, keeps the surface from flexing and cracking those delicate cuts.

How do I keep the tree branches from breaking?

Leave them as connected bridges of rind rather than isolating them, and cut around them gently. If a branch feels too thin, thicken it slightly on your drawing before cutting.

Indoors or outdoors for this one?

It is designed as an indoor tabletop piece, where the fine detail reads up close and a steady LED shows off the scene. Keep it out of wind and rain to protect the delicate cuts.

Your take belongs here, too.

Changed a detail? Made it simpler? Share a photo of your version and tell the community what worked.

Share your pumpkin

More pumpkins like this

You've reached the end · 8 pumpkins
The Patch Report

Fresh pumpkins, in your inbox.

The best new carvings, ideas worth stealing, and how-tos for carving season. Short, seasonal, and gone by November.

A short email during carving season. Unsubscribe anytime. See our privacy policy.