Halloween Pumpkin Carving Contest · Starts October 1st · $500 in prizes
← Back to ideas
@ai_concepts
Jul 15, 2026
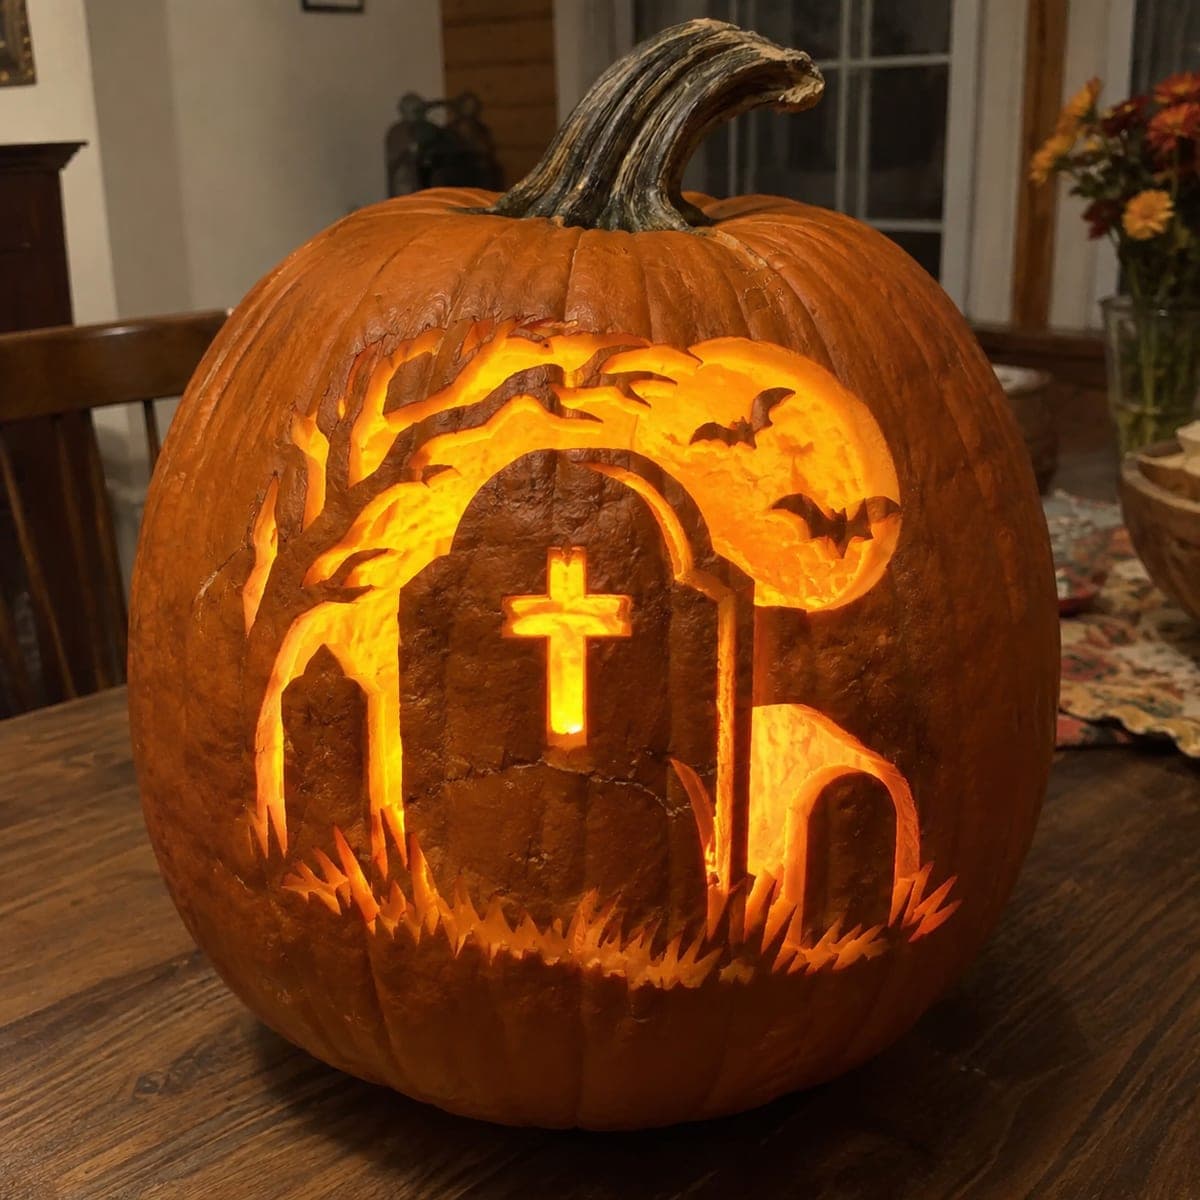
Graveyard Gate and Tombstone Jack-O-Lantern SceneAI
0

Graveyard Gate and Tombstone Jack-O-Lantern Scene

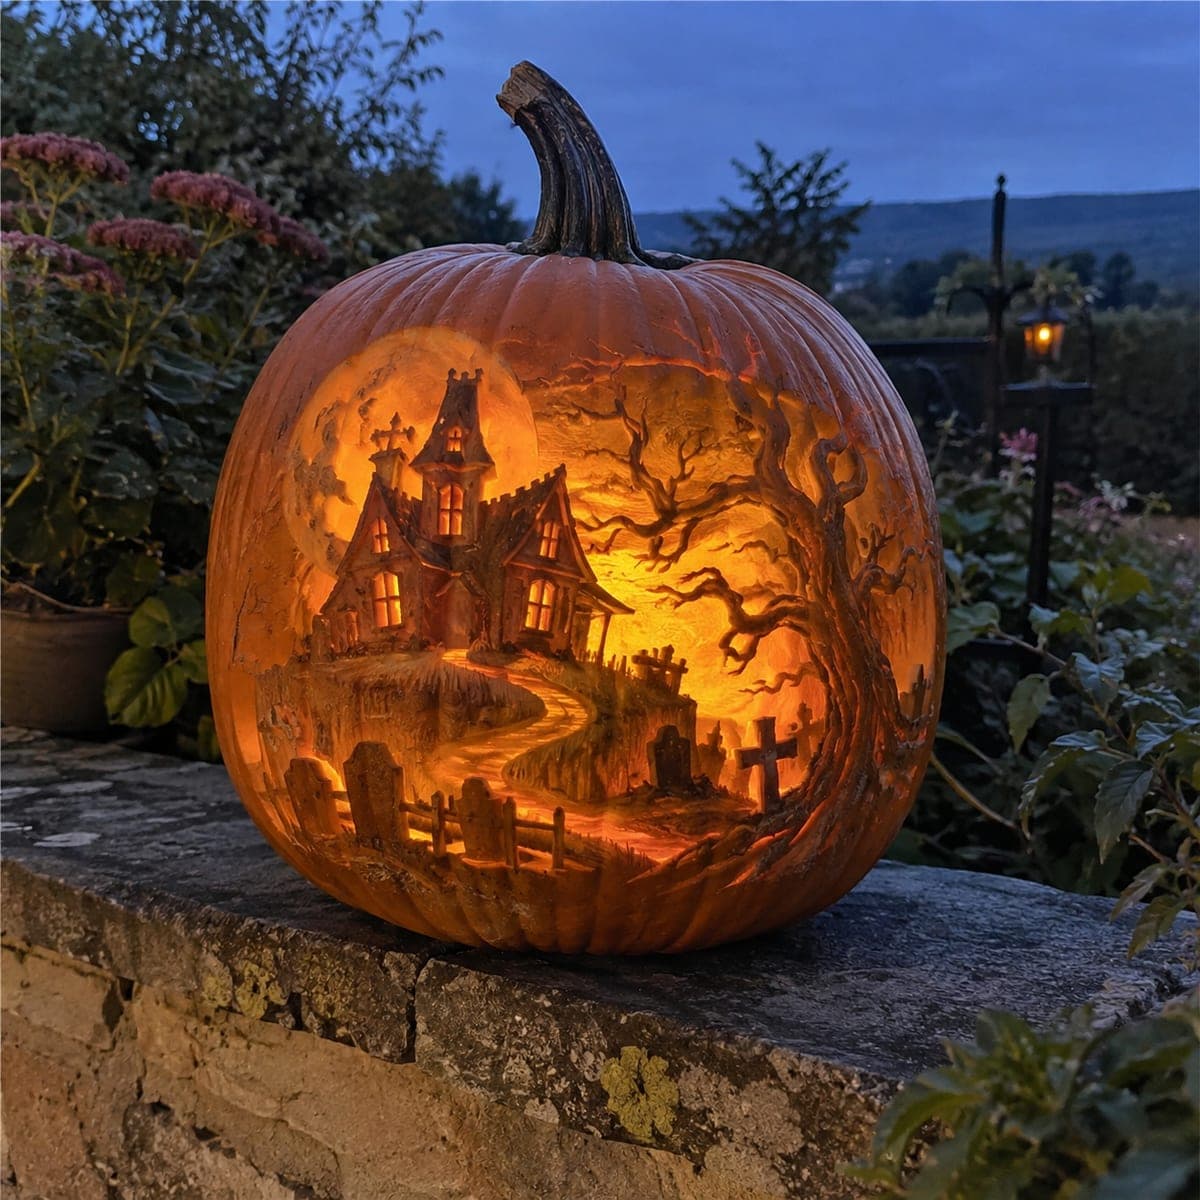
This graveyard scene jack-o-lantern packs a windblown tree, flying bats, a full moon, and a cross-topped headstone into one glowing panel. Most of the background is carved away so light floods around the dark tombstone, a classic silhouette-in-reverse trick. Carve the fragile grass blades and tree branches last so you are not stressing thin bridges while you work, and use an LED puck for even glow.

This is an AI-generated concept image: a realistic, carvable design idea rather than a photo of a finished carve. AI concepts are always labeled and sit out the leaderboard and the contest.

No ratings yet · Sign in to rate
Comments (0)

  • No comments yet — be the first.

Save without an account. Sign in to like or comment.

Our tips for carving a similar design

The core trick here is reverse silhouette: most of the background is cut away so light pours around a dark, uncarved tombstone that reads as a solid shape. You build the scene in layers, keeping the big central headstone as untouched skin while the moon, sky, and grass carry the glow. A stencil keeps the fragile branches and grass blades organized before you ever touch a blade.

Written by PumpkinCarvingIdeas.com, inspired by the image above. These are our suggestions, not instructions from the uploader. This approach to the AI concept has not been tested on a real pumpkin.

From pumpkin to porch

  1. Plan and transfer the scene

    Pick a smooth, wide pumpkin face so all the elements fit in one panel. Print or draw a graveyard stencil with the tree, moon, bats, headstone, and grass, then tape it flat and poke the outlines with a transfer tool. Mark which areas will stay dark, which get peeled, and which get cut fully through so you have a clear map. Doing this now prevents you from cutting the tombstone shape by mistake later.

  2. Open the pumpkin and thin the wall

    Have an adult cut a lid from the bottom or the back rather than the top, so the stem stays intact and the pumpkin sits stable. Scoop the pulp and scrape the carving wall down to about one inch thick where the design sits. A thinner wall makes peeling and cutting far easier and lets light glow evenly. Keep the wall a little thicker near the grass line where thin bridges will live.

  3. Cut the big background openings first

    Start with the largest full cutouts: the full moon and the open sky around the tree. Use a fine saw blade and take slow, steady strokes, cutting big shapes before small ones so the surface stays strong. Leave the central headstone completely uncut so it stands as a dark silhouette. Save the bats as small floating cutouts against the moon and cut them carefully so their wings do not tear.

  4. Peel the mid-tone shapes

    Switch to a shallow gouge or lino tool and skin off just the top layer on the moon's surface texture and the smaller side headstones. Removing only the skin, not the full wall, gives a soft dim orange glow that separates these shapes from the bright cutouts. Test depth in a hidden spot first. Keep the main cross-topped tombstone untouched so the contrast stays strong.

  5. Carve the cross and fine details

    Cut the small cross window in the center of the headstone so it reads as the brightest point of the scene. Then carve the dead tree branches and the flying bats, using thin bridges of skin to keep long branches attached and stable. Go slow on these delicate lines and support the pumpkin with your free hand away from the blade. If a branch feels weak, widen its base slightly for strength.

  6. Cut the grass and light it up

    Finish with the fragile grass blades along the bottom, cutting these last so you are not stressing thin bridges while carving above them. Angle the blades slightly and vary their heights for a natural look. Drop in a battery LED puck for even, flicker-free light, never a candle near these thin walls. Rub a little petroleum jelly on cut edges to slow drying, then photograph it in a dark room.

Gather your supplies

Check things off as you get ready.

Work on a stable surface, keep your free hand out of the cutting path, and have an adult handle sharp tools.

Three levels of light

  • Leave intact

    The main cross-topped tombstone and the tree trunk stay as untouched dark skin.

  • Peel & shade

    The moon's cratered surface and the smaller side headstones get skin-peeled for a soft dim glow.

  • Cut through

    The open sky, full moon opening, bats, grass blades, and the cross window are cut fully through for the brightest light.

Learn the carving basics

Before you start cutting

How do I keep the tombstone dark while everything glows around it?

Carve everything except the headstone, leaving that shape as full-thickness, untouched skin. Because no light passes through it, it reads as a solid dark silhouette against the bright cutout sky. This reverse silhouette effect is the whole point of the design, so resist the urge to add detail to the main stone.

Won't the thin tree branches and grass blades break?

They can if you carve them too early or too thin. Cut the large openings first, then the branches, and save the grass for very last so the wall stays strong while you work. Leave small bridges of skin connecting long branches, and widen the base of any blade that feels flimsy.

This is a concept image, so can a real pumpkin actually look like this?

Yes, with planning. Every element here is achievable if you keep the wall around one inch, use bridges on the tree and bats, and carve delicate pieces last. Just expect the fine branches and grass to be the trickiest part, so go slow and support the pumpkin with your free hand.

Your take belongs here, too.

Changed a detail? Made it simpler? Share a photo of your version and tell the community what worked.

Share your pumpkin

More pumpkins like this

You've reached the end · 8 pumpkins
The Patch Report

Fresh pumpkins, in your inbox.

The best new carvings, ideas worth stealing, and how-tos for carving season. Short, seasonal, and gone by November.

A short email during carving season. Unsubscribe anytime. See our privacy policy.