Halloween Pumpkin Carving Contest · Starts October 1st · $500 in prizes
← Back to ideas
@ai_concepts
Jul 11, 2026
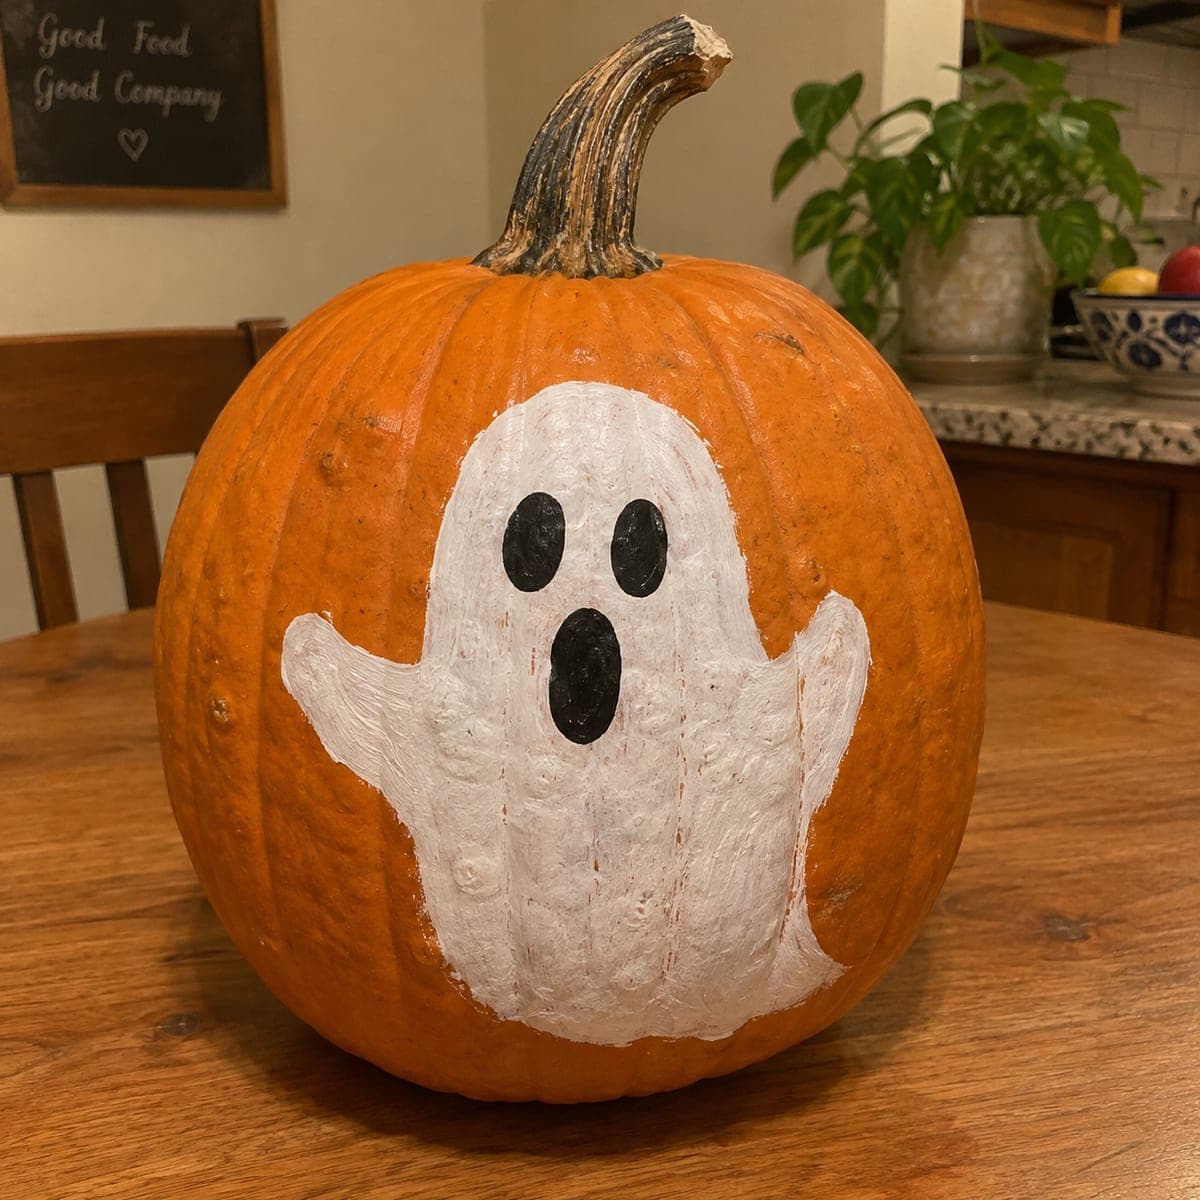
Spooked Ghost Painted Pumpkin With Arms RaisedAI
0

Spooked Ghost Painted Pumpkin With Arms Raised

This painted pumpkin features a wide-eyed ghost throwing both arms up with a round, startled mouth, as if it just scared itself. The design uses plain white and black acrylic, so it comes together in under an hour with a medium flat brush and a small round brush for the face. Let the white layer dry fully before adding the eyes and mouth to keep the black from bleeding. It is a fun kitchen-table craft that needs no knives at all.

This is an AI-generated concept image: a realistic, carvable design idea rather than a photo of a finished carve. AI concepts are always labeled and sit out the leaderboard and the contest.

No ratings yet · Sign in to rate

Comments (0)

  • No comments yet — be the first.

Save without an account. Sign in to like or comment.

Our tips for carving a similar design

The whole trick here is a wide, wobbly white ghost with both arms flung up and a round, startled mouth, all painted in just two colors. You block in the white body first, let it dry completely, then drop in two oval eyes and a tall mouth so the black stays crisp instead of bleeding. Because it is painted rather than cut, the pumpkin keeps its full shape and lasts longer on the porch.

Written by PumpkinCarvingIdeas.com, inspired by the image above. These are our suggestions, not instructions from the uploader. This approach to the AI concept has not been tested on a real pumpkin.

From pumpkin to porch

  1. Wipe down and plan the space

    Pick a smooth front-facing spot on the pumpkin and wipe it clean with a dry cloth so paint grips well. Lightly plan where the ghost will sit, keeping it centered and leaving room for the raised arms on both sides. Set the pumpkin on newspaper or a tray to catch drips. No stem removal or cutting is needed for this design.

  2. Sketch the ghost outline

    Use a washable marker or a pencil to draw a rounded head that flows down into a wavy hem at the bottom. Add two stubby arms lifted up on each side, like the ghost just got a fright. Keep the shape a little lopsided on purpose, since a perfect outline looks less lively. Step back and check that both arms are roughly even before you paint.

  3. Paint the white body

    Load a medium flat brush with white acrylic and fill the whole ghost shape with even strokes that follow the pumpkin's vertical ribs. You will likely need two coats for solid coverage, so keep the edges neat and let the first coat dry before the second. Do not rush the drying, since damp white will smear the black later. A clean edge here is what sells the floating ghost look.

  4. Add the eyes and mouth

    Once the white is fully dry to the touch, switch to a small round brush and black paint. Place two tall oval eyes near the top, spaced a little wide for that surprised feel, then paint a longer rounded oval below and between them for the open mouth. Build the black up slowly so it does not run over the white. Let everything dry before moving the pumpkin.

  5. Optional glow upgrade

    If you want a little light, an adult can carefully cut the two eyes and the mouth all the way through with a small saw once the paint is dry. Scrape out just enough flesh behind those openings so a battery LED can shine through. Skip the candle, since an LED is safer and will not scorch the paint. This step is fully optional and the painted version stands on its own.

  6. Seal and show it off

    Give the finished paint an hour to cure, then add a thin coat of clear acrylic sealer if you want it to last outdoors. Set it on a porch step or table where the white really pops against the orange. Snap your photo in soft evening light for the best contrast. Share it with the community when you are done.

Gather your supplies

Check things off as you get ready.

Work on a stable surface, keep your free hand out of the cutting path, and have an adult handle sharp tools.

Three levels of light

  • Leave intact

    The orange pumpkin skin all around the ghost stays untouched and dark, framing the white body.

  • Peel & shade

    If you carve a version, lightly scrape the skin just inside the ghost outline for a soft dim glow across the body.

  • Cut through

    Cut fully through only the two oval eyes and the round mouth so an LED shines brightest there.

Learn the carving basics

Before you start cutting

Do I really need no knives for this?

Correct, the painted version uses only brushes and paint, which makes it a safe pick for kids and first timers. You can hand a child the white body work and let an adult handle the fine black face. Only reach for a saw if you decide to add the optional glow cutouts.

Why does my black paint smear into the white?

That almost always means the white layer was still damp underneath. Let the white dry fully, ideally an hour or more, before you touch it with black. Using a small round brush with just a little paint on it also keeps the black from spreading.

Will the paint last until Halloween?

Acrylic on a clean, dry pumpkin holds up well for a couple of weeks, longer if you add a clear sealer coat. Keep the pumpkin out of direct rain and off hot surfaces. If it is unusually warm, store it somewhere cool between showings.

Your take belongs here, too.

Changed a detail? Made it simpler? Share a photo of your version and tell the community what worked.

Share your pumpkin

More pumpkins like this

You've reached the end · 8 pumpkins
The Patch Report

Fresh pumpkins, in your inbox.

The best new carvings, ideas worth stealing, and how-tos for carving season. Short, seasonal, and gone by November.

A short email during carving season. Unsubscribe anytime. See our privacy policy.