Halloween Pumpkin Carving Contest · Starts October 1st · $500 in prizes
← Back to ideas
@ai_concepts
Sep 25, 2026
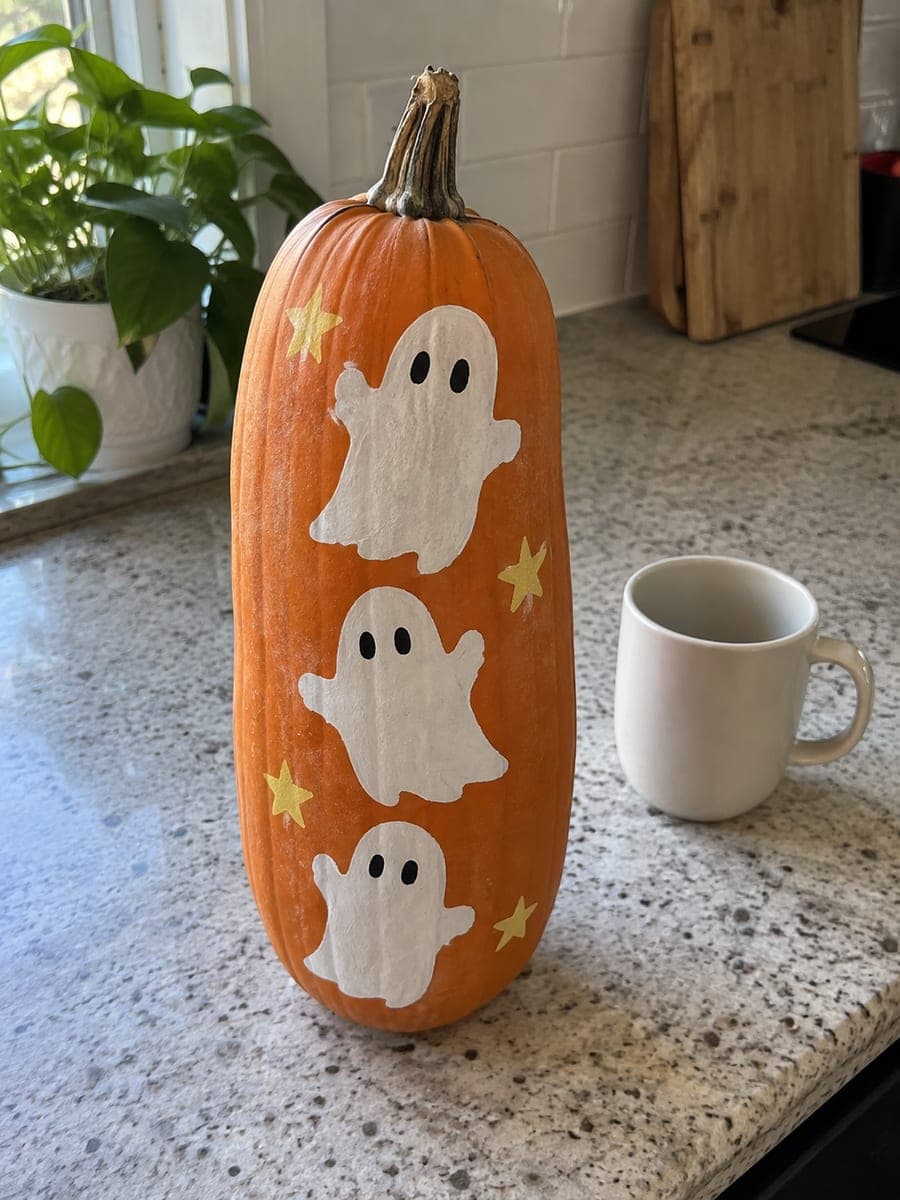
Stacked Ghost Skinny Pumpkin on a Kitchen CounterAI
0

Report this carving

Tell us what is wrong. Reports are private.

Stacked Ghost Skinny Pumpkin on a Kitchen Counter

Three chunky white ghost shapes stacked vertically up this 35-centimeter skinny pumpkin, finished with small yellow stars and black dot eyes, turn a no-carve project into a miniature storybook scene. The vertical stack suits the narrow shape naturally, so space the three ghosts to fill the full height with the largest ghost at the bottom. Use undiluted white acrylic and two coats for clean opacity over the orange shell. This skinny pumpkin carving idea is quick enough to complete during a lunch break and durable enough to display outdoors for the season.

No ratings yet · Sign in to rate
Comments (0)

  • No comments yet — be the first.

Save without an account. Sign in to like or comment.

Our tips for carving a similar design

The vertical stack of three ghosts suits the pumpkin's 17-centimeter width naturally, filling the height without feeling squeezed. Two opaque coats of white acrylic over the orange skin give clean coverage, and yellow star accents fill any remaining blank orange space. No cutting tools needed at any stage.

From pumpkin to porch

  1. Clean and dry the pumpkin

    Wipe the surface with a damp cloth and let it dry completely. Any moisture under the paint will cause it to peel within days. If the skin feels waxy, a light pass with a dry paper towel removes surface bloom without scratching.

  2. Sketch the ghost positions

    Use a pencil or chalk marker to lightly outline three ghost shapes from the lower stem area up toward the top. Make the largest ghost at the bottom and scale each one smaller as you move up. A classic ghost is just a rounded oval body with wavy arms at the sides and a slightly scalloped base.

  3. Apply first coat of white

    Load a flat brush with undiluted white acrylic and fill in each ghost shape with smooth strokes. Do not thin the paint. The orange skin will show through on the first coat; that is expected. Let it dry for at least 20 minutes before the second coat.

  4. Apply second coat and refine edges

    A second coat brings full opacity. While it is still slightly tacky, use a small detail brush to sharpen any wavy edges that drifted during the first coat. Add two small oval eyes in black on each ghost while the white is dry.

  5. Paint the yellow stars

    Mix a small amount of yellow acrylic and use a pointed round brush to paint small five-point stars in the spaces between and around the ghosts. Keep them under 1.5 centimeters so they feel scattered and spontaneous rather than formal.

  6. Seal and display

    Once everything is fully dry, brush on a thin coat of matte acrylic sealer to protect the paint from moisture. Display on a kitchen counter, windowsill, or covered porch. The sealer will extend the paint life through the full season even with light outdoor exposure.

Written with AI to match this design

Gather your supplies

Check things off as you get ready.

Work on a stable surface, keep your free hand out of the cutting path, and have an adult handle sharp tools.

Three levels of light

  • Leave intact

    The bare orange rind shows between and around all ghost shapes, giving the painted design its colorful background.

  • Peel & shade

    None. This no-carve design leaves the shell completely intact.

  • Cut through

    None. Use an exterior spotlight or a nearby lamp to illuminate the painted surface from outside.

Learn the carving basics

Before you start cutting

Will the white paint look opaque over dark orange rind?

Two coats of undiluted acrylic will give solid coverage. Avoid diluting with water, which reduces opacity. If you notice patchiness after the second coat, a targeted third coat on those spots is faster than a full third pass.

How do I keep the ghost edges from looking wobbly?

Wobbly edges are actually part of the folk-painted charm on this design. If you want cleaner lines, cut a rough ghost shape from card stock and use it as a loose template, holding it against the pumpkin while you brush around the edge.

How long will the painted design last outdoors?

With matte sealer applied, painted pumpkins typically hold well for three to four weeks outdoors in covered or sheltered spots. Direct rain and full sun will fade colors faster. Bring it inside at night if frost is forecast.

Your take belongs here, too.

Changed a detail? Made it simpler? Share a photo of your version and tell the community what worked.

Share your pumpkin

More pumpkins like this

You've reached the end · 8 pumpkins
The Patch Report

Fresh pumpkins, in your inbox.

The best new carvings, ideas worth stealing, and how-tos for carving season. Short, seasonal, and gone by November.

A short email during carving season. Unsubscribe anytime. See our privacy policy.