Halloween Pumpkin Carving Contest · Starts October 1st · $500 in prizes
← Back to ideas
@ai_concepts
Aug 19, 2026
Starfish and Seaweed Ocean Scene No-Carve PumpkinAI
0

Starfish and Seaweed Ocean Scene No-Carve Pumpkin

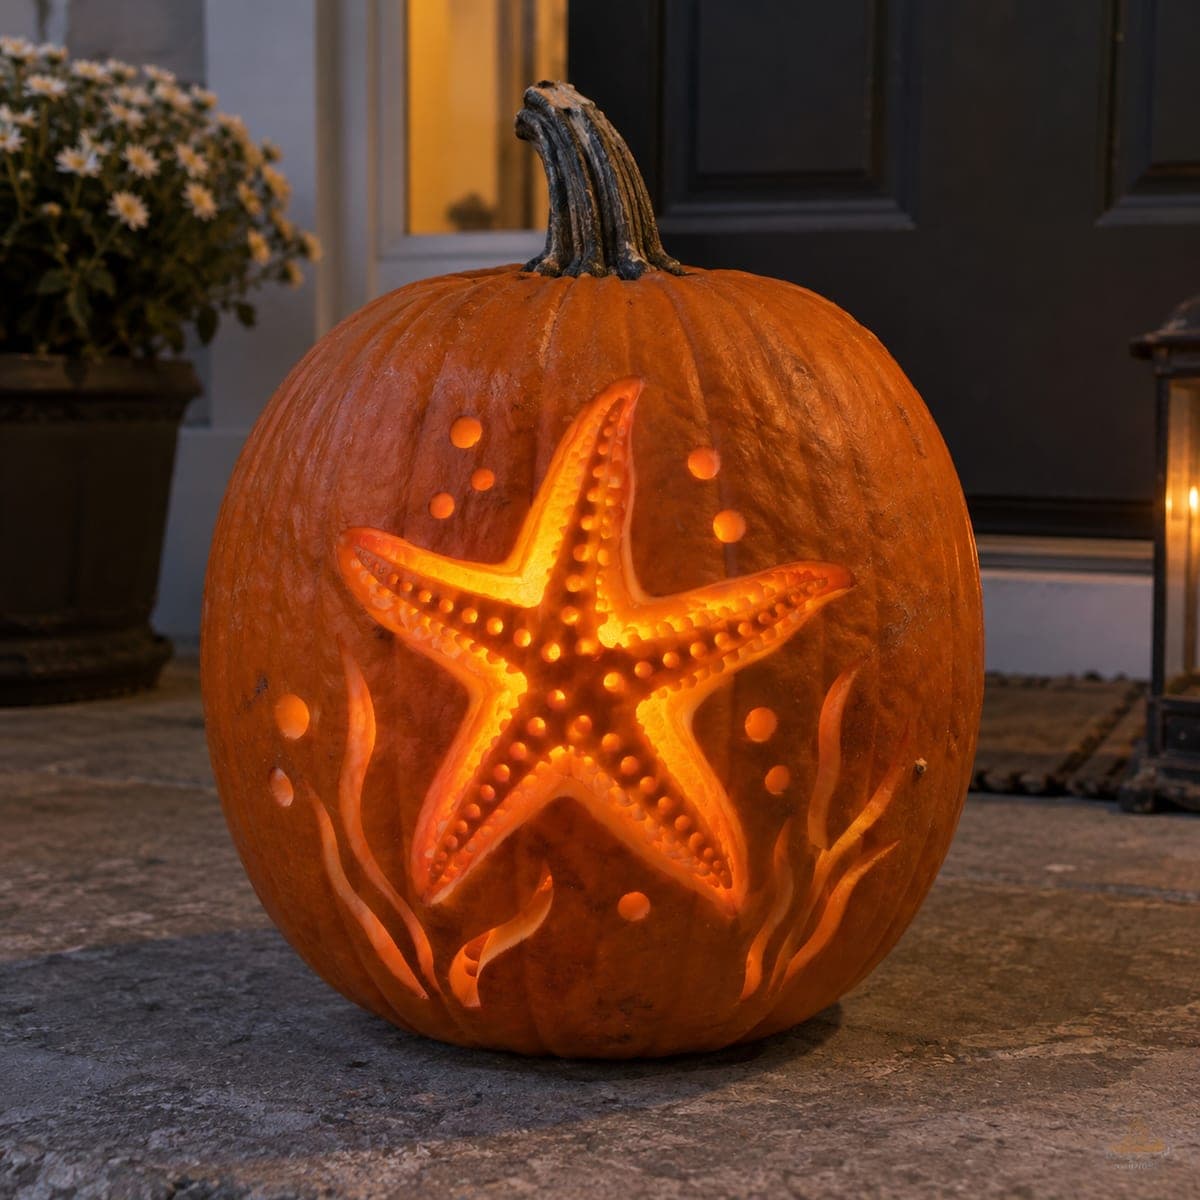
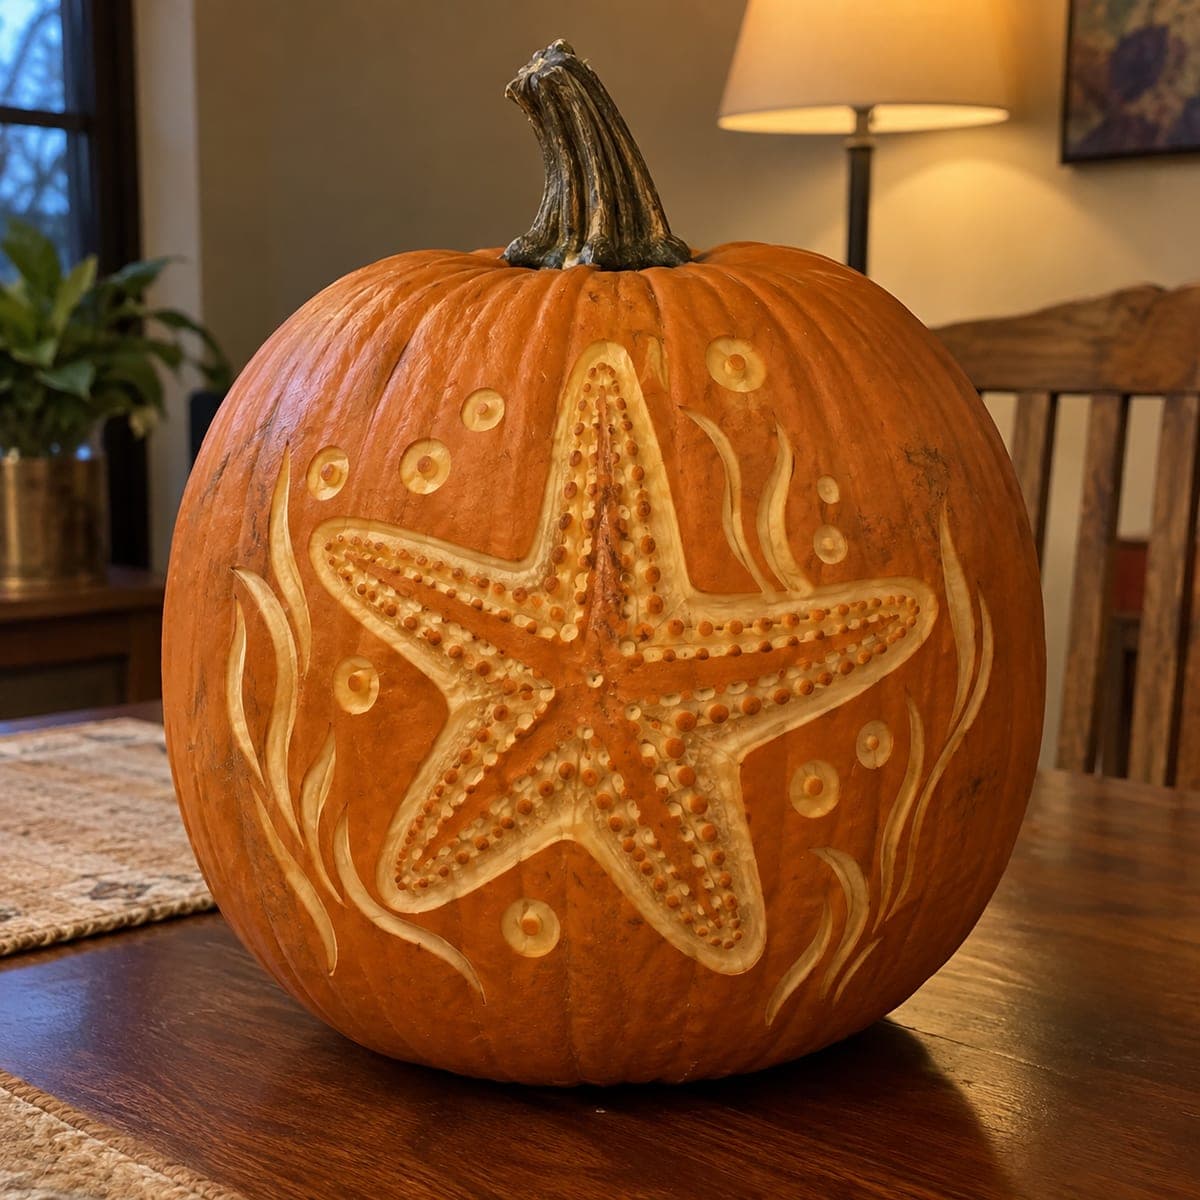
A large starfish surrounded by seaweed fronds and bubble dots is etched across the face of this pumpkin in careful surface relief, none of the design cut all the way through. The dotted texture on the starfish arms and the varied depth of the seaweed stems create a dimensional underwater scene that looks elegant in natural light. A linoleum cutter works well for the tiny raised dots, while a V-tool traces the curved seaweed lines. This nature-themed pumpkin carving idea suits a coastal or beach-style fall tablescape.

This is an AI-generated concept image: a realistic, carvable design idea rather than a photo of a finished carve. AI concepts are always labeled and sit out the leaderboard and the contest.

No ratings yet · Sign in to rate
Comments (0)

  • No comments yet — be the first.

Save without an account. Sign in to like or comment.

Our tips for carving a similar design

The whole trick here is depth without holes: the light never shines through, so every part of the design is either untouched skin, peeled skin, or a shallow dotted texture. You build a starfish out of raised dots surrounded by flowing seaweed and bubble rings, letting varied carving depth read as dimension in soft room light. Plan the star in the center first, then let the seaweed sweep out to fill the sides.

Written by PumpkinCarvingIdeas.com, inspired by the image above. These are our suggestions, not instructions from the uploader. This approach to the AI concept has not been tested on a real pumpkin.

From pumpkin to porch

  1. Prep and transfer the design

    Pick a large, smooth pumpkin with a flat-ish front so the star sits evenly. Since this is a surface relief piece, you do not need to open the top or gut it fully, but scooping a small access hole in the back lets you drop in an LED later. Tape your stencil over the face and poke the outline of the star, seaweed, and bubble dots with a pin or awl. Peel the paper and connect the dots lightly with a pencil so you can see the full layout.

  2. Outline the star and seaweed with a V-tool

    Trace the five arms of the starfish and the long curved seaweed fronds using a V-gouge, keeping each groove shallow and steady. Pull the tool toward you in smooth strokes and let the seaweed lines taper to fine points at their tips. Vary the depth slightly so some fronds sit deeper than others, which reads as layers underwater. Keep these lines connected to the surrounding skin so nothing lifts away.

  3. Skin-peel the raised areas for a mid glow

    Use a ribbon loop or shallow gouge to remove just the top skin inside the seaweed shapes and along the star's raised body, exposing the pale flesh underneath. Work in thin passes so you keep a smooth, even surface rather than digging pits. This peeled layer will glow a soft dim orange and separates the design from the darker untouched background. Leave the very center ridge of the star slightly higher for a rounded look.

  4. Punch the dotted texture on the star arms

    Switch to a small linoleum cutter or the smallest loop tool to press rows of tiny dots down each starfish arm and around the bubble clusters. Keep the dots evenly spaced and shallow, letting them catch light on their rims. Take your time here since the dots are what give the star its lifelike surface. If the flesh feels too wet to hold clean dots, blot the area with a paper towel as you go.

  5. Refine depth and clean the edges

    Step back and check that the seaweed reads as flowing behind the star and the bubble rings sit crisply. Go over any lines that need to be deeper for contrast, and gently round the peeled edges so there are no hard ridges. Wipe away loose bits with a dry brush. Because nothing is cut through, tidy edges are what make the relief look intentional and elegant.

  6. Light it and photograph

    Slip a warm white LED puck or short string into the back access hole, or simply set the pumpkin near a lamp as shown. Surface relief shows best in soft, angled light rather than a strong glow from inside. Rub a thin coat of petroleum jelly on the peeled areas to slow drying and keep the color rich. Snap your photo the same evening while the flesh is still bright.

Gather your supplies

Check things off as you get ready.

Work on a stable surface, keep your free hand out of the cutting path, and have an adult handle sharp tools.

Three levels of light

  • Leave intact

    The open background field and the darker channels between seaweed fronds stay as untouched skin.

  • Peel & shade

    The star's body and the broad seaweed shapes are skin-peeled for a soft dim orange glow.

  • Cut through

    Nothing is cut fully through on this design; the dotted texture reads as the brightest, most detailed accents.

Learn the carving basics

Before you start cutting

Do I really carve nothing all the way through?

Correct, this is a surface relief design, so all the light comes from peeled flesh and shallow texture rather than open cutouts. That means an interior candle will not shine through, so plan to use a warm LED near the back hole or display it beside a lamp. The payoff is a subtle, elegant look that suits a table centerpiece.

How do I keep the tiny dots from blurring together?

Use the smallest linoleum cutter you have and press straight down rather than dragging, lifting cleanly between each dot. Blot the flesh with a paper towel if it gets too wet, since soggy flesh smears. Spacing them in even rows down each arm keeps the pattern readable.

What if my seaweed lines look flat?

Vary the depth: carve some fronds deeper and let others stay barely grooved so they appear to sit at different distances. Tapering each line to a fine point at the tip also adds movement. Angled light will then cast tiny shadows that make the fronds feel dimensional.

Your take belongs here, too.

Changed a detail? Made it simpler? Share a photo of your version and tell the community what worked.

Share your pumpkin

More pumpkins like this

You've reached the end · 8 pumpkins
The Patch Report

Fresh pumpkins, in your inbox.

The best new carvings, ideas worth stealing, and how-tos for carving season. Short, seasonal, and gone by November.

A short email during carving season. Unsubscribe anytime. See our privacy policy.