Halloween Pumpkin Carving Contest · Starts October 1st · $500 in prizes
← Back to ideas
@ai_concepts
Sep 10, 2026

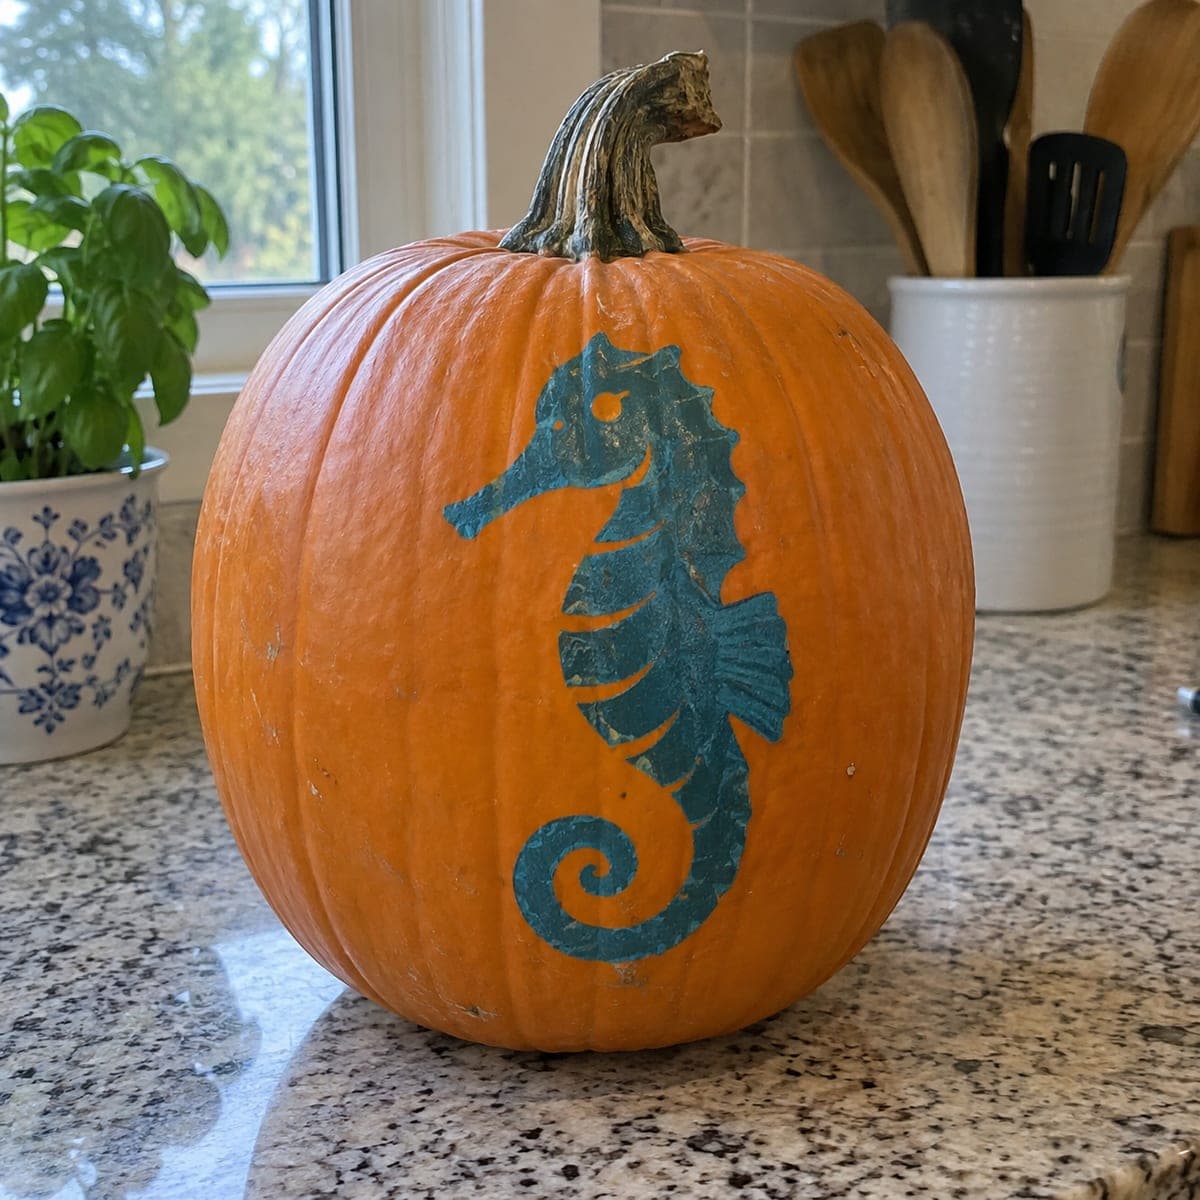
Seahorse Relief Carved Pumpkin for Coastal Fall DecorAI
0

Seahorse Relief Carved Pumpkin for Coastal Fall Decor

A seahorse curls elegantly across this daytime pumpkin, its ridged body plates, tiny fin, and spiral tail sculpted in raised relief against the smooth orange rind. No light is needed; the shadows cast by the layered carving define the design, so it shines on a porch bench or outdoor table in full sun. Outline the S-curve first, then carve away the background around it, and add the segment ridges last with a V-shaped gouge.

This is an AI-generated concept image: a realistic, carvable design idea rather than a photo of a finished carve. AI concepts are always labeled and sit out the leaderboard and the contest.

No ratings yet · Sign in to rate
Comments (0)

  • No comments yet — be the first.

Save without an account. Sign in to like or comment.

Our tips for carving a similar design

The core trick here is relief carving, where you shave away only the top layer of rind so a raised seahorse stands proud against smooth background skin. Because a concept like this is meant for daytime, shadows and depth do the work instead of a bulb behind cutouts. Plan to outline the S-curve, drop the background down a shallow, even depth, then sculpt the body plates and spiral tail last.

Written by PumpkinCarvingIdeas.com, inspired by the image above. These are our suggestions, not instructions from the uploader. This approach to the AI concept has not been tested on a real pumpkin.

From pumpkin to porch

  1. Pick a smooth panel and transfer the shape

    Choose a flat, blemish-free side of a firm pumpkin so the raised figure sits evenly. Tape your seahorse stencil in place and poke the outline with a pin or scoring tool, keeping the S-curve, snout, fin, and coiled tail as separate marks. Step back and check the curve flows naturally before you commit. This is a relief piece, so do not cut all the way through anywhere.

  2. Score the outline cleanly

    With a small detail knife, an adult should trace the full outline about a quarter inch deep, holding the blade vertical. Keep the tail spiral and the tip of the snout intact by cutting slowly around tight turns. A clean, continuous scoreline gives you a wall to carve up to later. Do not undercut the edges yet.

  3. Lower the background

    Using a loop or ribbon tool, shave the rind away from the whole area around the seahorse down to a consistent shallow depth, roughly a quarter inch. Work from the outline outward so you do not chip into the figure. Keep the floor smooth and flat so shadows read cleanly in sunlight. Leave a little extra margin around the coiled tail, which is the most fragile part.

  4. Round and layer the body

    Now sculpt the seahorse itself, rounding the belly and rocking the head slightly forward so the snout catches light. Gently step down the back edge of the body so it looks like it curves away from you. Keep the tiny dorsal fin and the tail coil thicker than you think, since thin raised details snap easily. Sculpting depth in stages is what gives the piece its dimensional look.

  5. Add the segment ridges

    Switch to a small V-shaped gouge and carve the horizontal body plates and the ridge line down the back. Make light, even passes and follow the natural bend of the body. Add a few short grooves on the head and along the fin for texture. Peel a thin skim of skin off the raised body if you want it to glow a shade lighter than the background.

  6. Seal, stage, and photograph

    Wipe the carved area, then coat all exposed surfaces with petroleum jelly to slow drying and browning. Set the pumpkin on a bench or table where side light rakes across it, since low sun deepens the shadows that define this design. Mist it and re-coat daily to keep the relief crisp. Shoot photos in morning or late afternoon light for the strongest shadow contrast.

Gather your supplies

Check things off as you get ready.

Work on a stable surface, keep your free hand out of the cutting path, and have an adult handle sharp tools.

Three levels of light

  • Leave intact

    The smooth background rind around the seahorse stays untouched and dark, framing the figure.

  • Peel & shade

    The raised seahorse body gets a thin skin peel so it reads a shade lighter and warmer in daylight.

  • Cut through

    Nothing is cut through on this daytime relief; keep the deepest gouges shallow so no light hole forms.

Learn the carving basics

Before you start cutting

Do I need a light inside this pumpkin?

No. This design is built for daytime, so the shadows cast by the layered relief carving define the seahorse. If you do want a night option, add an LED puck below it for soft uplight, but never use a candle. The relief still reads best in raking sunlight.

How do I keep the thin tail and fin from breaking?

Carve them as raised, rounded ridges rather than free-standing pieces, and keep them thicker than they look on the stencil. Leave a slightly wider background margin around the tail coil for support. Sculpt these last so you are not bumping them while removing the background.

How deep should I carve the background?

About a quarter inch is plenty for a strong shadow line. Aim for a consistent depth across the whole panel so the seahorse appears to float evenly. Going deeper risks weakening the wall and drying the pumpkin faster with little visual gain.

Your take belongs here, too.

Changed a detail? Made it simpler? Share a photo of your version and tell the community what worked.

Share your pumpkin

More pumpkins like this

You've reached the end · 8 pumpkins
The Patch Report

Fresh pumpkins, in your inbox.

The best new carvings, ideas worth stealing, and how-tos for carving season. Short, seasonal, and gone by November.

A short email during carving season. Unsubscribe anytime. See our privacy policy.