Halloween Pumpkin Carving Contest · Starts October 1st · $500 in prizes
← Back to ideas
@ai_concepts
Sep 25, 2026
Stitched Mouth Pumpkin Lantern With Blank EyesAI
0

Report this carving

Tell us what is wrong. Reports are private.

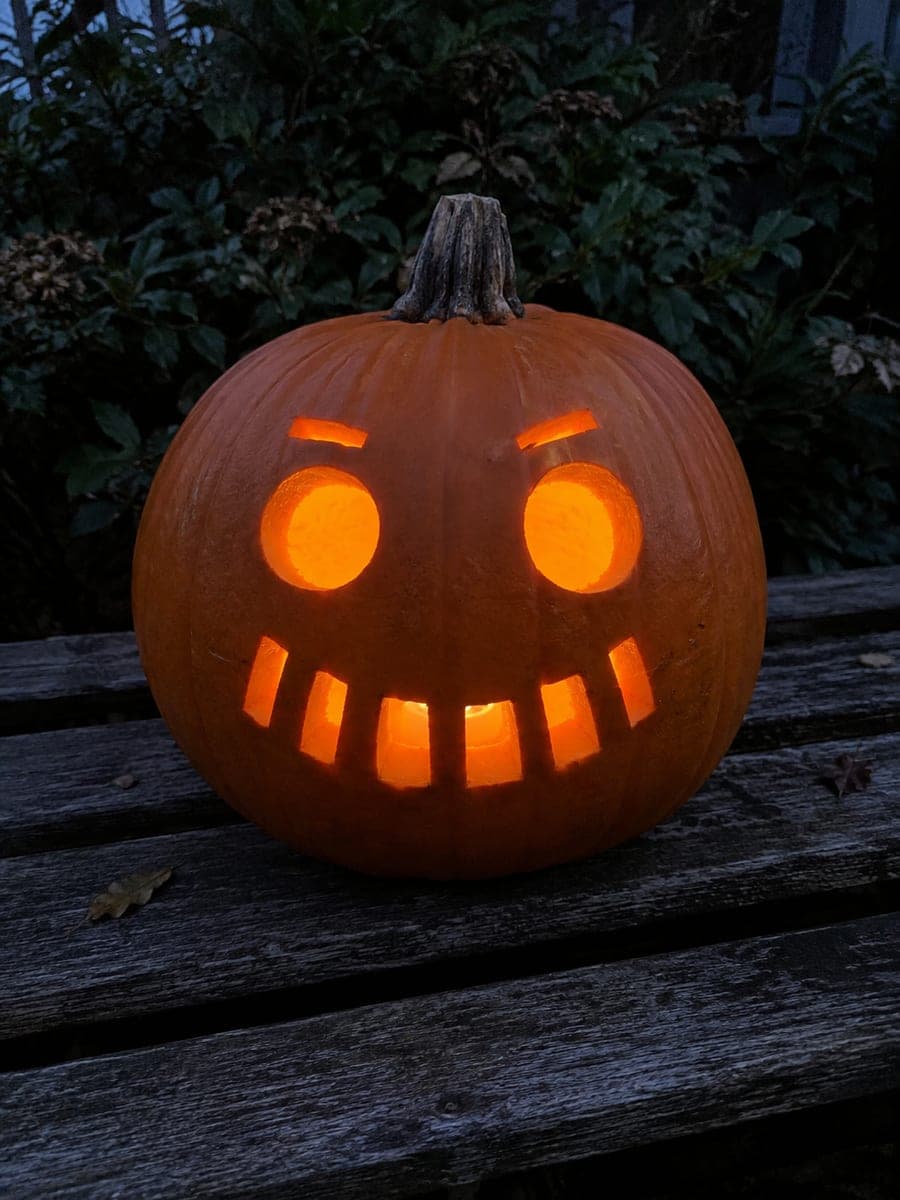
Stitched Mouth Pumpkin Lantern With Blank Eyes

Two empty round eyes, two short raised brow slits, and a mouth formed by seven separate narrow vertical rectangles arranged in an uneven arc create the signature stitched-face look in this creepy pumpkin face carving idea. Every rectangle must be cut independently so the connecting bars between them form clean, wide stitches. Score the arc lightly in pencil first, then cut each slot from the center outward so the arc stays consistent. Lit with a flickering candle, the stitch-bar shadows dance across a wall like something sutured shut.

No ratings yet · Sign in to rate

Comments (0)

  • No comments yet — be the first.

Save without an account. Sign in to like or comment.

Our tips for carving a similar design

The stitched mouth effect depends entirely on cutting each of the seven vertical slots as a fully independent opening so that the connecting bars between them look like thick stitches. Scoring the arc position in pencil before any cutting keeps the uneven curve consistent. Working from the center outward maintains symmetry through each slot.

From pumpkin to porch

  1. Scoop and sketch the layout

    Scoop to an even inch. Sketch two round eye circles, two short brow slits above them, and a gentle uneven arc for the mouth position. Mark seven equally spaced slot positions along the arc before drawing any individual slot shapes.

  2. Cut the two round eye holes

    Saw each round eye as a clean circle. Eyes without pupils are what gives this design its blank, creepy affect. Push each plug out from behind.

  3. Cut the two short brow slits

    Two short, narrow slots above each eye. These can be nearly horizontal or angled very slightly inward for a furrowed look. Keep them narrow (about 6mm wide) so they read as slits rather than openings.

  4. Score the mouth arc and cut the center slot first

    Draw the full mouth arc in pencil, then cut the center slot as the reference point. A center-first approach lets you space the remaining six slots evenly on either side. Each slot is a narrow vertical rectangle cut completely through.

  5. Cut the remaining six slots outward from center

    Work three slots to the left and three to the right of the center, maintaining even spacing and keeping the connecting bars between them at least 8mm wide. Pause and check bar width after each slot. Thin bars will crack under handling.

  6. Light and display

    A flickering candle is the ideal light source here: the bar shadows between the stitch slots dance on any nearby wall like something sutured shut and not quite still. Display in a window or on a step where the flickering is visible.

Written with AI to match this design

Gather your supplies

Check things off as you get ready.

Work on a stable surface, keep your free hand out of the cutting path, and have an adult handle sharp tools.

Three levels of light

  • Leave intact

    The solid bars between all seven mouth slots, the rind between brow slits and eyes, and all surrounding rind stay dark

  • Peel & shade

    None, through-cuts only

  • Cut through

    Two round eyes, two brow slits, and seven independent vertical mouth slots are all cut through

Learn the carving basics

Before you start cutting

How wide should the bars between the mouth slots be?

Eight millimeters is the minimum; 10-12mm is safer. The bars are the visual stitches so their width defines how the effect reads. Too thin and they crack; too wide and the design looks like a row of slots rather than a stitched mouth.

Does the mouth arc need to be a specific curve?

An uneven arc that is slightly lower on one side is more unnerving than a symmetrical one, which fits the creepy style. Sketch it freehand rather than using a compass: deliberate imperfection reinforces the sutured, damaged quality of the design.

Can I do more or fewer than seven slots?

Five slots give a simpler but still effective stitched look and are easier to keep structurally sound. Nine slots produce a more elaborate effect but require very careful bar-width management. Seven is a good middle ground for readable stitches without over-crowding.

Your take belongs here, too.

Changed a detail? Made it simpler? Share a photo of your version and tell the community what worked.

Share your pumpkin

More pumpkins like this

You've reached the end · 8 pumpkins
The Patch Report

Fresh pumpkins, in your inbox.

The best new carvings, ideas worth stealing, and how-tos for carving season. Short, seasonal, and gone by November.

A short email during carving season. Unsubscribe anytime. See our privacy policy.