Halloween Pumpkin Carving Contest · Starts October 1st · $500 in prizes
← Back to ideas
@ai_concepts
Sep 25, 2026
Swirling Flame Pumpkin with Glowing Ember OpeningsAI
0

Report this carving

Tell us what is wrong. Reports are private.

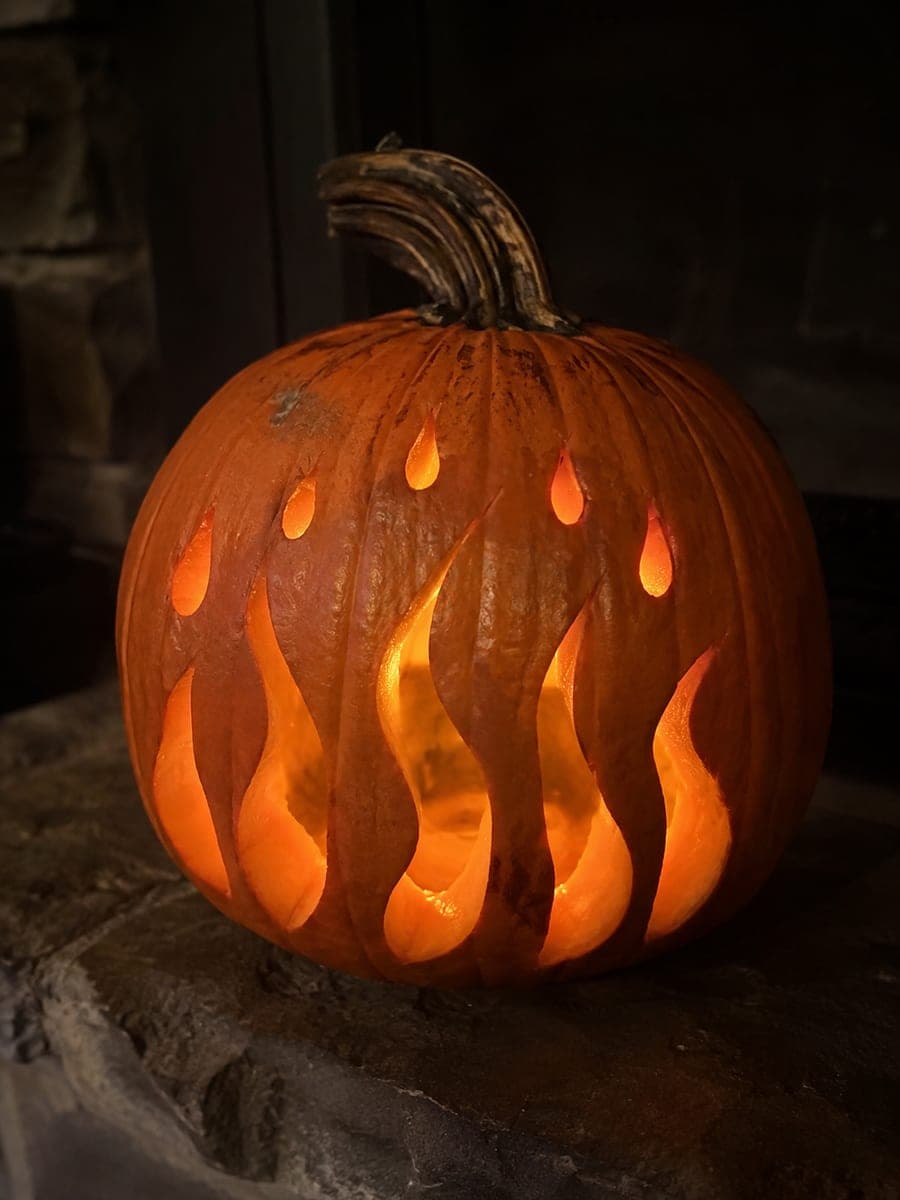
Swirling Flame Pumpkin with Glowing Ember Openings

Dozens of swirling flame shapes and scattered ember openings cover this expert flame pumpkin carving, glowing on brick at night. Plan the design so every flame and ember hole is separated by a broad connected strip of rind before making the first cut, as the many apertures will quickly weaken the shell if bridges are too thin. Work methodically from the center outward, checking stability after each section. Photographed on brick, it looks stunning backlit against a dark wall.

No ratings yet · Sign in to rate
Comments (0)

  • No comments yet — be the first.

Save without an account. Sign in to like or comment.

Our tips for carving a similar design

This design covers the pumpkin surface with many independent flame and ember apertures, which means the connecting rind strips between them collectively form a dense lattice. The critical rule is that every aperture must be separated from its neighbors by a broad connected strip before the first cut: a map created ahead of time prevents the rapid structural weakening that happens when too many holes appear too close together without a plan. Working methodically from center outward, and checking stability after each section, is what makes this design survivable.

From pumpkin to porch

  1. Plan the full aperture map on paper first

    Print or draw the design at the size of your pumpkin face and trace every rind strip between apertures. Confirm that no strip is narrower than three-quarters of an inch and that every rind section connects to at least two others. Mark any strips that look thin and widen them before transferring to the pumpkin. This planning step saves the carve.

  2. Prep and gut the pumpkin

    Use a pumpkin with particularly thick walls for this design: an inch and a quarter or more gives you more material to work with between apertures. Cut a wide bottom cap and scoop evenly. Dry the surface and transfer the full map, marking all retained strips explicitly before any aperture outline is drawn.

  3. Cut the central flame apertures first

    Begin at the center of the design, where you can see the whole pattern around you as you work. Cut the central cluster of flame apertures one at a time, checking overall stability after each cut. Remove pieces cleanly and keep the interior free of debris so you can see the remaining rind clearly.

  4. Work outward section by section

    Move outward from the center in sections, completing all apertures in one section before moving to the next. After finishing each section, press the adjacent rind strips to confirm rigidity. If a section feels soft, rub petroleum jelly into all exposed cut edges in that area and pause for at least 30 minutes before continuing.

  5. Add ember holes as the last detail in each section

    Within each completed section, punch the ember holes after all flame apertures in that section are done. This keeps the ember holes as finishing details and ensures the main structure of each section is confirmed solid before more holes are added. Keep ember holes at least three-quarters of an inch from any flame aperture edge.

  6. Light and display

    Place a bright LED bulb inside and display on a brick porch or against a pale wall where the projected light pattern creates a secondary fire-like glow on the surrounding surface. Apply petroleum jelly to all cut edges before the first display night and keep the pumpkin in a cool location when not on display to maximize longevity.

Written with AI to match this design

Gather your supplies

Check things off as you get ready.

Work on a stable surface, keep your free hand out of the cutting path, and have an adult handle sharp tools.

Three levels of light

  • Leave intact

    All rind strips between flame apertures and ember holes forming the dense lattice

  • Peel & shade

    None, all depth from through-cuts

  • Cut through

    Every individual swirling flame aperture and every ember hole

Learn the carving basics

Before you start cutting

How do I avoid losing track of which strips are retained and which are cut?

Use two different marker colors: one to outline retained strips (do not cut these) and one to outline aperture centers (remove these). As you finish each aperture, lightly cross out the aperture marker label so you can see at a glance what is done and what remains. This two-color system is the most reliable way to navigate a dense multi-aperture design.

At what point should I stop if the pumpkin starts to feel soft?

If pressing on a rind strip causes it to flex or crack, stop immediately. Rub petroleum jelly into all exposed cut edges, wrap the pumpkin in a damp cloth, and refrigerate it for at least a couple of hours. If the softness is in an outer section, you may be able to skip that section and consider the design complete at its current state. A partially complete expert carving still looks impressive.

How long will a pumpkin this heavily carved last outdoors?

A densely cut pumpkin typically lasts five to seven days outdoors before dehydration and surface mold become visible. You can extend this by keeping the pumpkin cool and dry when not on display, rubbing all cut edges with petroleum jelly daily, and using an LED light source rather than a candle. Avoid direct sun, which accelerates drying significantly.

Your take belongs here, too.

Changed a detail? Made it simpler? Share a photo of your version and tell the community what worked.

Share your pumpkin

More pumpkins like this

You've reached the end · 8 pumpkins
The Patch Report

Fresh pumpkins, in your inbox.

The best new carvings, ideas worth stealing, and how-tos for carving season. Short, seasonal, and gone by November.

A short email during carving season. Unsubscribe anytime. See our privacy policy.