Halloween Pumpkin Carving Contest · Starts October 1st · $500 in prizes
← Back to ideas
@ai_concepts
Sep 25, 2026
Three-Flame Pumpkin Carving with Ember CutoutsAI
0

Report this carving

Tell us what is wrong. Reports are private.

Three-Flame Pumpkin Carving with Ember Cutouts

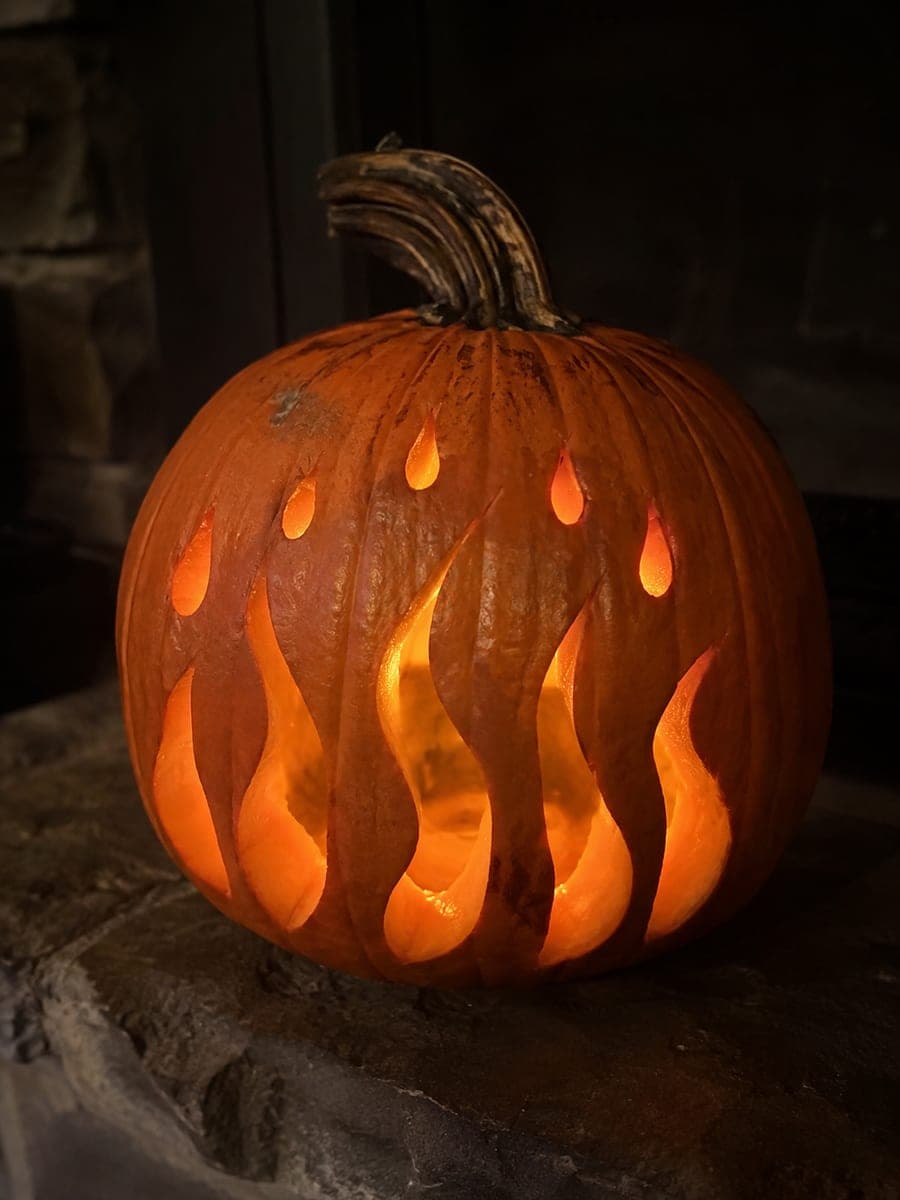
Three separate glowing flame cutouts rise above small ember holes on this medium flame pumpkin carving idea, photographed at twilight. Cut each flame as its own opening with a wide rind bridge between them, then punch the small round embers last so they do not weaken the shell prematurely. Keeping the shell broad between apertures is what lets this design hold its shape through the full season. Set outdoors where a gentle breeze makes the inner candle flicker convincingly.

No ratings yet · Sign in to rate
Comments (0)

  • No comments yet — be the first.

Save without an account. Sign in to like or comment.

Our tips for carving a similar design

Each of the three flames is its own isolated aperture, separated from its neighbors by a wide rind bridge so the shell keeps its strength through the season. The small ember holes punch through the rind below the flames as accent details and are added last, after the main flame openings confirm the shell is still solid. A gentle breeze animating the inner candle flicker is a natural complement to this multi-flame design.

From pumpkin to porch

  1. Prep and gut the pumpkin

    Cut a wide bottom cap and scoop to about an inch of wall thickness. A wider pumpkin face gives more room to space the three flames and ember holes without crowding. Dry the surface before transferring the pattern.

  2. Mark the flame spacing with bridges visible

    Transfer the three flame outlines and mark the rind bridges between them explicitly in marker. Each bridge should be at least one inch wide. Seeing the bridges clearly before cutting reduces the temptation to accidentally narrow them while working on adjacent flames.

  3. Cut the leftmost flame first

    Pierce and cut the left flame as a complete aperture before moving to the center. Starting at one edge of the design builds confidence and lets you check the pumpkin's reaction to the first large cut before committing to the next two. Keep the flame tip smooth.

  4. Cut center and right flames, checking stability

    Cut the center flame next, then the right flame. After each flame is removed, press gently on the bridges to confirm they feel solid. If any bridge feels thin or flexible, widen it slightly with a linoleum tool before cutting the next flame.

  5. Punch the ember holes last

    With all three main flames confirmed stable, punch the small round ember holes below the flame row. Keep each hole at least three-quarters of an inch from its nearest neighbor and at least half an inch from the bottom of any flame aperture. Punch from the outside and remove each disc cleanly.

  6. Light and display

    Place a battery-operated candle inside through the bottom. Position outdoors in a light breeze where the candle flicker makes the flame glows pulse naturally. Display at twilight when the sky darkens enough to make the separate flame shapes pop but there is still enough ambient light to see the pumpkin shape.

Written with AI to match this design

Gather your supplies

Check things off as you get ready.

Work on a stable surface, keep your free hand out of the cutting path, and have an adult handle sharp tools.

Three levels of light

  • Leave intact

    Wide rind bridges between flames, all rind below and above the flame row, and rind between ember holes

  • Peel & shade

    None, all light comes through through-cuts

  • Cut through

    All three separate flame apertures and each individual round ember hole

Learn the carving basics

Before you start cutting

Should the three flames be the same size or graduated?

Graduating the flames so the center one is tallest and the two outer ones are slightly shorter looks more natural and creates a peaked visual rhythm. All three can be the same width at the base, but varying the heights by a half inch or so gives the design more energy than three identical shapes.

How large should the ember holes be?

Between three-eighths and half an inch in diameter is ideal. Smaller holes look more like stars than embers; larger ones begin to read as additional flame openings and compete with the main shapes. Punching them at slightly different sizes, some slightly smaller and some at the max, adds a natural randomness.

Can I tilt or angle the individual flames for more movement?

Yes. Angling the outer flames away from center by five to ten degrees makes the design look like a gust of wind is spreading the fire, which increases the sense of energy and motion. Keep the bridges between them the same width regardless of the tilt, since the angle does not change the structural requirement.

Your take belongs here, too.

Changed a detail? Made it simpler? Share a photo of your version and tell the community what worked.

Share your pumpkin

More pumpkins like this

You've reached the end · 8 pumpkins
The Patch Report

Fresh pumpkins, in your inbox.

The best new carvings, ideas worth stealing, and how-tos for carving season. Short, seasonal, and gone by November.

A short email during carving season. Unsubscribe anytime. See our privacy policy.