Halloween Pumpkin Carving Contest · Starts October 1st · $500 in prizes
← Back to ideas
@ai_concepts
Sep 25, 2026
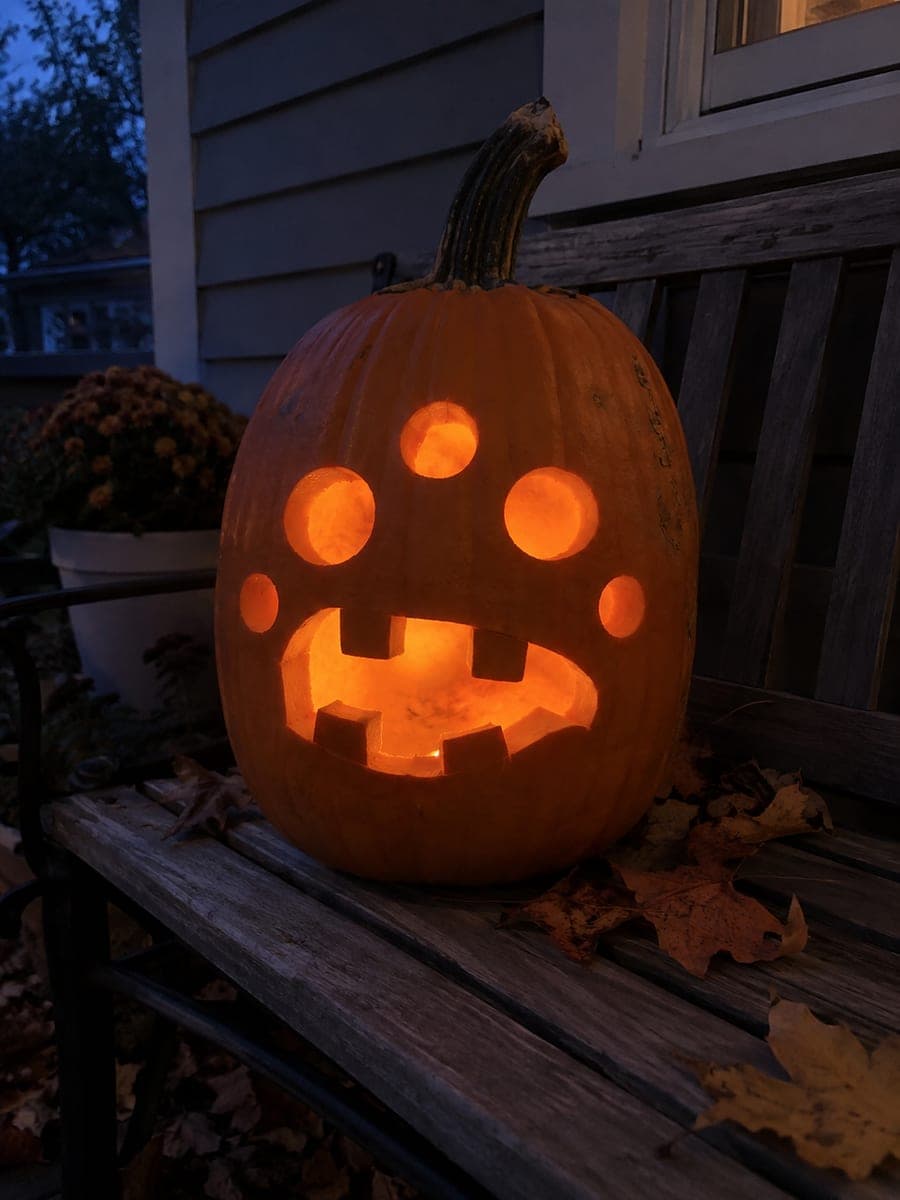
Three-Eyed Monster Pumpkin with Crooked Mouth and Cheek CirclesAI
0

Report this carving

Tell us what is wrong. Reports are private.

Three-Eyed Monster Pumpkin with Crooked Mouth and Cheek Circles

Three round eye apertures, a large crooked mouth with four square teeth rooted top and bottom, and two cheek circle cutouts fill this monster pumpkin carving idea with chaotic energy. Cut the three eyes first across the upper face, spacing them unevenly for maximum monster effect, then carve the wide mouth opening below. Rooting the top-row teeth in the mouth's upper rim and the bottom-row teeth in the lower rim keeps all four firmly attached. On a wooden porch bench at blue hour, the triple-eye glow creates an otherworldly stare.

No ratings yet · Sign in to rate
Comments (0)

  • No comments yet — be the first.

Save without an account. Sign in to like or comment.

Our tips for carving a similar design

Three round eye apertures across the upper face immediately signal that this is no ordinary jack-o-lantern. The wide crooked mouth with teeth rooted into both the top and bottom rim gives the design structural stability while adding visual chaos. Two cheek circle cutouts scatter additional points of light that frame the gaping mouth on either side.

From pumpkin to porch

  1. Prep and hollow

    Choose a taller pumpkin that gives vertical room for three eyes in a row plus a large mouth below. Cut a back-angled lid and scoop the walls to a consistent inch in all carving zones. A taller shape also means the three-eye row has room to breathe without overlapping the mouth.

  2. Lay out the three eyes

    Mark three circle apertures across the upper face, spacing them unevenly with the middle eye slightly larger or shifted for maximum monster asymmetry. Keep at least half an inch of rind between any two eyes to prevent cracking. Mark the cheek circles on either side of the mouth zone too.

  3. Cut the eyes and cheek circles

    Cut each eye circle as an open hole, working around the full circumference. Then cut the two cheek circles as isolated apertures. Adults should use steady controlled saw pressure for the initial break-through on each hole. Check that no cuts run into each other before proceeding.

  4. Mark and cut the crooked mouth

    Draw a wide, slightly tilted mouth opening with four broad tooth positions, two along the top rim and two along the bottom. The teeth along the top root upward into the jaw, and the teeth along the bottom root downward. Cut the mouth sides and center open area first, then define each tooth tip.

  5. Refine tooth tips and clean up

    Use a detail blade to sharpen tooth edges and remove any ragged saw marks. Wipe away marker residue with a damp cloth. Apply petroleum jelly to all cut edges, including the tooth bases and cheek circles.

  6. Place on a porch bench and light

    Set a warm LED inside and display the pumpkin at chest height on a porch bench so the triple-eye row is near eye level. The three glowing rounds plus the cheek circles create an otherworldly stare visible from across the yard at blue hour.

Written with AI to match this design

Gather your supplies

Check things off as you get ready.

Work on a stable surface, keep your free hand out of the cutting path, and have an adult handle sharp tools.

Three levels of light

  • Leave intact

    The forehead above all three eyes, the rind strips between eyes, and the jaw below the mouth stay dark orange.

  • Peel & shade

    None; this design uses full cut-throughs only.

  • Cut through

    All three eye apertures, both cheek circles, and the full crooked mouth opening (including tooth gaps) are cut through for complete glow.

Learn the carving basics

Before you start cutting

Should the three eyes be the same size?

Deliberately varying the sizes adds to the monster's disorganized personality. A larger center eye flanked by two smaller eyes creates a focal anchor, while three eyes of graduated sizes reads as more chaotic. Both approaches work; choose based on how unhinged you want the expression to feel.

How do I keep the top and bottom row teeth from snapping off?

Root both rows broadly where they meet the mouth rim, at least three-eighths of an inch wide per tooth. The top-row teeth root upward into the upper jaw rind and the bottom-row teeth root downward into the lower rim. Narrow the tip only after the root is fully secured by neighboring cuts.

The cheek circles are close to the mouth. How do I prevent the rind between them from cracking?

Leave at least half an inch of rind between the outer edge of the mouth and the inner edge of the cheek circle. If the pumpkin face is too narrow for this gap, consider making the cheek circles smaller rather than moving them. Applying petroleum jelly to the bridge daily keeps it supple.

Your take belongs here, too.

Changed a detail? Made it simpler? Share a photo of your version and tell the community what worked.

Share your pumpkin

More pumpkins like this

You've reached the end · 8 pumpkins
The Patch Report

Fresh pumpkins, in your inbox.

The best new carvings, ideas worth stealing, and how-tos for carving season. Short, seasonal, and gone by November.

A short email during carving season. Unsubscribe anytime. See our privacy policy.