Halloween Pumpkin Carving Contest · Starts October 1st · $500 in prizes
← Back to ideas
@ai_concepts
Sep 25, 2026
Three-Eyed Monster Pumpkin with Zigzag Forehead OpeningAI
0

Report this carving

Tell us what is wrong. Reports are private.

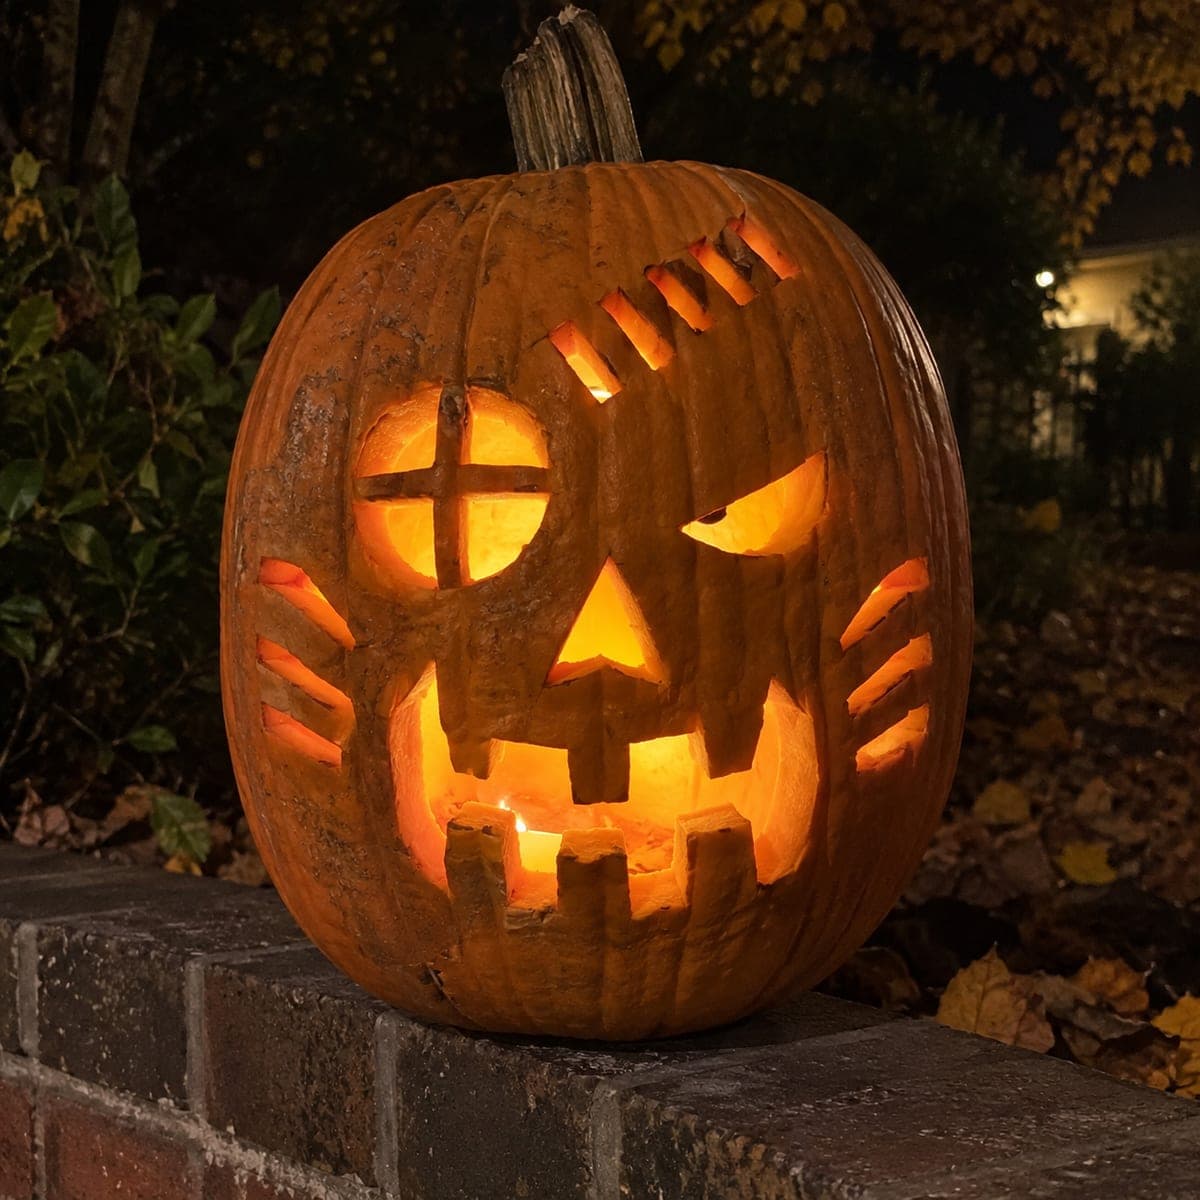
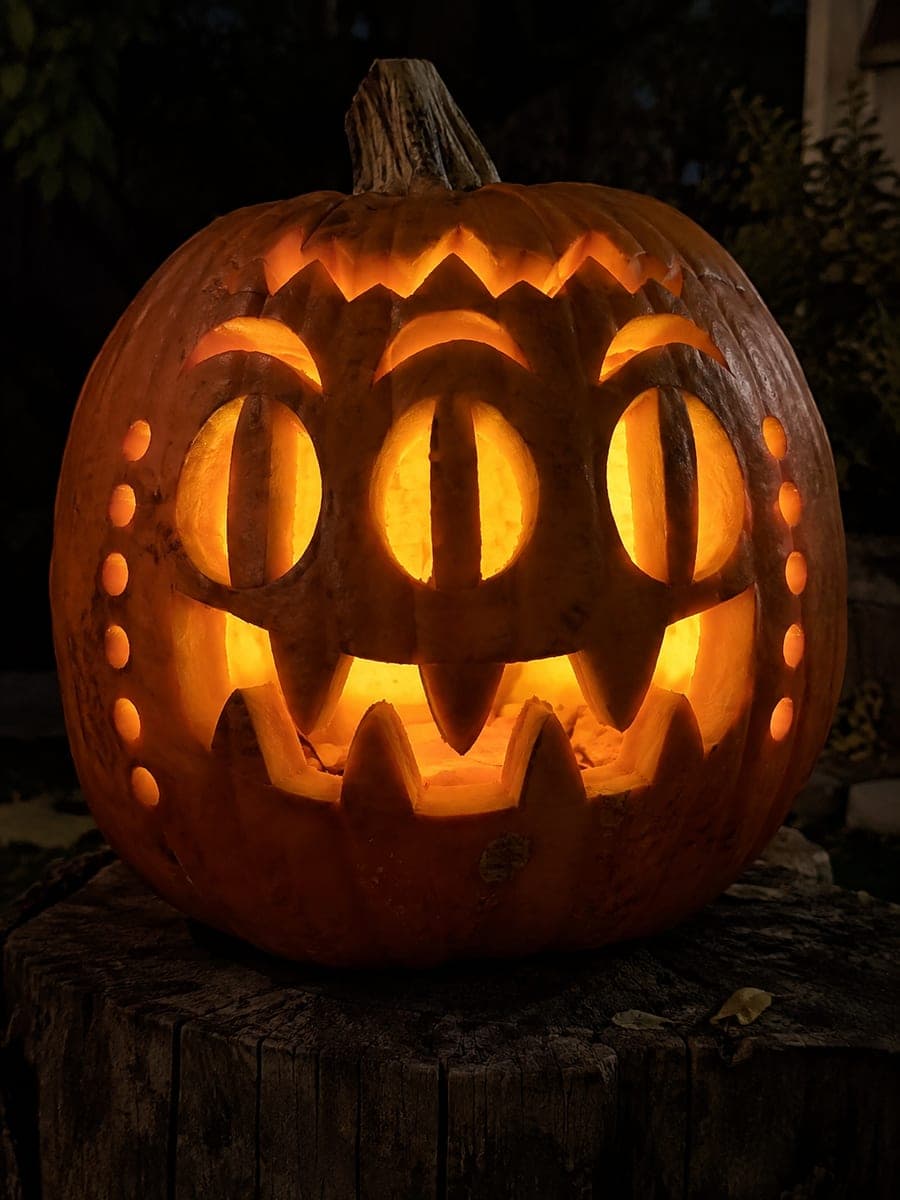
Three-Eyed Monster Pumpkin with Zigzag Forehead Opening

Three eye openings each crossed by connected bars, seven individually rooted teeth, separate eyebrow apertures, and a zigzag forehead opening make this monster pumpkin carving idea one of the most expressive advanced designs in the series. Carve each eye bar independently, confirming it connects to all four sides before moving on, since the bars in the outer eyes must bridge narrower gaps. The zigzag forehead opening should be cut with short angled strokes to preserve the pointed peaks. Displayed on a stump at night, the three glowing eyes with bars create a menacing insectoid stare.

No ratings yet · Sign in to rate

Comments (0)

  • No comments yet — be the first.

Save without an account. Sign in to like or comment.

Our tips for carving a similar design

Three eye openings each crossed by their own connected bar, separate eyebrow apertures, seven individually rooted teeth, and a zigzag forehead opening make this one of the most element-dense designs in the set. Because each eye bar must bridge a narrower gap in the outer eyes than in the center one, each bar needs individual planning. Build outward from the center eye first, then tackle the flanking eyes before adding the zigzag, eyebrows, and teeth.

From pumpkin to porch

  1. Select a large pumpkin and hollow it

    A large, firm, flat-faced pumpkin gives you the surface area for three eyes in a horizontal row with enough rind between them. Thin the interior walls to three-quarters of an inch in all carving zones. Thorough wall thinning makes every bar and accent aperture glow at maximum brightness.

  2. Map every element in marker

    Draw the three eye bar positions with socket boundaries, the eyebrow aperture outlines above each outer eye, the zigzag forehead line with peaks and valleys, the mouth outline with all seven tooth root marks, and any additional accent apertures. Label bridge strips and check that no two apertures encroach on a shared bridge.

  3. Carve the center eye bar first

    Cut the center eye socket in four quadrants around the bar junction, confirming all four connections before removing the last quadrant. Move to the outer eyes and repeat, working carefully around the narrower bar gaps. An adult with a narrow rigid blade handles these cuts most safely.

  4. Carve eyebrow apertures

    Each eyebrow aperture sits above an outer eye socket, separated by a rind bridge. Cut each aperture as an isolated shape, entering cleanly and exiting at the other end without sawing back through the bridge. These small apertures take only minutes but add significant expressiveness.

  5. Carve the zigzag forehead opening

    Cut along the zigzag line with short angled strokes, alternating blade direction at each point to create crisp peaks. Do not try to cut the entire zigzag in one continuous stroke. The forehead opening should remain surrounded by uncut rind on all sides so the top of the pumpkin stays connected.

  6. Carve the seven rooted teeth, seal, and display

    Cut the lower jaw opening, stopping before each of the seven tooth bases. Mark all root positions first and confirm each root is at least a quarter-inch wide. Coat every cut surface with petroleum jelly. Set on a stump or low platform outdoors at night and step back; the three barred eyes create the full insectoid stare from any viewing distance.

Written with AI to match this design

Gather your supplies

Check things off as you get ready.

Work on a stable surface, keep your free hand out of the cutting path, and have an adult handle sharp tools.

Three levels of light

  • Leave intact

    The structural rind network including all bridges between eyes, between eyebrows and eyes, and between the zigzag and the eyebrows stays solid throughout.

  • Peel & shade

    None; this design uses full cut-throughs only.

  • Cut through

    All three barred eye sockets (four quadrants each), both eyebrow apertures, the entire zigzag forehead opening, and the seven-tooth jaw are cut completely through for full-brightness glow.

Learn the carving basics

Before you start cutting

Why are the outer eye bars harder to cut than the center one?

The outer eye sockets are typically narrower because they are closer to the curved edges of the pumpkin face, which compresses the available socket space. The bar must bridge a shorter gap with less room for the blade to maneuver. Work in smaller increments on the outer bars and use the thinnest blade you have.

How do I cut the zigzag peaks without snapping the points?

Keep each peak wide at the base by angling the blade outward as you approach the tip, rather than driving straight down into the point. Use a detail blade rather than a serrated saw for the peak cuts. Short strokes of two to three millimeters per cut give you the best control.

With this many elements, how do I know which order to cut them in?

Always cut the most structurally critical features first, which are the eye bars, since a broken bar is very difficult to recover. Follow with the eyebrows, then the zigzag forehead, then the teeth last. Teeth are the most replaceable element if something goes wrong; eye bars are not.

Your take belongs here, too.

Changed a detail? Made it simpler? Share a photo of your version and tell the community what worked.

Share your pumpkin

More pumpkins like this

You've reached the end · 8 pumpkins
The Patch Report

Fresh pumpkins, in your inbox.

The best new carvings, ideas worth stealing, and how-tos for carving season. Short, seasonal, and gone by November.

A short email during carving season. Unsubscribe anytime. See our privacy policy.