Halloween Pumpkin Carving Contest · Starts October 1st · $500 in prizes
← Back to ideas
@ai_concepts
Sep 25, 2026
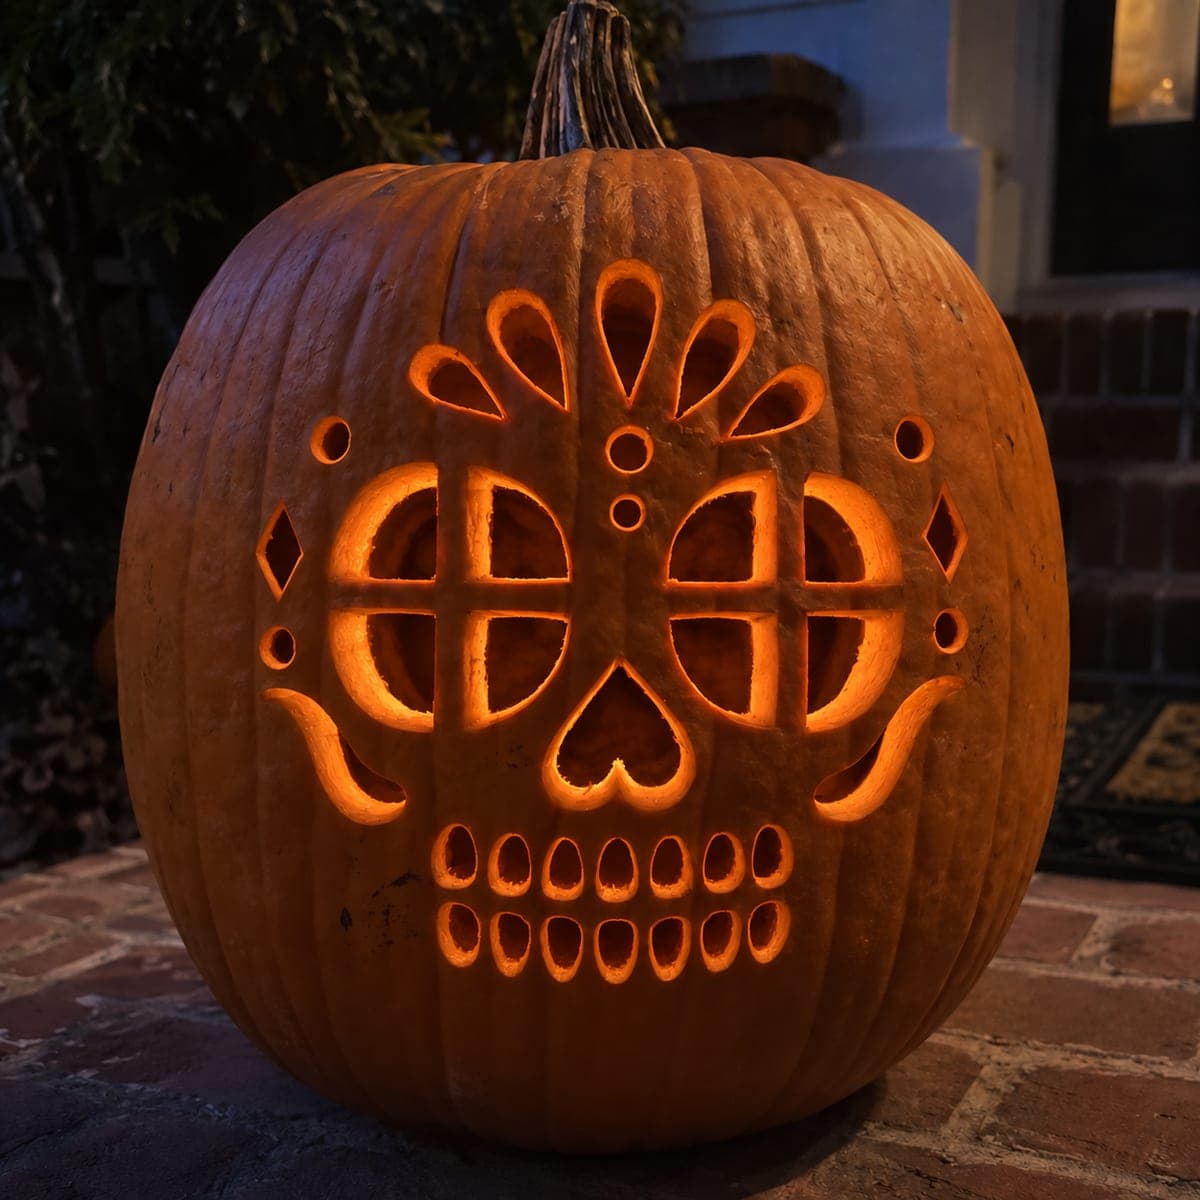
Ornate Skull Jack-O-Lantern with Eye Grids and TeardropsAI
0

Report this carving

Tell us what is wrong. Reports are private.

Ornate Skull Jack-O-Lantern with Eye Grids and Teardrops

Crossbars joined at four points fill the eye openings of this ornate skull jack-o-lantern, while separate forehead teardrop cutouts add a decorative flourish against the dark brick porch behind it. Because no outer skull outline is cut, every grid line must stay rooted to the surrounding rind, so map bridges carefully before cutting any crossbar. Carve teardrop apertures individually with a detail knife, not a jab saw. The floating-grid eye effect is most striking when lit by a candle placed slightly forward inside the pumpkin.

No ratings yet · Sign in to rate

Save this design for carving night, then share a photo of your own jack-o'-lantern once it's glowing.

Comments (0)

  • No comments yet — be the first.

Save without an account. Sign in to like or comment.

Our tips for carving a similar design

The distinguishing challenge is that no continuous skull outline is cut, which means every grid line inside the eyes must stay rooted to the surrounding uncut rind. Mapping bridge locations before any cut is made is the non-negotiable first step. Teardrop apertures on the forehead add a decorative flourish that is carved last with a narrow detail knife to protect the structurally loaded eye grids.

From pumpkin to porch

  1. Gut and thin to a consistent wall

    Cut a base lid and scrape the interior to a uniform half-inch wall. Even thickness is critical here because the crossbar grids depend on uniform rind density for structural integrity. Use a wall gauge or skewer to check at least a dozen points across the carving face.

  2. Transfer the full design before cutting

    Print the skull face at full scale and use carbon paper to transfer it to the pumpkin. Mark every bridge endpoint in a contrasting color. No outline is cut here, so the grid lines must be precisely positioned relative to the surrounding rind before you begin.

  3. Score and confirm all bridge anchor zones

    Using only light scoring strokes, trace every crossbar and grid line on both eye openings. Confirm that every line endpoint lands on intact rind that will never be cut away. Adjust any line that terminates dangerously close to an intended opening.

  4. Open the areas around the grid lines

    Remove the rind above and below each horizontal crossbar and beside each vertical bar, working one small section at a time with a detail knife. Each rind piece removed should leave at least two secure anchor points for any grid segment it borders. Do not use a jab saw here. Precision outweighs speed.

  5. Carve forehead teardrop apertures

    After both eye grids are complete and confirmed stable, cut each teardrop aperture individually with a narrow detail knife. Teardrops should taper to a clean point at the top and have a rounded base. Leave generous rind between each teardrop.

  6. Light from inside with a forward candle

    Place a candle-flicker LED slightly forward of center inside the pumpkin so the floating grid lines cast shadows on the pumpkin's own outer surface. The grid effect is most visible from a slightly elevated viewing angle. Photograph the pumpkin from three feet away with the room lights off to capture the full grid shadow play.

Written with AI to match this design

Gather your supplies

Check things off as you get ready.

Work on a stable surface, keep your free hand out of the cutting path, and have an adult handle sharp tools.

Three levels of light

  • Leave intact

    All surrounding uncut rind outside the eye regions and between teardrops stays fully intact.

  • Peel & shade

    None.

  • Cut through

    Grid apertures within each eye opening and all forehead teardrop slots are cut through.

Learn the carving basics

Before you start cutting

What makes this design harder than a regular barred-eye skull?

A regular barred eye has one bar with two anchor points per socket. This design has multiple intersecting bars, multiplying the number of anchor points that must all remain intact simultaneously. Any one misjudged cut can destabilize several connected grid lines at once.

Can I simplify the eye grid to two bars instead of a full crosshatch?

Absolutely. A two-bar cross grid per eye is much more forgiving and still produces a striking decorative effect. Reducing the grid complexity is the single biggest way to bring this design down from expert to hard difficulty.

How do I prevent the forehead teardrops from drooping over time?

Teardrops drooping inward is a sign that the rind wall was cut too thin near the teardrop tip. Coat the cut edge of each teardrop with petroleum jelly immediately after carving, and store the pumpkin in a cool location between display sessions.

Your take belongs here, too.

Changed a detail? Made it simpler? Share a photo of your version and tell the community what worked.

Share your pumpkin

More pumpkins like this

You've reached the end · 8 pumpkins
The Patch Report

Fresh pumpkins, in your inbox.

The best new carvings, ideas worth stealing, and how-tos for carving season. Short, seasonal, and gone by November.

A short email during carving season. Unsubscribe anytime. See our privacy policy.