Halloween Pumpkin Carving Contest · Starts October 1st · $500 in prizes
← Back to ideas
@ai_concepts
Sep 25, 2026
Three-Hole Surprised Face Pumpkin Carving IdeaAI
0

Report this carving

Tell us what is wrong. Reports are private.

Three-Hole Surprised Face Pumpkin Carving Idea

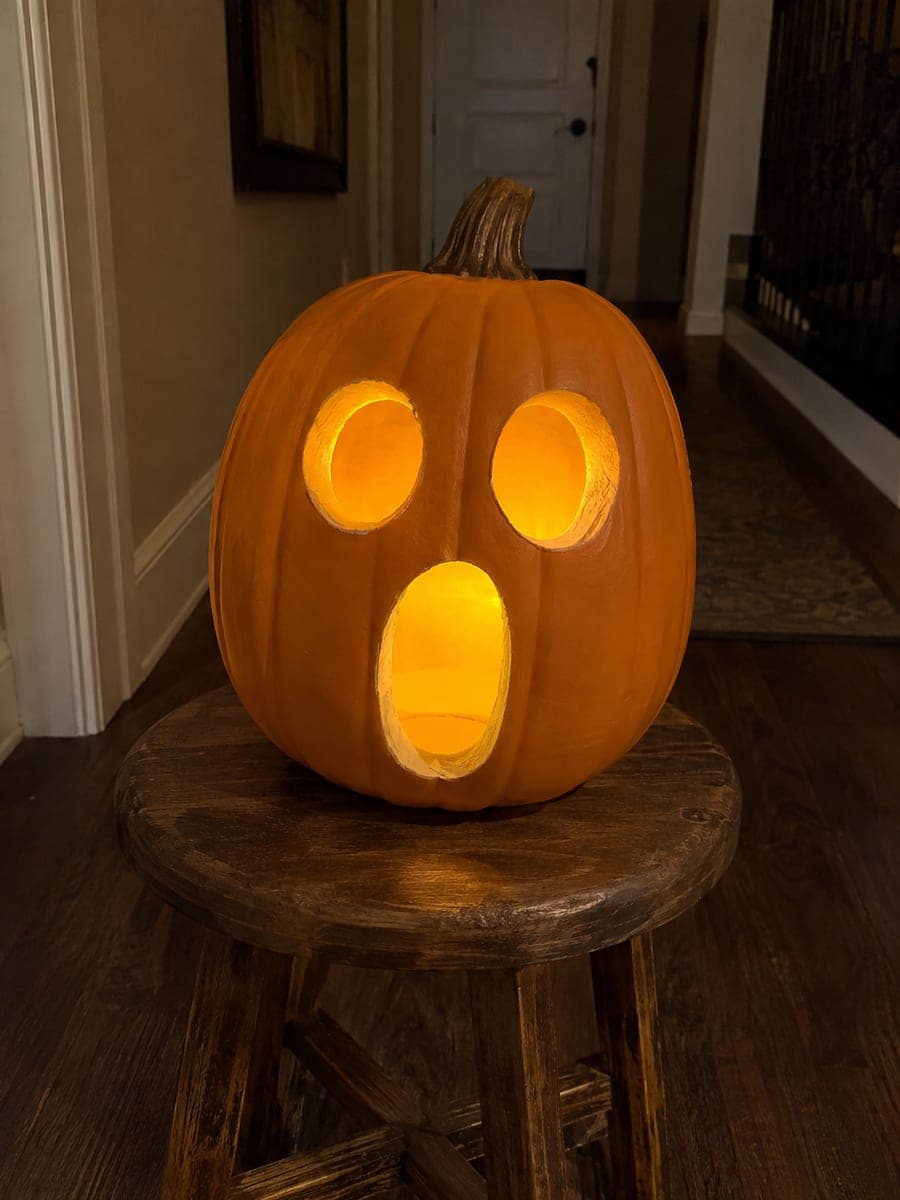
This classic last minute pumpkin carving idea features just two triangular eyes and one wide oval surprised mouth, three through-cuts total. Scoop out the pumpkin, print the face shape on paper, tape it to the rind, and poke through the outline before cutting. Start with the mouth since it is the largest opening. A single tea light inside makes the three glowing holes pop against the dark.

No ratings yet · Sign in to rate

Save this design for carving night, then share a photo of your own jack-o'-lantern once it's glowing.

Comments (0)

  • No comments yet — be the first.

Save without an account. Sign in to like or comment.

Our tips for carving a similar design

Two triangle eyes and one wide oval mouth are the only three cuts needed, making this genuinely achievable for a first-time carver. The mouth is cut first because it is the largest opening and anchors the face proportions. A single tea light inside fills all three openings with warm glowing light that reads clearly from the street.

From pumpkin to porch

  1. Scoop the pumpkin

    Cut a lid at the bottom or top at a slight inward angle so it sits back snugly. Scoop out seeds and pulp until the interior walls are about an inch thick. Wipe the outer surface dry with a paper towel so marker lines stay sharp and visible.

  2. Print and transfer the face

    Print the three-shape face on paper, tape it to the pumpkin, and poke through each outline with a nail or poking tool at close intervals. Remove the paper and connect the poke marks with a marker to create complete outlines of both triangle eyes and the oval mouth.

  3. Cut the mouth first

    Follow the oval mouth outline with a thin pumpkin saw, starting at the widest point and working around both sides until the piece releases. Push it inward gently to avoid tearing the surrounding rind.

  4. Cut the triangle eyes

    Cut each triangle with straight-line cuts meeting cleanly at each corner. Pop both pieces inward. Confirm both eyes are the same size and equally spaced from the mouth before wiping away any remaining marker lines.

  5. Insert the light and display

    Place a single LED tea light inside and replace the cap. Step back and view the face in low light to confirm the surprised expression reads clearly. Place the pumpkin at doorstep height so it greets visitors at roughly face level.

Written with AI to match this design

Gather your supplies

Check things off as you get ready.

Work on a stable surface, keep your free hand out of the cutting path, and have an adult handle sharp tools.

Three levels of light

  • Leave intact

    All rind surrounding the three openings stays solid and dark.

  • Peel & shade

    None for this design.

  • Cut through

    Both triangle eye holes and the wide oval mouth are cut completely through for full warm glow.

Learn the carving basics

Before you start cutting

How do I make the two eyes perfectly symmetrical?

Fold your template in half vertically before printing and confirm both triangles are mirror images. When taping the template to the pumpkin, align the fold line with the vertical center of the face. The poke-transfer method then delivers both eyes in exact mirror positions.

Can I add teeth to the oval mouth?

Yes. Leave one or two rectangular rind tabs across the mouth opening, each at least 15 mm wide at its base so it stays attached to both the upper and lower lips. This turns the surprised oval into a surprised open-mouthed face with visible teeth.

The pumpkin face is curved and the template keeps slipping. What do I do?

Use several small pieces of painter's tape around all four edges of the template paper to hold it firmly against the curved surface. Making short radial cuts in the paper around its perimeter also helps it conform to the curve without buckling away from the rind.

Your take belongs here, too.

Changed a detail? Made it simpler? Share a photo of your version and tell the community what worked.

Share your pumpkin

More pumpkins like this

You've reached the end · 8 pumpkins
The Patch Report

Fresh pumpkins, in your inbox.

The best new carvings, ideas worth stealing, and how-tos for carving season. Short, seasonal, and gone by November.

A short email during carving season. Unsubscribe anytime. See our privacy policy.