Halloween Pumpkin Carving Contest · Starts October 1st · $500 in prizes
← Back to ideas
@ai_concepts
Sep 25, 2026
Teardrop Ring and Center Dot Pumpkin LanternAI
0

Report this carving

Tell us what is wrong. Reports are private.

Teardrop Ring and Center Dot Pumpkin Lantern

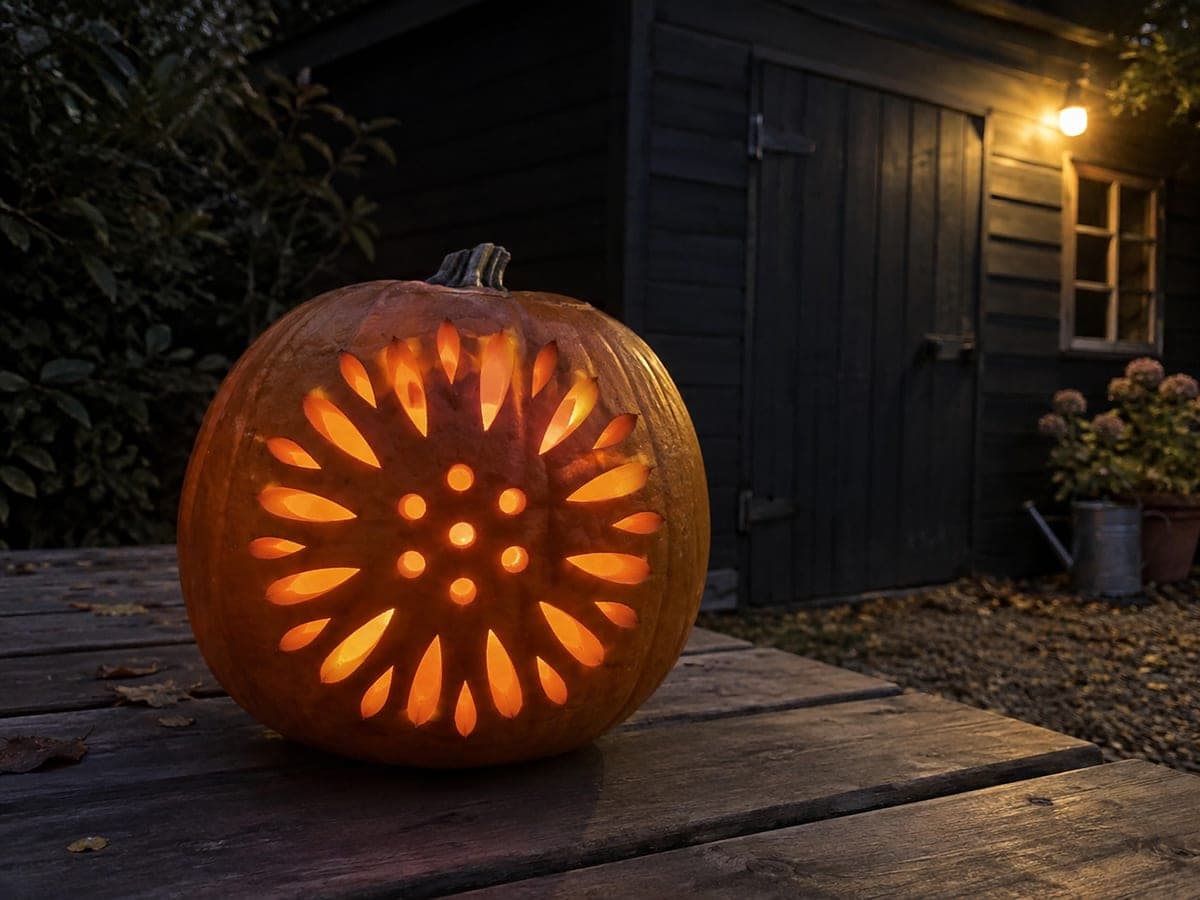
An elegant ring of 20 narrow teardrop holes circles eight small round holes at the center of this precise last minute pumpkin carving idea. Despite the repetitive geometry, accurate spacing between each hole is what separates this design from an easier one. Print or draw a compass-guided template first to keep the ring evenly round. Cut the center dots before the outer ring so you have a stable grip on the pumpkin throughout.

No ratings yet · Sign in to rate

Comments (0)

  • No comments yet — be the first.

Save without an account. Sign in to like or comment.

Our tips for carving a similar design

Twenty narrow teardrop holes in an evenly spaced ring around eight small central round holes create a design that looks intricate but relies entirely on accurate spacing rather than complex bridging. All shapes are independent holes with solid rind between them, so the main challenge is placing them evenly. A compass-guided paper template is the preparation step that makes everything else straightforward.

From pumpkin to porch

  1. Scoop and find the center

    Cut a bottom cap and scoop to about three-quarters of an inch of wall thickness. Mark the precise center of the pumpkin face; this point anchors both the inner cluster and the outer teardrop ring and all spacing radiates from it.

  2. Create a compass-guided template

    On paper the same size as the pumpkin face, use a compass to draw the ring radius and a protractor to mark 20 evenly spaced positions around it at 18-degree intervals. Draw eight center dot positions on a smaller inner circle. Tape the template to the pumpkin and poke through every position.

  3. Drill the eight center holes first

    Use a spade bit on a low-speed drill to cut the eight round center holes cleanly. Drill straight in at each marked center and withdraw slowly. Cutting the center cluster first leaves the pumpkin structurally intact while you do the more demanding outer ring work.

  4. Cut the teardrop ring

    Work through all 20 teardrop holes, completing each one fully before moving to the next. Use a fine detail blade for the narrow pointed tip and a thin saw for the wider body. Keep the blade perpendicular to prevent undercutting the rind between adjacent teardrops.

  5. Light and display

    Insert a bright LED lantern to illuminate all 28 holes evenly. The design looks especially beautiful on a flat table where the ring of teardrop shadows projects onto the surface around the pumpkin. Rotate the pumpkin slightly if the stem blocks the top of the ring pattern.

Written with AI to match this design

Gather your supplies

Check things off as you get ready.

Work on a stable surface, keep your free hand out of the cutting path, and have an adult handle sharp tools.

Three levels of light

  • Leave intact

    Solid rind between the teardrop ring and the center cluster and all rind outside the ring stays dark.

  • Peel & shade

    None for this design.

  • Cut through

    All 20 teardrop holes and all 8 center round holes are cut through completely for full glowing light.

Learn the carving basics

Before you start cutting

What is the easiest way to space 20 teardrops evenly around a circle?

Draw the full circle on paper and mark 18-degree intervals with a protractor to get exactly 20 positions. Alternatively, fold the paper circle in half four times to get 16 divisions, then adjust four positions slightly to reach 20. Transfer the marks by poking through the paper while it is taped flat to the pumpkin.

How narrow can the teardrop tips be?

Keep each tip at least 3-4 mm wide to prevent tearing during cutting and crumbling after a few days of drying. A teardrop roughly 20 mm long, 8 mm wide at its widest point, and with a 3-4 mm blunt tip balances elegance with structural durability.

Should I drill or saw the round center holes?

Drilling with a spade bit produces cleaner round holes than sawing and is significantly faster. A 12-16 mm bit creates visible glowing dots without dominating the outer ring visually. If you do not have a drill, a small circular cookie cutter pressed and twisted firmly into the rind creates a usable round hole.

Your take belongs here, too.

Changed a detail? Made it simpler? Share a photo of your version and tell the community what worked.

Share your pumpkin

More pumpkins like this

You've reached the end · 8 pumpkins
The Patch Report

Fresh pumpkins, in your inbox.

The best new carvings, ideas worth stealing, and how-tos for carving season. Short, seasonal, and gone by November.

A short email during carving season. Unsubscribe anytime. See our privacy policy.