Halloween Pumpkin Carving Contest · Starts October 1st · $500 in prizes
← Back to ideas
@ai_concepts
Sep 14, 2026
Top-Hat Skull With a Feather PumpkinAI
0

Top-Hat Skull With a Feather Pumpkin

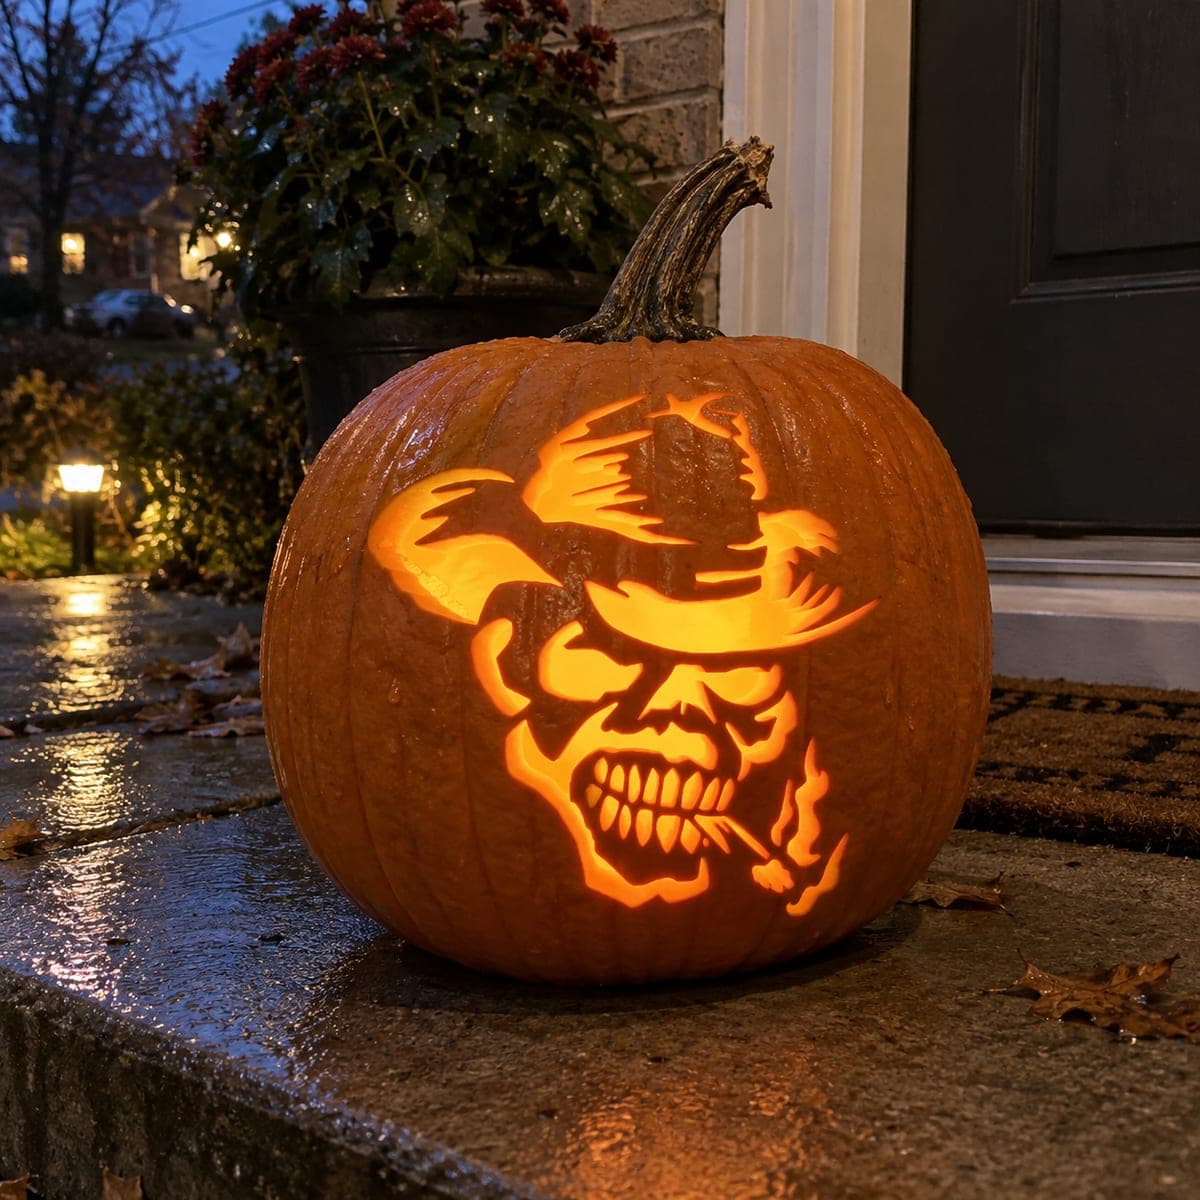
A grinning skull wearing a wide-brimmed cowboy hat with a feather tucked into the band glows as a cutout pumpkin carving idea on a rainy doorstep, the hat's broad brim spanning nearly the full width of the design. All elements are pierced through, so the brim, feather, and teeth each glow as separate bright zones. Start carving with the narrow feather shape since it sits between the hat and the skull and is the most confined cut in the design, then open the hat brim and the face from the inside out. Because the brim is wide and the skull sits below it, position the pumpkin stem toward the back so the heavy-topped design does not tip forward when the hat area is hollowed out.

This is an AI-generated concept image: a realistic, carvable design idea rather than a photo of a finished carve. AI concepts are always labeled and sit out the leaderboard and the contest.

No ratings yet · Sign in to rate

Comments (0)

  • No comments yet — be the first.

Save without an account. Sign in to like or comment.

Our tips for carving a similar design

The core trick here is turning one grinning skull into several separate bright shapes: the wide hat brim, the tucked feather, and the toothy grin each read as their own glowing zone. Since this is an AI concept, no real pumpkin exists, but you could recreate it by piercing every element clean through and letting thin skin ridges between them act as the drawn lines. Plan the top-heavy hat first so the design stays balanced.

Written by PumpkinCarvingIdeas.com, inspired by the image above. These are our suggestions, not instructions from the uploader. This approach to the AI concept has not been tested on a real pumpkin.

From pumpkin to porch

  1. Prep and pick a tall pumpkin

    Choose a large, fairly round pumpkin with a smooth front panel wide enough for the sweeping hat brim. Cut a lid from the back or a hole in the base rather than the top, since the stem should stay toward the back to keep the heavy hat area from tipping forward. Scrape the inside wall behind the face down to about one inch so light passes through evenly. Dry the inner wall with a paper towel before you transfer the pattern.

  2. Transfer and study the pattern

    Tape your stencil flat against the front, snipping the edges so it hugs the curve without wrinkles. Poke through the outlines with a pin or transfer tool, spacing dots close on the fine feather and grin so the shapes stay readable. Before cutting, look for the thin skin strips that separate the hat, feather, and face, and mark those as bridges you will leave intact. Those little ridges are what keep the design from becoming one big hole.

  3. Cut the feather first

    Start with the narrow feather tucked between the hat band and the skull, since it is the most confined cut and easiest to reach while everything around it is still solid. Use a fine detail saw or a craft knife and take short, patient strokes, letting the blade do the work. Keep the little barb lines separated by leaving slim uncut ridges between them. Working this tight shape first means you are not fighting a weakened wall later.

  4. Open the hat brim from the inside out

    Move to the broad brim, cutting the interior shapes before the long outer edge so the panel stays rigid as long as possible. Poke and remove small sections at a time rather than one giant sweep, and save the widest outer curve of the brim for last. Keep the thin band line between the brim and the crown attached so the hat still reads as a hat. Support the wall with your free hand from below while you work the largest openings.

  5. Carve the skull face and grin

    Cut the eye sockets and nose next, then work the grin as a row of separate teeth by leaving narrow vertical bridges between each one. Cut each gap fully through so the teeth glow individually. Do the smaller cigarette or matchstick detail carefully so it stays connected to the jaw. Trim any rough back edges at a slight bevel to widen the light and brighten each zone.

  6. Light it and photograph

    Set a battery LED inside, never a candle, since the deep interior scraping and thin bridges dry out fast. Test in a dark room and rotate the light or add a second LED so the hat brim and grin glow as evenly as the face. If any zone looks dim, bevel its back edge a little more to pull in more light. Shoot at dusk on a step or ledge with the stem tilted back for that classic doorstep look.

Gather your supplies

Check things off as you get ready.

Work on a stable surface, keep your free hand out of the cutting path, and have an adult handle sharp tools.

Three levels of light

  • Leave intact

    The outer face skin, the hat crown, and the ridges outlining each tooth stay dark for contrast.

  • Peel & shade

    Skin-peel the hat band and cheekbone areas for a dim orange glow that shapes the skull without full cutouts.

  • Cut through

    Pierce the brim, feather, eye sockets, and each tooth gap all the way through for the brightest zones.

Learn the carving basics

Before you start cutting

How do I keep the wide hat brim from collapsing?

Cut the interior shapes of the brim first and save the long outer edge for last so the panel stays supported while you work. Remove small sections at a time instead of one long sweep, and brace the wall from inside with your free hand. Leaving the thin band line attached between brim and crown also adds stiffness.

Why carve the feather before anything else?

The feather sits in the tight space between the hat and the skull, so it is the hardest shape to reach once the surrounding wall is weakened by other cuts. Doing it first means you have a full, rigid panel to work against. Keep its barb lines separated by slim uncut ridges so it does not turn into one blob.

How do I keep the pumpkin from tipping forward?

The hat brim is wide and heavy while the skull sits low, so a top-heavy front can lean once hollowed. Position the stem and any lid opening toward the back to keep weight balanced. Cutting your access hole in the base rather than the top also lowers the center of gravity.

Your take belongs here, too.

Changed a detail? Made it simpler? Share a photo of your version and tell the community what worked.

Share your pumpkin

More pumpkins like this

You've reached the end · 8 pumpkins
The Patch Report

Fresh pumpkins, in your inbox.

The best new carvings, ideas worth stealing, and how-tos for carving season. Short, seasonal, and gone by November.

A short email during carving season. Unsubscribe anytime. See our privacy policy.