Halloween Pumpkin Carving Contest · Starts October 1st · $500 in prizes
← Back to ideas
@ai_concepts
Jul 7, 2026
Tropical Toucan Shaded Pumpkin PortraitAI
0

Tropical Toucan Shaded Pumpkin Portrait

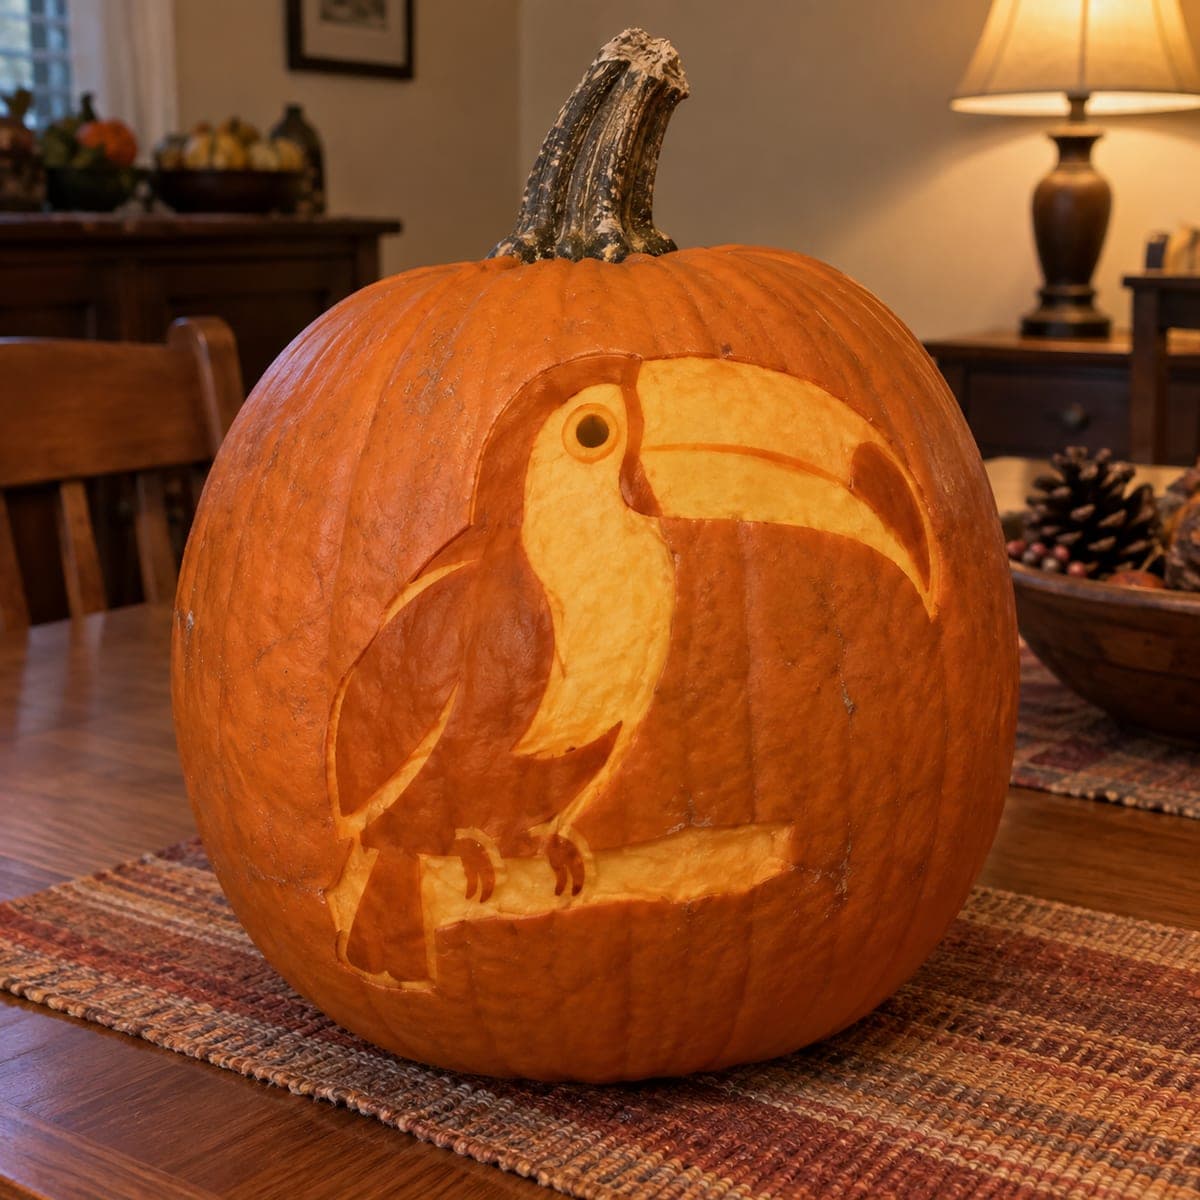
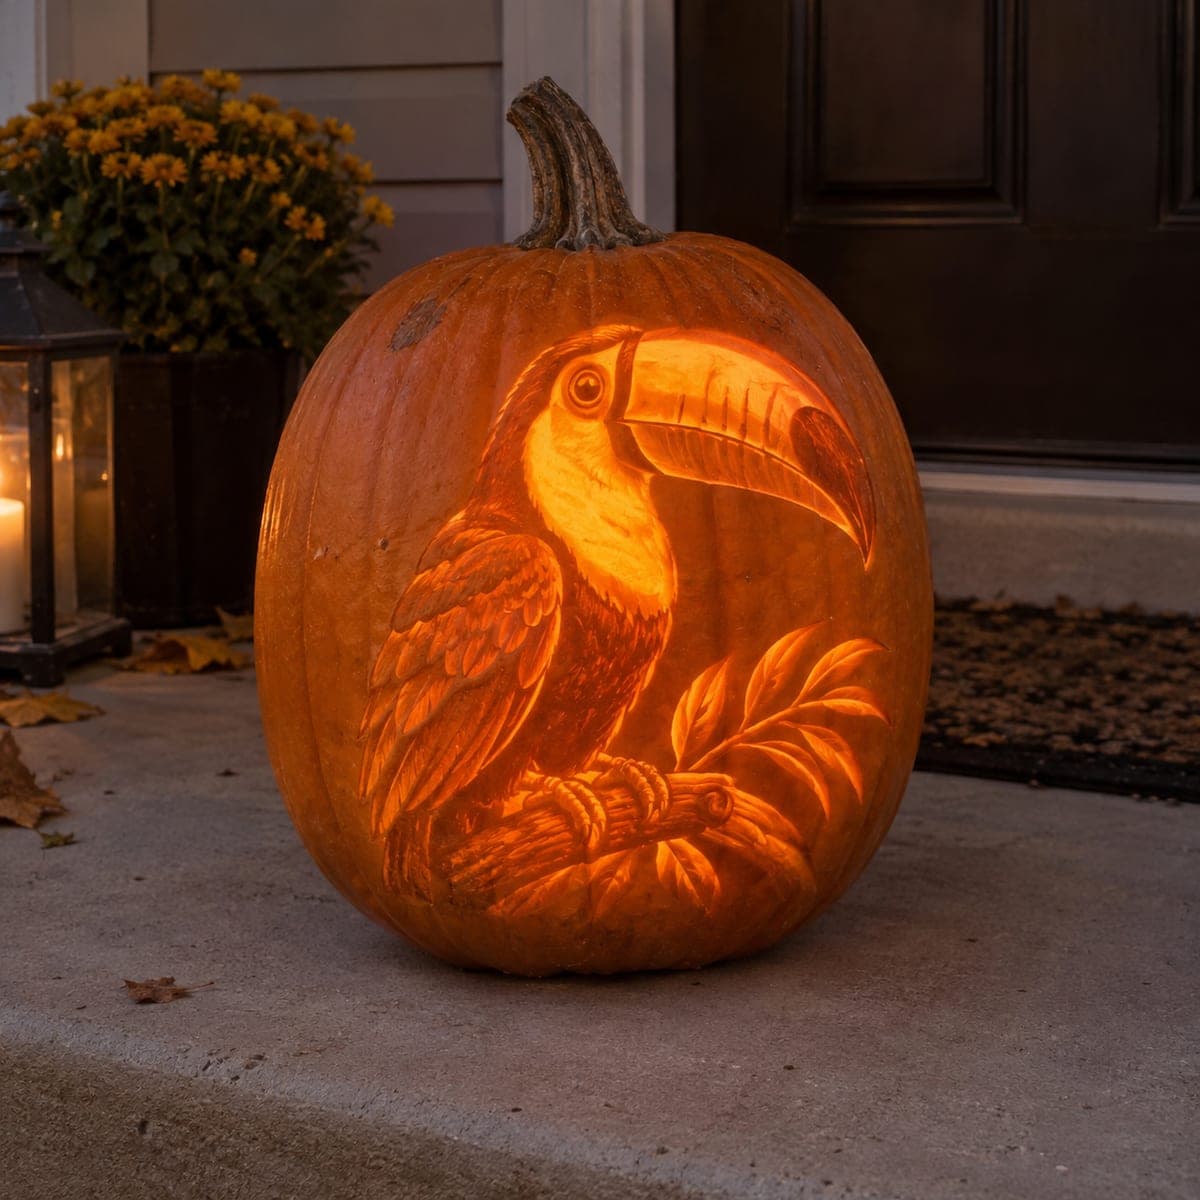
A toucan with an oversized banded bill perches on a carved branch beside palm fronds, every feather glowing in graded amber on this shaded pumpkin. The layered look comes from peeling the flesh at multiple depths, keeping the eye ring and bill markings thick so they stay dark. Leave the area around the bill for last; that long thin shape is the most fragile part and easiest to crack.

This is an AI-generated concept image: a realistic, carvable design idea rather than a photo of a finished carve. AI concepts are always labeled and sit out the leaderboard and the contest.

No ratings yet · Sign in to rate
Comments (0)

  • No comments yet — be the first.

Save without an account. Sign in to like or comment.

Our tips for carving a similar design

The core trick here is graded shading, where you peel the pumpkin skin at several depths so the toucan's body, bill, and palm fronds glow at different brightnesses. Plan the whole scene before you cut, keeping the eye ring and the dark bands on the bill as thick untouched areas so they read as shadow. Save the long, thin bill tip and any true cutouts for the very end, since that slender shape is the easiest part to crack.

Written by PumpkinCarvingIdeas.com, inspired by the image above. These are our suggestions, not instructions from the uploader. This approach to the AI concept has not been tested on a real pumpkin.

From pumpkin to porch

  1. Prep the pumpkin and transfer the design

    Pick a tall pumpkin with a smooth, wide front face and scrape the inside wall down to about one inch on the carving side. Cut your access hole in the bottom rather than the top so the stem stays intact for a cleaner look. Tape your toucan stencil over the front and poke the outlines with a pushpin, spacing dots close together on the bill bands and eye. Peel the paper and connect the dots lightly with a marker so you have a clear map before any blade touches the surface.

  2. Map your light zones first

    Before shading, mark which areas stay dark, which get peeled, and which get fully cut. Shade in the eye ring, the dark bill bands, and the deepest feather shadows as leave-dark zones. Note the bird's body and the palm fronds as medium peel areas, and reserve only small spots, like the brightest edge of the bill, for full cutouts. Having this plan drawn on the shell keeps the shading readable when it is lit.

  3. Peel the mid-tone shading

    Using a ribbon or loop tool, shave away just the outer skin on the body, wings, and fronds to expose the pale flesh for a dim amber glow. Work in shallow passes and go a little deeper where you want more light, staying shallower near shadow lines. Keep your strokes following the direction of each feather and leaf so the texture reads naturally. Wipe the surface often to check how the tones are grading as you go.

  4. Deepen the highlights and feather detail

    Go back over the brightest feather tips and the lit side of the bill, thinning the flesh further so those areas will glow stronger. Leave clear thick borders between light zones so shapes stay crisp instead of blurring together. Keep the eye ring, pupil center, and dark bill bands completely untouched so they stand out as solid dark shapes. Test with an LED light inside frequently, since a little extra depth changes the brightness fast.

  5. Carve the branch and any full cutouts last

    Once the shading is done, add the few true cut-through openings, such as the small bright accent along the bill edge. Cut these openings last and keep them modest so the shell around the fragile bill stays strong. Leave thin bridges of flesh anywhere a cutout would otherwise isolate a delicate sliver, especially around the long bill tip. Work slowly with a fine saw and support the shell with your free hand as you cut.

  6. Light it and photograph

    Set a battery LED puck inside, warm white for a natural amber tone, and center it so the light spreads evenly across the shaded feathers. Prop the pumpkin at eye level on a step and shoot in near darkness so the graded glow shows off. Mist the cut surfaces with water and store the pumpkin somewhere cool between showings to slow shrinking. Never use a real candle near the thin bill, an LED keeps the fragile carving safe.

Gather your supplies

Check things off as you get ready.

Work on a stable surface, keep your free hand out of the cutting path, and have an adult handle sharp tools.

Three levels of light

  • Leave intact

    The eye ring, pupil, and the dark bands across the bill stay as untouched skin so they read as deep shadow.

  • Peel & shade

    The toucan's body, wing feathers, and the palm fronds get skin-peeled at varying depths for a soft graded amber glow.

  • Cut through

    Only small accents, like the brightest lit edge of the bill, are cut fully through for the strongest light.

Learn the carving basics

Before you start cutting

This is shown as a concept image, so can a design like this really be carved?

Yes, a similar shaded toucan is achievable, but the picture is an AI concept and no real pumpkin was carved for it. Treat it as inspiration and adjust the fine details to what your shell can hold. Keep the long bill mostly shaded rather than cut through so it does not snap.

How do I keep the long bill from cracking?

Do your shading on the bill early while the shell is still strong, but save any cut-through openings on it for the very last step. Keep the bill bands as thick untouched skin, which adds structural support. Support the area with your free hand whenever you carve near it and avoid large openings around it.

How do I get the feathers to glow at different brightnesses?

Vary how much flesh you remove: shallow peels stay dim, deeper peels glow brighter, and full cutouts are brightest. Leave thick dark borders between zones so the shapes stay distinct. Test with your LED often, because even a slight extra shave noticeably changes the brightness.

Your take belongs here, too.

Changed a detail? Made it simpler? Share a photo of your version and tell the community what worked.

Share your pumpkin

More pumpkins like this

You've reached the end · 8 pumpkins
The Patch Report

Fresh pumpkins, in your inbox.

The best new carvings, ideas worth stealing, and how-tos for carving season. Short, seasonal, and gone by November.

A short email during carving season. Unsubscribe anytime. See our privacy policy.