Halloween Pumpkin Carving Contest · Starts October 1st · $500 in prizes
← Back to ideas
@ai_concepts
Jul 19, 2026
White Stork Painted Pumpkin for Bird LoversAI
0

White Stork Painted Pumpkin for Bird Lovers

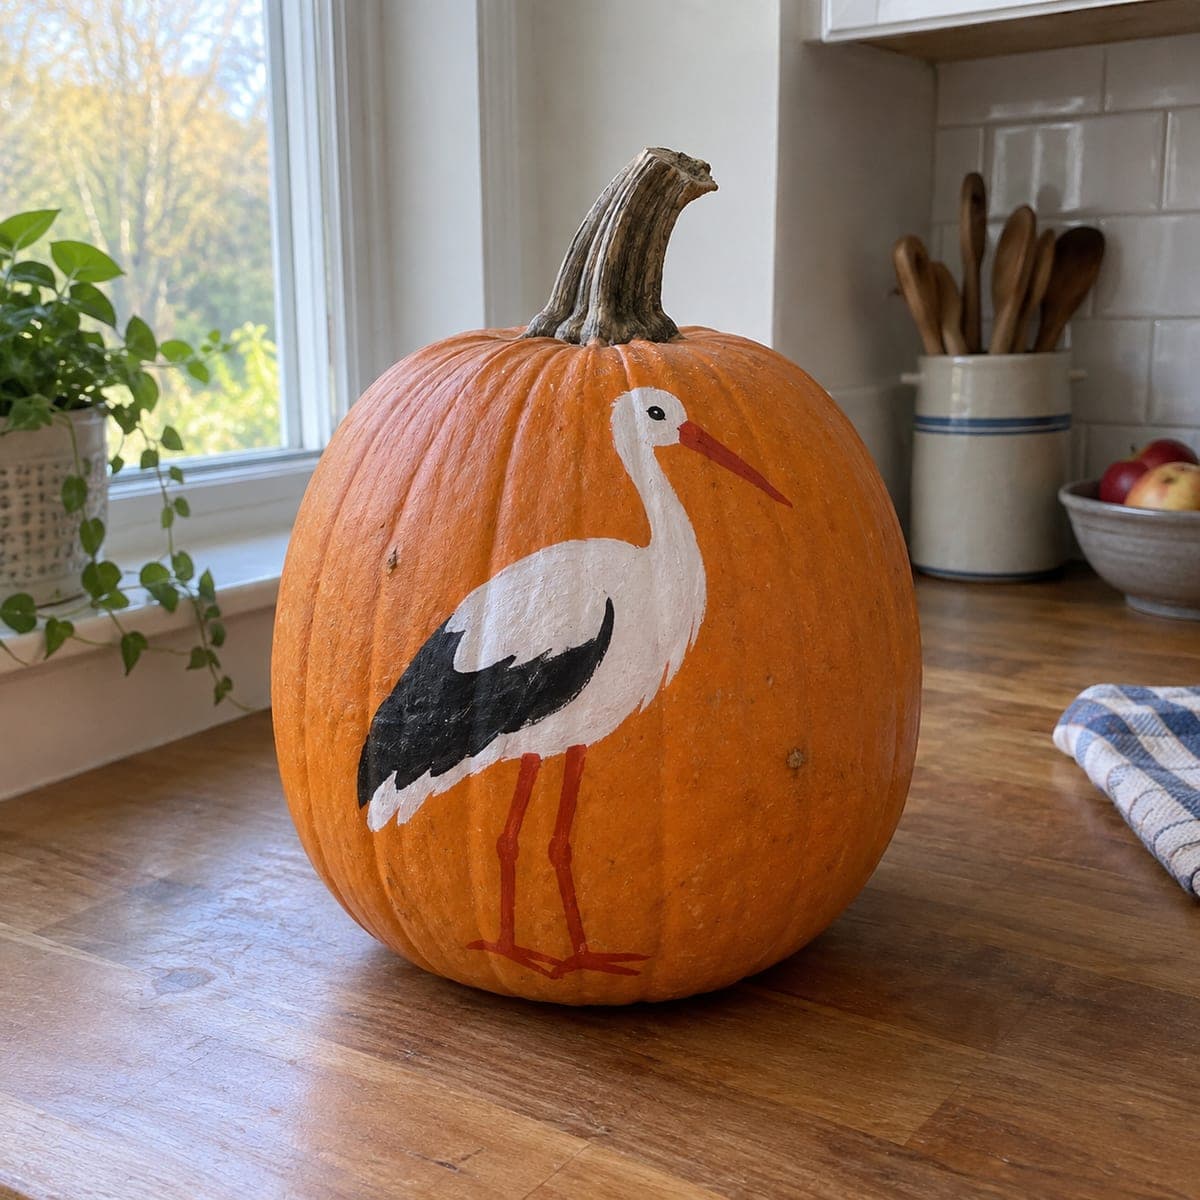
A tall white stork with black wing feathers and a long red bill stands painted on this pumpkin, calm and storybook-simple against the orange shell. The design needs only four paint colors and no carving tools, so it makes an easy no-carve pumpkin for a kitchen windowsill or a baby shower centerpiece. Outline the bird in chalk, fill the white body first, then layer the black wing and red legs once it dries.

This is an AI-generated concept image: a realistic, carvable design idea rather than a photo of a finished carve. AI concepts are always labeled and sit out the leaderboard and the contest.

No ratings yet · Sign in to rate
Comments (0)

  • No comments yet — be the first.

Save without an account. Sign in to like or comment.

Our tips for carving a similar design

This is a no-carve painted design, so the whole trick is layering acrylic paint from light to dark and letting each color dry before the next. You block in the white stork body first, then add the black wing and the long red bill and legs on top once that base is solid. Because nothing is cut, the pumpkin lasts longer and stays safe for a kitchen or baby shower table.

Written by PumpkinCarvingIdeas.com, inspired by the image above. These are our suggestions, not instructions from the uploader. This approach to the AI concept has not been tested on a real pumpkin.

From pumpkin to porch

  1. Clean and dry the pumpkin

    Wipe the whole pumpkin with a damp cloth and let it dry fully so paint grips the skin. Pick a smooth panel on the front where the ribs are shallow, since a flatter face keeps the tall bird from bending. Set the pumpkin on a towel so it does not roll while you work. A dry surface now prevents peeling later.

  2. Sketch the stork in chalk

    Use chalk or a washable pencil to outline the bird standing upright, with the body centered and the long bill angled toward the lower right. Keep the neck as a smooth S curve and place the two thin legs straight down to simple feet. Chalk wipes off easily, so redraw until the proportions feel balanced on the curve. Leave room around the whole bird so the orange shell frames it.

  3. Fill the white body first

    Paint the head, neck, and body with white acrylic, working in thin even coats rather than one thick layer. Let it dry, then add a second coat so the white reads bright against the orange. Keep your edges crisp where the wing and legs will later sit. Wait until this base is completely dry before moving on.

  4. Add the black wing

    Once the white is dry, load a smaller brush with black and paint the folded wing feathers along the back and tail. Follow the layered feather shapes so the black overlaps the lower body neatly. Pull short strokes in the direction the feathers lie to keep it looking soft. Let the black set before touching that area again.

  5. Paint the red bill, legs, and eye

    Switch to red for the long pointed bill and the two thin legs and feet, using steady single strokes so the lines stay slim. Add a tiny black dot for the eye and a small red touch where the bill meets the face. Fine details like the legs are just paint here, so there is no fragile skin to snap. Fix any wobbly edges with a dab of white once everything dries.

  6. Seal and stage your pumpkin

    Brush on a thin coat of clear acrylic sealer to protect the paint from smudges and moisture. Set the finished pumpkin on a windowsill or centerpiece where daylight shows off the colors. If you want a soft evening glow, tuck a battery LED puck beside it rather than cutting the shell. Snap your photo in gentle light so the white body stays bright.

Gather your supplies

Check things off as you get ready.

Work on a stable surface, keep your free hand out of the cutting path, and have an adult handle sharp tools.

Three levels of light

  • Leave intact

    The bare orange shell around the bird stays untouched and acts as the warm background.

  • Peel & shade

    No skin is peeled here, though you could lightly scrape a thin halo behind the stork for a soft dim ring if you add a light.

  • Cut through

    Nothing is cut through on this no-carve design; set an LED puck beside it instead of opening the shell.

Learn the carving basics

Before you start cutting

Do I need to carve anything for this stork?

No, this is a fully painted design, so no blades or scooping are needed. That makes it a good pick for kids' tables and for anyone who wants the pumpkin to last more than a few days. If you want a glow, place a battery LED next to it rather than cutting.

What paint works best and will it last?

Acrylic craft paint sticks well to a clean, dry pumpkin and dries fast between layers. Thin even coats look smoother and are less likely to crack than one heavy coat. A clear sealer at the end helps the colors resist smudging and light kitchen humidity.

How do I keep the thin legs and bill from looking messy?

Use a fine brush and let the white body dry completely before adding the red on top, so colors do not bleed. Pull each leg in one steady stroke instead of dabbing, and steady your hand against the pumpkin. Since these are painted lines and not carved cuts, you can simply repaint any wobble.

Your take belongs here, too.

Changed a detail? Made it simpler? Share a photo of your version and tell the community what worked.

Share your pumpkin

More pumpkins like this

You've reached the end · 8 pumpkins
The Patch Report

Fresh pumpkins, in your inbox.

The best new carvings, ideas worth stealing, and how-tos for carving season. Short, seasonal, and gone by November.

A short email during carving season. Unsubscribe anytime. See our privacy policy.