Halloween Pumpkin Carving Contest · Starts October 1st · $500 in prizes
← Back to ideas
@ai_concepts
Sep 6, 2026
Ancient Green Man Tree Spirit Carved PumpkinAI
0

Ancient Green Man Tree Spirit Carved Pumpkin

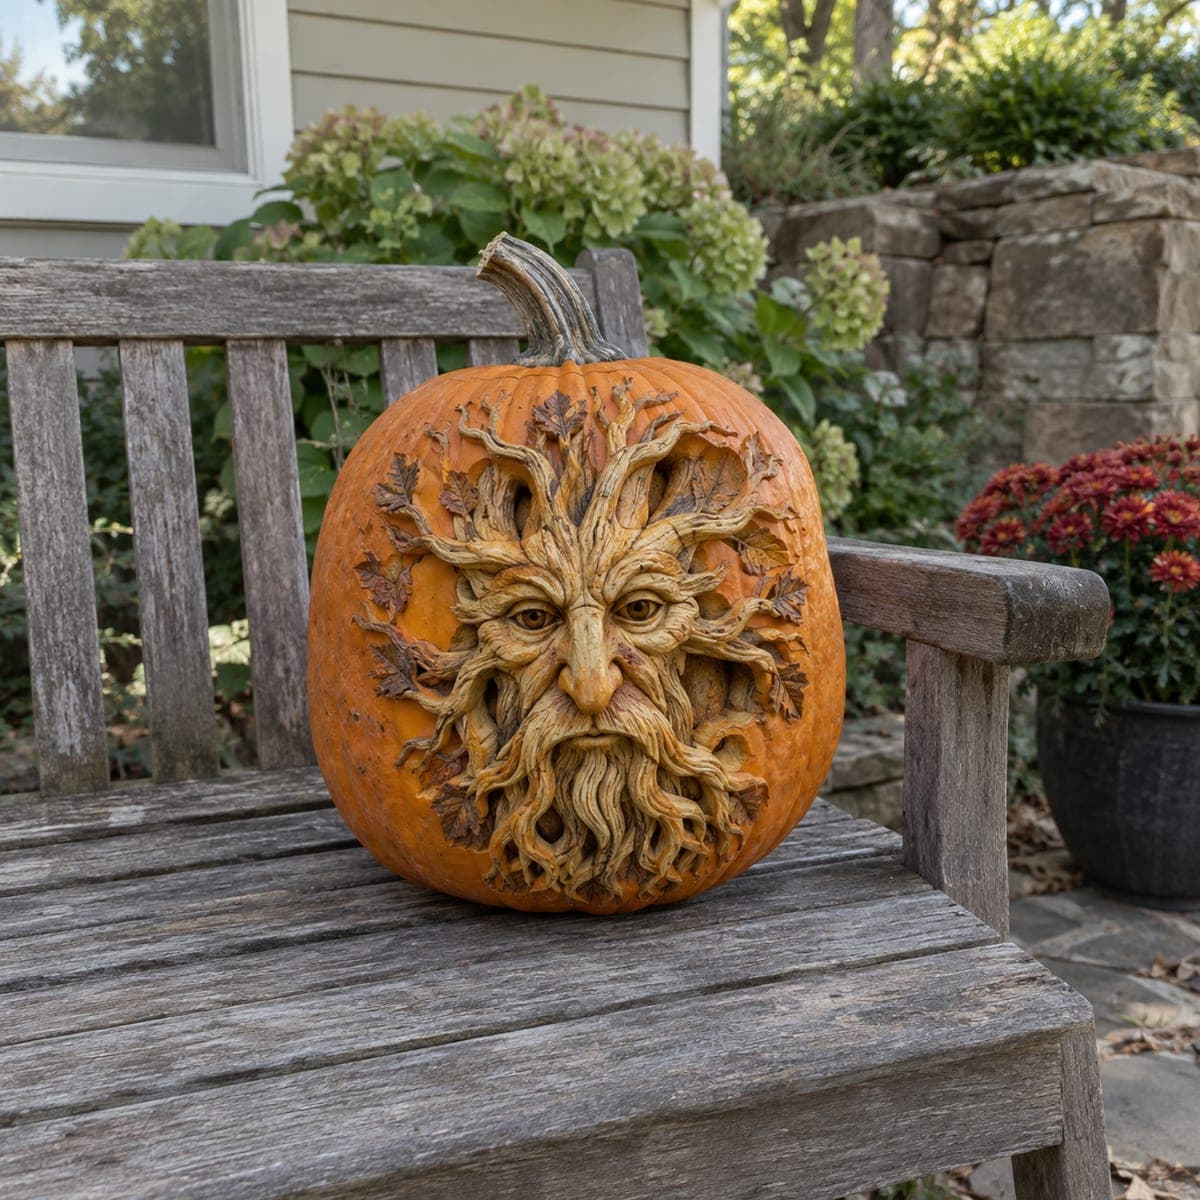
A Green Man face gazes calmly from this pumpkin, his beard twisting into roots and his brow sprouting branches and oak leaves in deep sculpted relief. The design covers the entire front surface, blending the face into bark textures at the edges so it seems grown rather than carved. Work the deepest undercuts around the eyes and nose first, and display it unlit where daylight can rake across the texture.

This is an AI-generated concept image: a realistic, carvable design idea rather than a photo of a finished carve. AI concepts are always labeled and sit out the leaderboard and the contest.

No ratings yet · Sign in to rate
Comments (0)

  • No comments yet — be the first.

Save without an account. Sign in to like or comment.

Our tips for carving a similar design

The core trick here is relief sculpting rather than cutting all the way through, so light barely matters and daylight does the work. You build a face out of flowing bark textures, then let the beard and brow dissolve into oak leaves and roots at the edges. Plan the whole front as one connected surface so the face looks grown into the pumpkin instead of pasted on.

Written by PumpkinCarvingIdeas.com, inspired by the image above. These are our suggestions, not instructions from the uploader. This approach to the AI concept has not been tested on a real pumpkin.

From pumpkin to porch

  1. Pick a thick-walled pumpkin and map the face

    Choose a large, evenly round pumpkin with a smooth front and firm, thick flesh, since relief work needs depth to carve into. Do not cut a lid or hollow it fully, because this design stays mostly solid for support. Lightly sketch the central face, the beard flowing down, and the branching brow with a washable marker. Keep the eyes and nose near the center where the wall is thickest.

  2. Score the outlines and rough the depth

    With a fine detail knife or a loop tool, trace all your main lines to set the face apart from the surrounding leaf and bark zones. Work in shallow passes and remove skin in stages rather than gouging deep at once. Establish the highest points, the nose and cheekbones, then lower everything around them. This rough stage sets the whole sense of depth before you refine.

  3. Sculpt the deep undercuts first

    Carve the sockets around the eyes and the shadows beside the nose early, while the surrounding flesh is still solid and stable. Use small loop and ribbon tools to scoop smooth hollows, angling under the brow so shadows pool naturally. Deep cuts near the center are hardest to reach later, so getting them done now protects the delicate ridges you will add. Keep the eyeballs slightly raised and rounded so they catch light and read as calm.

  4. Texture the beard, brow, and leaves

    Peel the skin off the beard and hair strands and rake long parallel grooves so they twist like roots and vines. Leave patches of skin on the deepest recesses so they stay dark and push the strands forward. Carve the oak leaves and branches in shallow relief around the edges, keeping each leaf connected to a stem so nothing snaps off. Blend the outer leaves into rough bark texture so the face seems to emerge from the pumpkin.

  5. Refine and unify the surface

    Step back often and squint to check that the face reads from a few feet away. Soften any hard tool marks, deepen shadows where the form needs more separation, and add fine hair lines over the smooth beard for realism. Bridge any thin strand that feels fragile by leaving a small connection to a neighbor. Wipe away marker lines with a damp cloth.

  6. Seal and display in raking light

    Coat all cut surfaces with a thin layer of petroleum jelly or a pumpkin preservative spray to slow drying and browning. Set the pumpkin where morning or late-day sun rakes across it from the side, which throws long shadows and shows off the relief. This design is best viewed unlit, but a small LED placed to one side after dark can mimic that side light. Mist it daily and keep it cool to extend its life.

Gather your supplies

Check things off as you get ready.

Work on a stable surface, keep your free hand out of the cutting path, and have an adult handle sharp tools.

Three levels of light

  • Leave intact

    The untouched skin at the edges and the deepest beard recesses stay dark to anchor the shadows.

  • Peel & shade

    The face, beard strands, and oak leaves are skin-peeled so they glow a soft dim orange and catch raking light.

  • Cut through

    Almost nothing is cut fully through on this relief design, though a few narrow gaps between beard roots could be opened for accents.

Learn the carving basics

Before you start cutting

Do I need to hollow out and light this pumpkin?

No, this is a relief sculpture meant to be seen in daylight, so it stays mostly solid for strength. Hollowing it thin would weaken the deep undercuts around the eyes and nose. If you want a glow after dark, tuck a small LED off to one side to keep the raking-light effect.

How do I keep the twisting beard strands from breaking off?

Carve them in relief rather than cutting all the way through, so each strand stays backed by solid flesh. Where two strands nearly separate, leave a small bridge of pumpkin connecting them. Work with light passes so you never pry or over-flex a delicate ridge.

This says expert. What makes it so demanding?

The whole front is one continuous sculpted surface, so you are shading with depth instead of cutting simple shapes. Reading a human face in flowing bark takes patience and constant stepping back to check proportions. If it feels like too much, start with a single oak leaf or a simpler bearded face and build up your relief skills first.

Your take belongs here, too.

Changed a detail? Made it simpler? Share a photo of your version and tell the community what worked.

Share your pumpkin

More pumpkins like this

You've reached the end · 8 pumpkins
The Patch Report

Fresh pumpkins, in your inbox.

The best new carvings, ideas worth stealing, and how-tos for carving season. Short, seasonal, and gone by November.

A short email during carving season. Unsubscribe anytime. See our privacy policy.